Deliver to Kyrgyzstan
IFor best experience Get the App
📟 Elevate your DIY game with the sleekest I2C LCD display on the block!
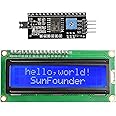
The SunFounder IIC/I2C/TWI LCD1602 Display Module is a compact, 16x2 character LCD designed for easy integration with Arduino and Raspberry Pi. It operates on a 5V power supply, uses only four pins via the I2C protocol, and includes a potentiometer for customizable backlight and contrast. Perfect for makers 14+, it comes with a ready-to-use library to accelerate your prototyping and coding experience.
Standing screen display size | 1 Centimeters |
Screen Resolution | 2560 x 1600 pixels |
Max Screen Resolution | 2560 x 1600 pixels |
Card Description | Dedicated |
Wireless Type | 802.11b |
Brand | SunFounder |
Series | 2004 20x4 LCD Module |
Item model number | TS0351 |
Operating System | ios |
Item Weight | 1.41 ounces |
Product Dimensions | 4.9 x 1.7 x 0.4 inches |
Item Dimensions LxWxH | 4.9 x 1.7 x 0.4 inches |
Color | 16x2 I2C LCD |
Processor Brand | ARM |
Number of Processors | 1 |
Voltage | 5 Volts |
Manufacturer | SunFounder |
ASIN | B019K5X53O |
Is Discontinued By Manufacturer | No |
Date First Available | April 13, 2016 |
K**L
Used with Cypress PS0C 5LP no problem
Despite the Arduino focused listing title, the display is Hitachi compatible using the PCF8574T (in my unit) I2C converter backpack that can work on other processor lines easily. I needed to hook it up to a Cypress PSoc 5LP eval board (CY8CKIT-059). Cypress provides many code examples and auto-generates APIs for library parts like parallel and serial graphics and text displays. The library worked fine with the parallel Hitachi displays including this 4x20. It did not work with this backpack and the I2C library supporting NXP PCF2119x commands. The solution was to find and use a community library (V2.1 as of this date). It also adds a few new functions to integrate position and string and char printing. The default address (no jumpers installed on A0-A2) is 0x27 (7bit), or 0x4E (8bit). The non T version of the PCF8574 may be 3F default. You need to pay attention to the header or library component address entry for which form of address, 7 or 8 bit, is required to be entered as the protocol shifts the address 1 bit position. It is also helpful to run a small routine to scan the I2C bus to see what shows up if yo have any difficulty. Check for the community code at the cypress community website, thread number 11727. The backpack is a common part and you can remove it and use it on other displays, in my case a 2x16 Hitachi compatible display. For a programmable backlight level I cut the trace on the 5V side (top side of board) of the backlight 2 pin header and wired a jumper from the now open pin up to pin 16 on the backpack. My PWM wire supplies 5V and switched ground on a 2 pin 0.100" center plug. I changed it on the backpack so it would work on any display it ever got moved to since not all displays have easy onboard backlight connections or configuration jumper pads.
T**R
A device that works as expected, easy to use, lots of instructions and Arduino library online.
Great product. Go to the website, check out the video, downloaded the library, hooked it up to my generic Arduino using their guides. Before I even loaded the sketch the device sprung to life when the backlight was powered up displaying a default message. I could immediately see the LCDs were displaying well.I loaded the zip library from the website, loaded the sample sketch and ran it and bingo I saw their help world message. Updated it and Bam I saw my message. Googled how to create and display a custom character and did so. Vary happy with the purchase.If paying the price of a side of fries at your favorite fast food place doesn't phase you then I highly recommend spending a couple extra bucks to buy from these guys, and know you are getting something you can enjoy right away.I haven't tried powering this from a device running 3.3 volts but my 5 volt Arduino clone works great with this.
B**Y
This worked perfectly when connecting to a Particle Photon.
This worked perfectly when connecting to a Particle Photon. I2C Address is 0x27, and I used 5K pull-up resistors on the SDA and SCI lines. The display is nice and bright. It was seriously easy to use.Below is the test program I used from Particle (search the Particle.IO library for LiquidCrystal_I2C_Spark.h":/*8-Feb-2015Jim Browerbulldoglowell@gmail.com*/#include "LiquidCrystal_I2C_Spark.h"LiquidCrystal_I2C *lcd;int lastSecond = 0;void setup(void){Serial.begin(9600);lcd = new LiquidCrystal_I2C(0x27, 16, 4);lcd->init();lcd->backlight();lcd->clear();lcd->print("***Spark Time***");}void loop(void){if (Time.second() != lastSecond){Serial.print(Time.timeStr());lcd->setCursor(0,1);lcd->print(Time.hour() < 10? " 0" : " ");lcd->print(Time.hour());lcd->print(Time.minute() < 10? ":0": ":");lcd->print(Time.minute());lcd->print(Time.second() < 10? ":0": ":");lcd->print(Time.second());lastSecond = Time.second();}}
A**N
Great Product, Great Price, Fast Delivery!
Works great! Thanks
Trustpilot
2 months ago
3 days ago