
DOWNLOAD THE APP


Customer Services
Copyright © 2025 Desertcart Holdings Limited
DOWNLOAD THE APP


🖥️ Small Screen, Big Impact: Elevate your Raspberry Pi projects with touch!
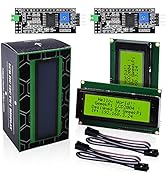
The GeeekPi 2.8-inch TFT LCD offers a crisp 240x320 resolution resistive touchscreen powered by the reliable ILI9341 controller. Designed for Raspberry Pi models 3 and 4, it demands some hardware savvy for setup but rewards with compact, interactive display capabilities ideal for custom DIY computing projects.


| ASIN | B091C7YMZG |
| Are Batteries Included | No |
| Brand | GeeekPi |
| Customer Reviews | 3.0 3.0 out of 5 stars (7) |
| Date First Available | 28 April 2020 |
| Guaranteed software updates until | unknown |
| Item Weight | 60 g |
| Manufacturer reference | EP-0065 |
| Package Dimensions | 10.6 x 8 x 2.9 cm; 60 g |
| Processor Brand | ARM |
| Screen Resolution | 320X240 |
| Standing screen display size | 7.1 Centimetres |
T**M
No clear instructions and screen sometimes goes white
Instructions are useless. Had to piece together things from online to get it working. Sometimes the screen just randomly goes white and unresponsive. Only way to fix is to unplug the Raspberry Pi USB power and plug back in again. Update: Screen was setup with a 5v input and the 5v connection soldered on the board - Caused random white screens. I setup instead with a 5v (and then 3v) input and the 3v connection soldered on the board - Fixed the random white screens, but now the screen is barely bright enough to see in the day. Update 2: Nope, white screen still randomly appears. Terrible product.
W**N
Screen works ok, and so does touch, tricky to configure H/W though
To run on an arduino or rpi pico requires a significant amount of soldering skill. Out of the box it comes setup for 8080 parallel, so some SMD 0R resistors need to be moved, and a solder bridge needs to be made to turn on backlight. The provided link shows how to hook up the LCD to a pico, and that does work once you have done the soldering. (Actually I had to use a SMD heat gun to do it). The touch also needs 3 solder bridges to be made to work with SPI. It does require a good 5v supply (I wouldn't recommend reconfiguring the Vcc to 3v3 as it requires a 1amp 3.3 supply to work reliably), even when powered at 5v it has a regulator that drops it to 3v3. FWIW the teensy3/4 ILI9341 library drives the lcd panel nicely. I do not know why this says it is for use on a rpi3/4 as I see no instructions or connections to hook up to an rpi, (only the rpi pico). I've given the display 4 stars as it is quite nice once it works, but you need some H/W skill to get it configured correctly. The reports of white screen is probably due to insufficient 5v power (or 3v3 power), I also got white screen until i beefed up the power.
M**S
Works really well. Good image
I 've played with many LCD's like this over the years - and this is a good one. Clear image and good backlight. Followed the instructions in the Wiki and got the thing working in next to no time (C, stm32F4 using SPI) - its a standard ILI9341 interface. Top Tip! - if you are having trouble getting it working then buy a cheaper alternate one with the same ILI9341 interface - this'll confirm if its your code or hardware setup. If you pwm the backlight then it uses less power (if thats important to you). Loads of connector options too. Can use a single spi interface to access the touch screen and LCD (with CS pins) - keeps the cable count low.
M**Y
Great value, nice bright screen, slightly fiddly to set up for SPI
A good little display that works well with the RPi Pico (RP2040) and the C/C++ SDK and the ili9341 driver from the tvlad/pico-displayDrivs project on GitHub. The pinout that's working for me is L_RST --> GPIO16, L_CS --> GPIO17, L_DC is GPIO20, SCK --> GPIO18, MOSI --> GPIO19, VCC --> VSYS, GND --> GND. As others have said, the need to re-solder the small jumpers (IM0-3) to select SPI mode is a pain and quite fiddly to do by hand. NB: both of the units I received came set up for Vcc = 5V (jumper at lower right) which is contrary to what I'd expected from the WiKi in the description.
Trustpilot
1 month ago
2 months ago