Description
✂️ Scan, cut, create—your DIY game just leveled up!
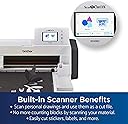
- SCAN CUT IN ONE - Built-in scanner turns your sketches into precise cut files—no guesswork, just creativity.
- INSTANT PROJECT LIBRARY - 251 built-in designs plus wireless access to free patterns—craft like a pro right out of the box.
- QUIET PRECISION CRAFTING - Whisper-quiet operation means you can craft without distractions—perfect for home or office.
- SEAMLESS WIRELESS WORKFLOW - Send designs from your tablet or PC directly to the machine—create anywhere, anytime.
- EFFORTLESS MATERIAL HANDLING - Auto blade sensor detects thickness up to 3mm—cut paper, vinyl, fabric, and more without manual adjustments.
The Brother ScanNCut SDX85C is a compact, wireless electronic cutting machine featuring a unique built-in scanner and a 3.5" touchscreen. It offers 251 ready-to-use designs and auto blade sensor technology that cuts materials up to 3mm thick with precision. Ideal for vinyl, fabric, paper, and more, it integrates seamlessly with Brother sewing machines and supports wireless file transfer for a modern, flexible crafting experience.