Some deliveries may take a little longer than usual due to regional shipping conditions.

DOWNLOAD THE APP


Customer Services
Copyright © 2025 Desertcart Holdings Limited
DOWNLOAD THE APP
🚀 Unlock lightning-fast external storage — because your data deserves the VIP treatment!
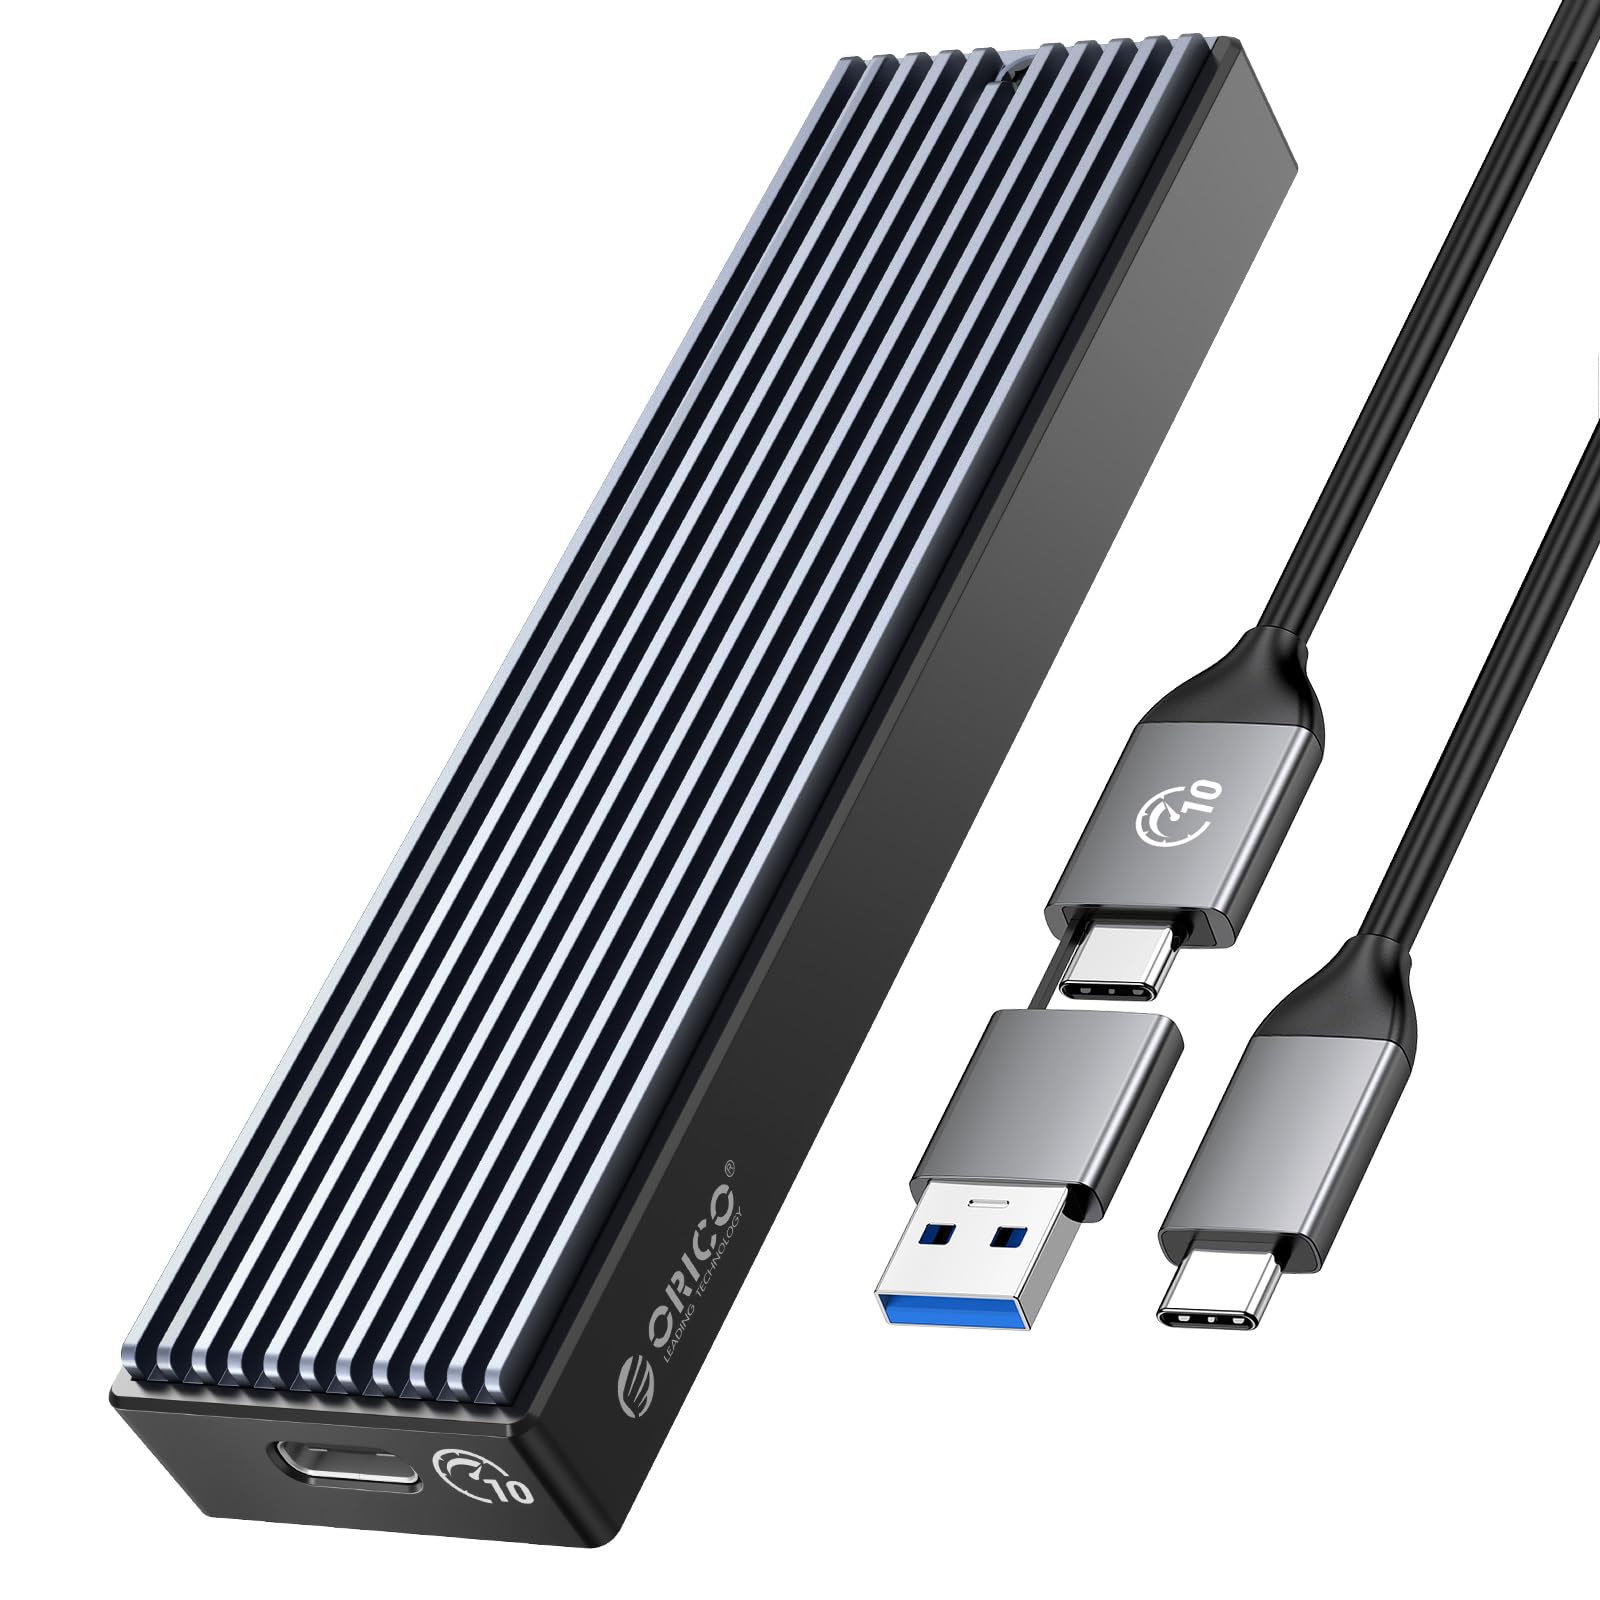
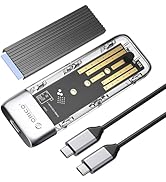
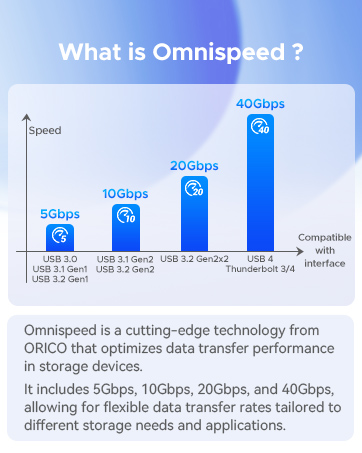
The ORICO M.2 NVMe SSD Enclosure is a high-performance external adapter designed for PCIe NVMe M-Key SSDs up to 8TB. Featuring a Realtek RTL9210 chipset and USB 3.1 Gen 2 Type-C interface, it delivers blazing data transfer speeds up to 10Gbps with UASP acceleration. Its aluminum heat spreader ensures effective cooling during intensive use, while its compact, portable design supports plug-and-play compatibility across Windows, Mac, Linux, smartphones, and gaming consoles. Ideal for professionals seeking fast, reliable, and versatile external storage solutions.


| ASIN | B08G14NBCS |
| Best Sellers Rank | #17 in Enclosures |
| Compatible Devices | Laptop |
| Connectivity Technology | SATA, USB |
| Customer Reviews | 4.3 4.3 out of 5 stars (5,559) |
| Data Transfer Rate | 10 Gigabits Per Second |
| Date First Available | September 5, 2020 |
| Hard Disk Form Factor | 22 Millimeters |
| Item Weight | 3.52 ounces |
| Item model number | M.2 NVMe |
| Manufacturer | ORICO Technologies Co.,Ltd |
| Material | Aluminum |
| Max Number of Supported Devices | 1 |
| Memory Storage Capacity | 8 TB |
| Product Dimensions | 5.91 x 3.19 x 1.42 inches |
M**A
Great budget option using an m.2 NVMe SSD as USB storage
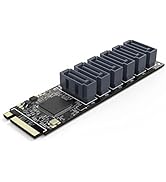
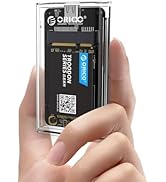
I purchased this NVMe SSD enclosure because it had a decent price, in addition to using a design that provides a heatspreader for the SSD. While it supports NVMe SSDs with no problem, it is important to understand that this does not act as a HBA, instead when a drive is installed, it will show up as a “Realtek RTL9210 NVME SCSI Disk Device”. This means that you will not be able to update the firmware of the SSD in the enclosure or access any other low level functions. Instead all you will get is the SMART data, and the ability to initialize and format the drive in addition to normal reading and writing of user data. This means that if you need to update the firmware of your SSD, you will need to take it out of the enclosure and then connect it to the m.2 slot of a PC. (((Performance))) While the RTL9210 chipset supports NVMe and SATA, the enclosure is only wired for NVMe, thus you must use an NVMe SSD. The chipset also runs at PCIe 3.0 X2, but provides a USB interface of USB 3.1 Gen 2, for a speed of 10Gbps. In terms of real world performance, when using it with a Western Digital SN770 1TB drive, on a 10Gbps USB port (USB 3.2 gen 2), the enclosure reached a real world read speed of 1016.12 MB/s, and a real world write speed of 973.39MB/s. In repeating the tests on a 5Gbps USB port (USB 3.2 gen 1), the performance dropped significantly across the board, even in areas where the interface does not seem to be saturating, for example, performance drops in Q32T16 4K random reads and writes, even though the drive cannot offer 4K random at speeds fast enough to saturate either a 5Gbps or 10Gbps interface. Under a 5Gbps port, the read speeds dropped to 442.36MB/s and the writes dropped to 414.54MB/s. This overall indicates some additional overhead is taking place when the enclosure is operating in the 5Gbps mode. (((Installation and Setup))) The enclosure is quite easy to set up and install. Simply unscrew the single torx screw holding the cover that doubles as a heatsink/ heatspreader. Then lift the heatspreader up at the area you just unscrewed (The heatsink hinges out rather than slides). The bottom half of the case is made out of plastic, but has a metal threaded insert for the screw mount of the heatspreader. The top heatspreader is made out of aluminum. The thermal pad is a standard 1mm thermal pad, though the protective film is a bit thick, thus be sure to remove both pieces of protective film before closing the lid. The gap between the SSD and heatsink is about 0.99mm when closed. To install the SSD into the enclosure, first remove the PCB of the enclosure (there are no screws or clips holding it in place). Then insert the rubber retainer for the SSD in the hole that corresponds to the length of your SSD. A standard 2280 SSD would require the use of the 4th hole (hole farthest from the USB-C port on the PCB). It will take some effort to get the rubber peg through the hole as it relies on a friction fit to stay in place. Next, insert your SSD, and while pressing it down, also bent the rubber retainer out of the way enough for the SSD into position, then allow the rubber groove to grip onto the end of the SSD. Next, take the thermal pad, and notice the protective film on both sides of it. Peel off one side of the protective film and place the thermal pad onto the SSD (make sure to fully cover the controller and DRAM IC of the SSD (if available), covering the NAND package is not really needed as they do not get very warm, though it is not an issue if it is covered since the heat spreader does not have much thermal mass and does not dissipate a large amount of heat, this it will not overly cool the NAND package. After the thermal pad has been placed on the drive, peel off the remaining protective film slowly. Once that is done, install the heatspreader by first placing the lip of the heat spreader into the groove at the front of the case where the USB-C port is located, then bring the other end of the heatspreader own, closing the case like a clamshell. This will ensure no sliding motion that can cause the thermal pad to shift or rip. In my testing with a WD black SN770, the controller reaches a temperature of 71C under a sustained write intensive load, while the NAND reaches a temperature of 46C. The setup process is simple and straight forward. On the first power up of the enclosure with the SSD installed, let the enclosure run for a little while to give windows time to install any needed generic drivers. After that, head to your disk management utility, and then initialize the SSD (I recommend using the GPT partition table). After that, you can create a new NTFS volume for the SSD, and then begin using it as you would any other flash drive. (((Closing Thoughts))) If you need a lot of storage (especially in the 1TB+ range), an NVMe enclosure is a far better value and also allows for far better quality. Many standard flash drives that are 1TB+ often use very low binned NAND which will not consistently saturate a 10Gbps connection during extended writes, while many decent TLC NAND based NVME SSDs, will easily offer over 1GB/s even when the pSLC cache has run out, thus in the vast majority of cases, the enclosure will perform exactly the same from 0-100% fill. Update: So far the enclosure continues to work very, well with consistent performance, even for demanding workloads. The controller does not get very warm, and using it for recording higher bit rate footage with a camera for an extended period of time yielded great results. So far I have used a second one with a 2TB SSD, and I eventually plan to purchase a 4TB SSD to use with it.
T**N
Easily installed, high quality adapter. Works perfectly.
Great SSD adapter enclosure with built in heat sink. Very fast. Speed almost to limit of my USB C/Thunderbolt port on my 2025 Mac Air M3. Great value for the money. Great design. Installation quick and easy. Directions (albeit print very small all as is all Chinese printed material) were easy to follow although I had to use magnifying glass to read. Very high quality design and build. Very good heat dissipation. I transferred an 850 GB file and although it got very warm, it did not get hot as many such devices do. Great value for money. Highly recommended. I used a 4 TB SSD which worked fine. No problems. Just formatted ExFAT and it ran perfectly.
J**O
blind guy review: solid materials, instructions are a joke
So I am giving this 4 stars and will explain why, and also give instructions to do this without seeing, since i am blind and I hope this even helps sighted people assemble this right. Isn't it great when you figure things on your own? took me a while but here i am. I confess I almost asked for sighted assistance out of desperation. so 4 stars: it works. Does not really heat up too much but still worth it to feel on it from time to time and carefully consider what software you use to copy and so on, I did not need the pieces of paper or whatever things.. I think they are thermal pads or something. it also does not come with instructions and online they are hard or impossible to find. Cables it comes with are helpful, but more the USB C to USB a type and its good to have them, but I ended up using other more reliable cables that have served me for years when I used the unit. I tried scanning the piece of paper that came with it but nothing. I also tried to assemble it for about half an hour last night, and just gave up, too tired to even figure out a simple thing. Then I tried another half an hour today, I felt progress in the first 10 minutes, then intuition and creativity did their thing and well so I will explain how to put this together. Inside the box you will find the enclosure, which is about the size, length and thickness of a energy bar, or a cereal bar, really not too big. It is plastic and aluminum. ON one side of the stick there is the usb C port and on the other side, on top of the aliminum cover is a small hole. You will also find a bag with a replacement screw and two rubber caps and also a bag with a very small screwdriver you can use to manipulate the only center screw of the enclosure. So, to install a drive into this go ahead and take that screw off and place it in a cup or some place that is easy to retrieve. Like with all screws, the tip of the driver should snugly fit into the screw and you unscrew to the right. When you take the lid off, which should hinge open to be able to slide off the plastic you will find a card similar to a drive also made of plastic. You will see and feel (using your fingernail at first if you'd like) some tiny holes, a bit bigger than a braille dot. These correspond to 2230, 2242, 2260, and 2280 drives. The further away they are from the usb C por the bigger or longer the drive is. Take the pcb out of the case, it should slide easily but if it does not then put your fingers on the sides and try to pry it out. Not much effort is needed as there is really nothing holding it in, you could also use something to act as a small lever to get it out. There are grooves on this pcb which feel like soldered on chips, and they should be facing down. You can retrieve your ssd now and also the rubber cap. A word on that infamous kinda cone shaped rubber cap: this one is used to secure the drive once you insert it. You should practice putting it on without the drive first. The direction it should go is the thinnest tip facing down. You do need to apply some pressure and align it some, but the small tip should protrude on the other side and that is enough. You can also turn it upside down on a table and push it firmly so that the tip protrudes some more. There is actually no need to insert it really all of the way in which I guess is what many people here are doing somehow and that is really an impressive feat, because that has been kind of impossible for me. Take it out for the next steps though as its much easier to put the drive, then put the retainer. To install the drive: If you look or feel at the short side edges of the rectangular drive, and also using your fingernail carefully, you will notice it as a tiny dent. This actually is the PCIE port or the connector that makes anything recognize the drive. On the opposite side there is a bigger dent at the very center which is the edge of the drive. If you feel past the USB port on the pcb, you will also notice that there is a small rectangular groove where this tiny dent part of the sd should be fitted on. Assuming you have placed the USB c on to your left, the port where this tiny dent goes should be facing away from you, you can actually feel it if you run your fingernail across the groove. Grab the ssd with two or three fingers, only touching the long front and back edges, almost as if your hand is a clamp. With the other hand, hold the pcb in a straight line, and line up the edge of the drive with the port or groove of the pcb, and the drive should be diagonally pointed (downwards) towards the port. Then, carefully but firmly push to slide the drive into the port of the pcb. If done correctly, the drive will cling to the pcb and if you stop touching it or release it, it should stick upwards a bit. you can carefully and slowly push it down until it touches the pcb. It should go back up if you release it. To stop this from happening and to secure the drive, is time to use the rubber cap you practiced putting on earlier. You will notice that the bigger horseshoe shaped dent on the other side of the drive (or the edge of the drive) lines with the almost brailled sized hole of the pcb for the drive length, so the rubber should fit right in without applying too much pressure or too much effort. And once you have this assembled, then put the pcb bach in, similarly to how you put the drive on the pcb, aligning it with the USB C port facing diagonally and down towards the USB opening on the plastic base. Then put the aluminum cover back in, put the screw back in, and you are done. I really hope this helps someone.
M**N
My Old SSD Died, This Saved the Data (and the Drive)
I bought this enclosure because I had an old M.2 NVMe drive that was on its last legs (literally about 1% life left according to the diagnostics). I needed a quick, reliable way to clone and archive the data before the drive gave up the ghost. This did the trick! The enclosure itself is well-built, with a nice aluminum shell that feels premium and helps with heat dissipation. Assembly was incredibly simple; it's a tool-free design—you just slide the cover off, pop the M.2 stick in, and secure it with the included plug. It took less than two minutes. Once connected via the USB 3.1 Gen 2 (10 Gbps) interface, the speed was exactly as advertised. I was able to transfer hundreds of gigs of data off the failing drive quickly and safely. If you have a spare NVMe drive sitting around or need to close out an old one like I did, this is a fantastic, reliable enclosure. It’s simple, fast, and turned my near-dead drive into a useful external backup. Highly recommended.
M**.
Ich nutze das ORICO NVMe-Gehäuse zusammen mit einer Lexar NM790 als Time-Machine-Backup-Lösung und bin mit der Leistung sehr zufrieden. Für diesen Einsatzzweck ist das Gehäuse ideal. Leistung & Geschwindigkeit: Über USB-C (USB 3.2 Gen2x2) erreiche ich beim Schreiben stabile ca. 980 MB/s, was für regelmäßige Backups mehr als ausreichend ist. Die Übertragungsrate bleibt konstant, ohne Einbrüche. Temperatur & Kühlung: Das Aluminiumgehäuse hält die SSD angenehm kühl. Auch bei längeren Kopiervorgängen bleibt die Temperatur im absolut unkritischen Bereich, was die Lebensdauer der SSD schützt. Verarbeitung & Kabel: Das Gehäuse wirkt hochwertig und gut verarbeitet. Das beiliegende Kabel ist relativ kurz, dafür aber stabil und sorgt für eine sichere Verbindung ohne Wackelkontakt. Für stationären Einsatz völlig okay. Einsatzgebiet: Für Backups, Datentransfer, Foto-/Video-Archiv oder als schnelle externe NVMe-Lösung ist das Gehäuse perfekt geeignet. Fazit: Schnell, kühl, stabil und ideal für regelmäßige Backups. Sehr gutes NVMe-Gehäuse für alle, die eine zuverlässige externe SSD suchen. Klare 5 Sterne.
D**C
I was looking for M.2 enclosures for my laptop as it doesn't have space for a 2nd NVMe drive. Although my laptop doesn't have USB 3.2, I still get incredible speeds for a little USB drive like this - MUCH faster than any mechanical HDD, as expected. Read and Write speeds are 420MB/s, and that is a particular number I can't argue with! Since I cannot run it at its advertised speed due to laptop limitations, I cannot say how efficient the cooling is (lower speed generates less heat), but I CAN tell you that the metal does warm a little bit, so it is clearly conducting heat from the NVMe itself, so contact between the NVMe - thermal pad and the heatsink is good! The only downside is the cables it comes with are very short, but they do work well. I ordered a 10' long USB-C cable so when I use this drive, I can put it somewhere away from my laptop's exhaust ports/keep it out of the way. Orico does make some quality stuff. I also have a 2.5" HDD enclosure that I have used for a good 4-5 years and is still going strong!
V**.
Images says it all. Im comparing the same NVME by connecting it to the motherboard (normal speeds), and with this ORICO device which gives terrible performance (yes Im plugging it in to my computer's USB3.2 gen 2x2 = 20 Gbps port). I was not even able to format the brand new NVME SSD using ORICO device, I had to manually open my computer and install the filesystem using it with the motherboard. Then it would atleast sometimes recognize the device from USB 20 Gbps port. Been doing a lot of message ping pong with ORICO on this one, sending them NUMEROUS graphs like this one trying many different things. They finally wanted to update the firmware when we saw it gave acceptable speeds on my other (slower) USB3.2 Gen 2x1 port = 10 Gbps, but again it was half the speed I intended to use when I bought it. Next problem was AMAZON where its impossible to send the firmware using their "anonymous mail service". When trying to send a link to a shared cloud folder AMAZON censor the link. When trying to send a private email adress AMAZON censor the adress. Its freaking impossible to work like this and this set my project back 2 weeks. I will never recommend buying something from AMAZON again after having this issue with support. ORICO team wanted to help, AMAZON made it impossible. Don't get me wrong, the product should work from the first place. And ORICO could also publish the firmware for this device on their website, like they have done with their other products. My issue is not resolved yet, and here I am with a very expensive 2 TB NVME SSD which I paid 250 USD (from my very limited student budget) for and cant use now. If I could put negative stars I would. 1 star is way to much for all my headache.
L**N
good design come with type c and usb cables and screw driver and heat sink pad
A**R
جدا حلوه و ممتاز اذا لابتوب و تبغا شي اسرع من HDD خارجي
Trustpilot
1 month ago
3 weeks ago