We remain fully operational. Our teams are working around the clock to ensure your deliveries continue safely.

DOWNLOAD THE APP


Customer Services
Copyright © 2025 Desertcart Holdings Limited
DOWNLOAD THE APP


🚀 Elevate your 3D printing game with pro-grade precision and massive scale!
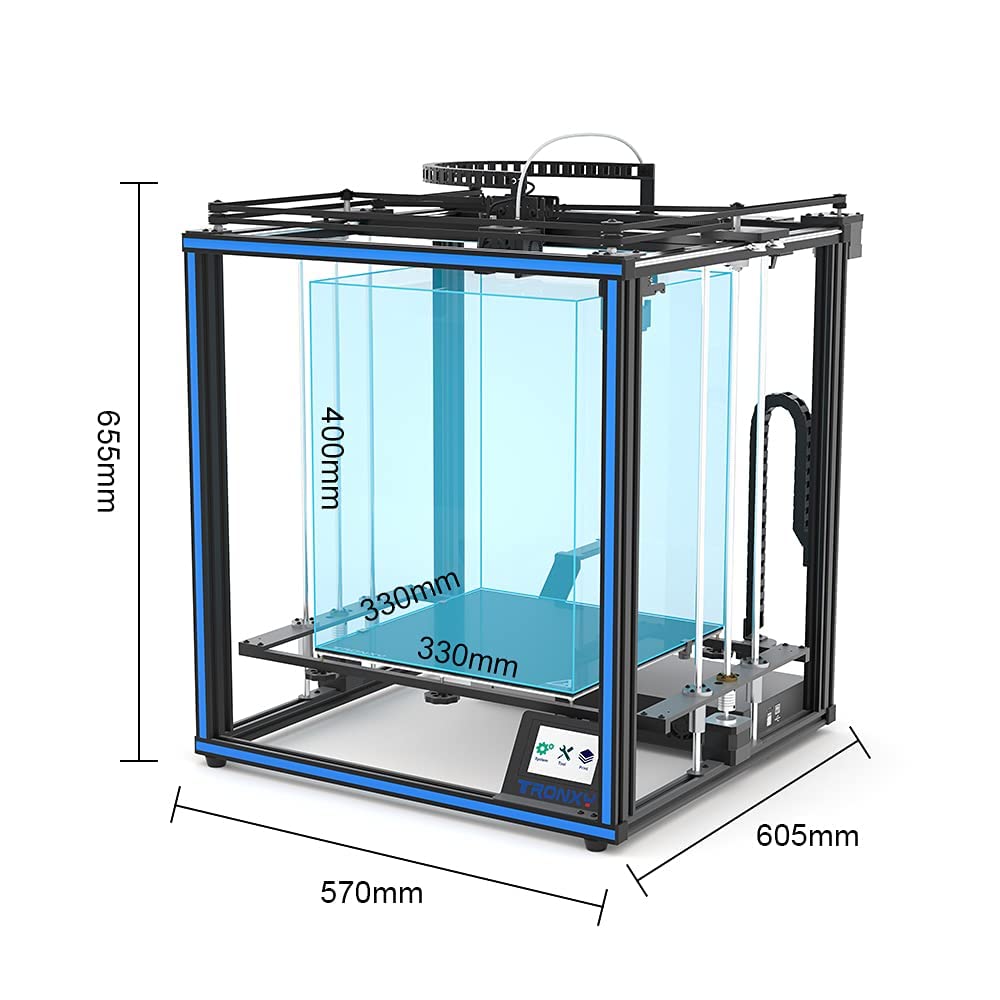
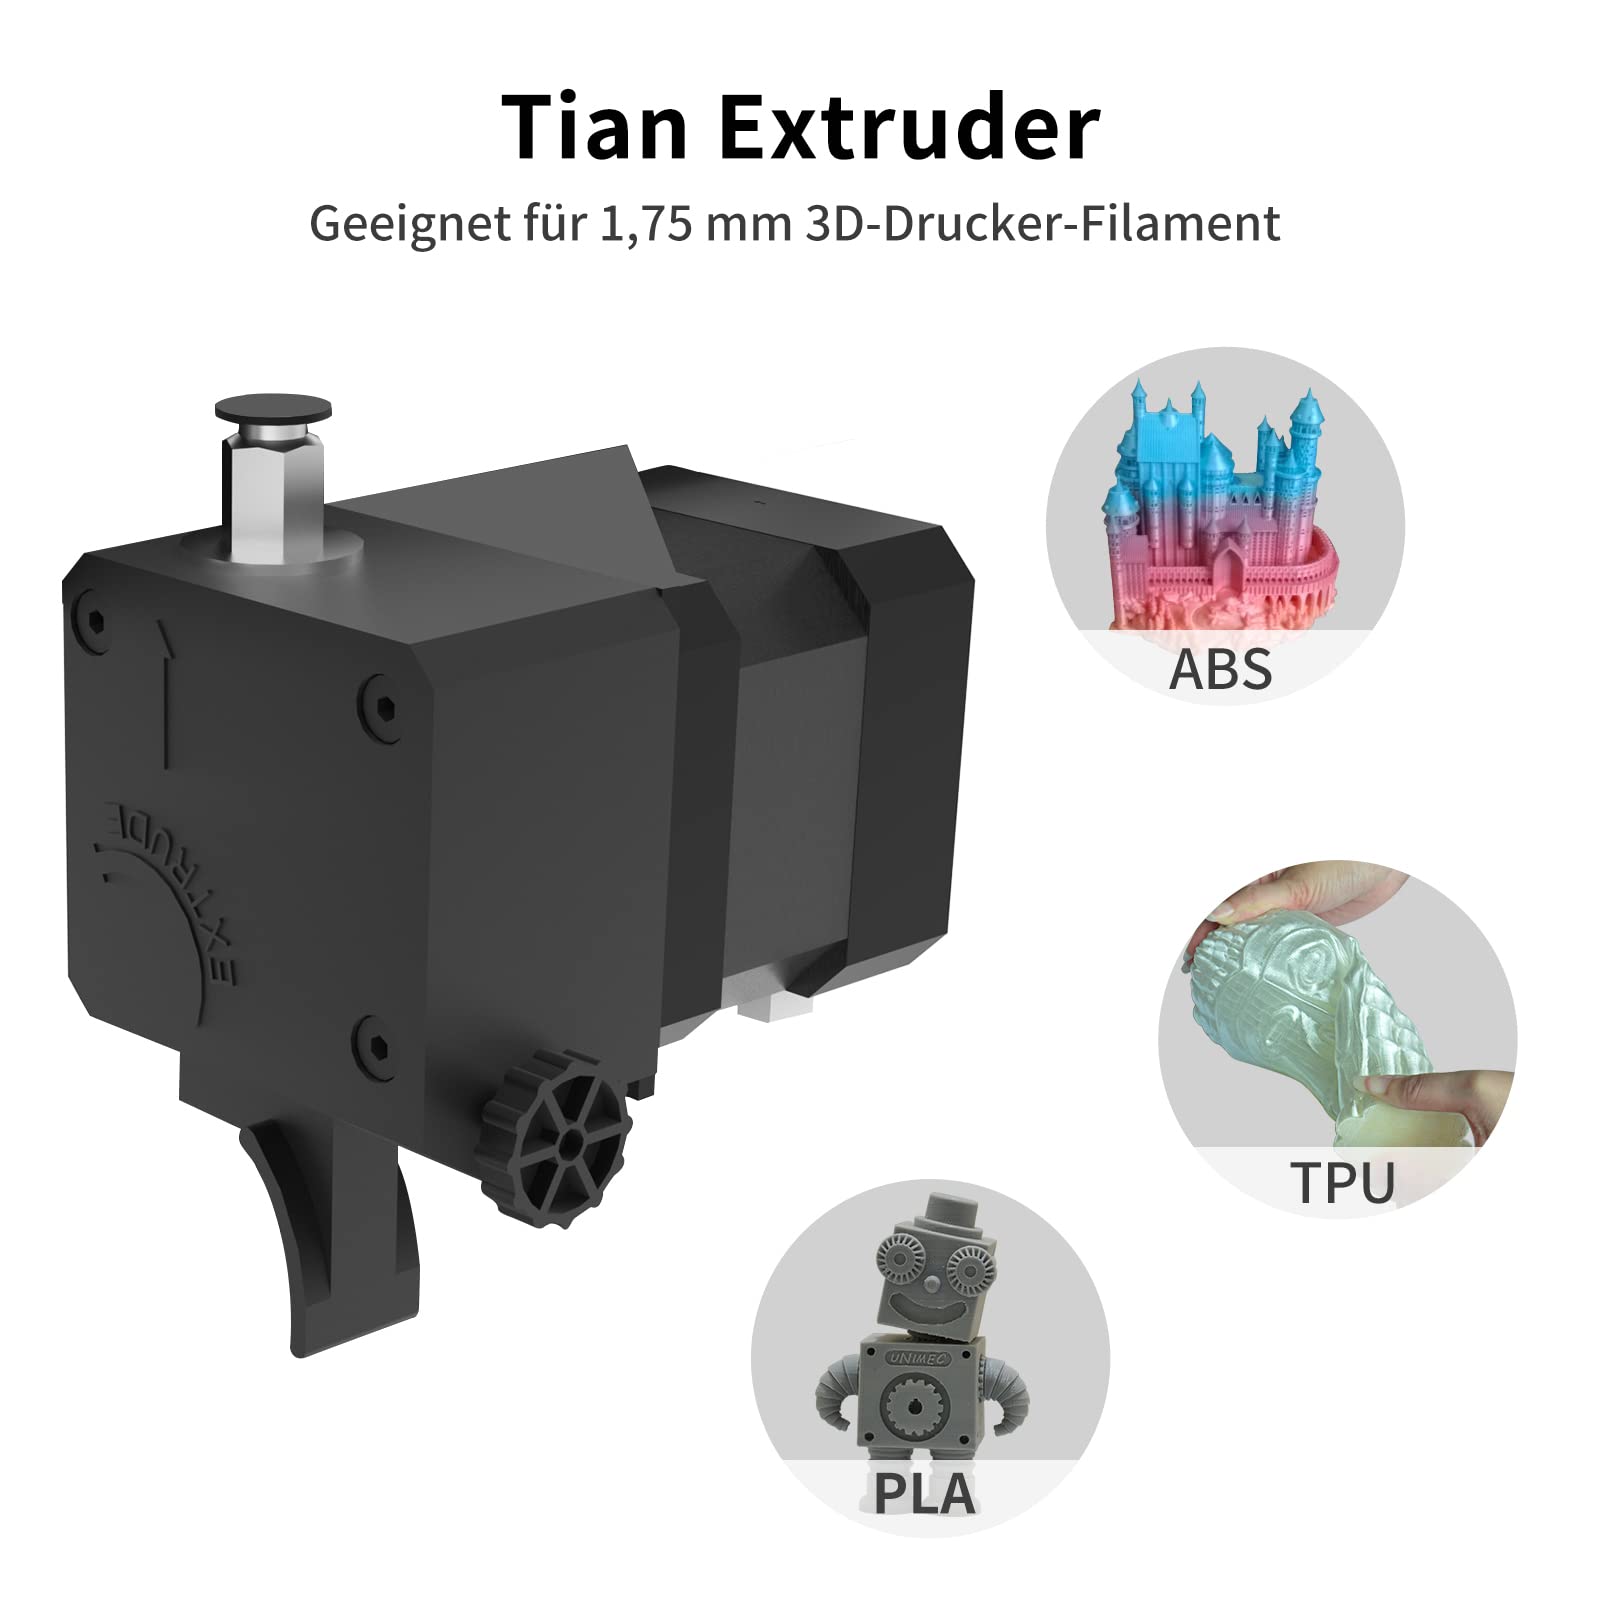
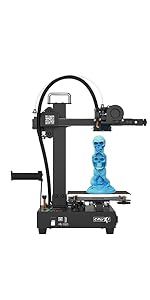
The TRONXY X5SA PRO is a professional-grade CoreXY 3D printer featuring a robust full metal frame, large 330×330×400mm build volume, and advanced upgrades including a glass bed, Titan extruder, OSG dual guide rails, and a silent control board. It offers one-key auto-leveling with a black TR-sensor, filament detection, and print resume capabilities, making it ideal for experienced makers seeking high-precision, large-format printing with quieter operation.


| ASIN | B092QL7T33 |
| Customer Reviews | 3.4 3.4 out of 5 stars (183) |
| Date First Available | April 16, 2021 |
| Item Weight | 31.9 pounds |
| Item model number | BUK-X5SA-PRO-JGBL |
| Manufacturer | TRONXY |
| Product Dimensions | 27.17 x 18.9 x 7.87 inches |
F**R
TronXY doing a good job. X5SA Pro is a nice solid printer.
I originally bought the TronXY X5SA. I build it was impressed with the printer. I initially saw the pro version but decided to go with the standard X5SA. Well. I decided to give the standard one to my grandkids and bought the Pro version. The X5SA Pro is a nice setup. Fewer Acrylic bits, only 4. The rest is metal. I had the same issue with needing to clear the holes in the Z axis motor mounts so the vertical slide rails can fit. With the upgraded guide rails and trolley wheels, I did find some jerkiness in the movement. This was caused by some residue on the trolley wheels. This cleaned up easily with a Q-tip and some rubbing alcohol. After that, no issue. The rest of the build was straight forward and uneventful. everything fits and lines up well. The touch panel works fine. I find you can drive the Axis past the maximum limit. I will see if there is a way to turn the software stop on. I still wish ( original X5SA review ) the firmware was open and easier to modify, but it does work well. Could add some touches like position display when on a page that lets you move an axis, but not a deal breaker. Over all it works well. I think the upgraded parts are worth the cost difference from the standard version.
P**Y
Amateur grade printer with some design flaws - bad company moral value
First, let me say what I like about this printer. - It can print large volume, which was the primary reason why I bought it. - The arrangement of parts is neat - Decent body frame - Printing is decent after some googling and adjustments In general I think it is good enough for hobbyists but it is NO WAY to be considered industrial graded printer. Ok, then here are the problems. First of all, this printer has AUTO LEVEL-SENSING and NOT auto leveling. There is a false marketing on this feature. What it has is a distance sensor that detect the distance to the printing bed at 12 different locations and you have to adjust the bed by turning the screws (of course with your hand). There are a few design problems - The harness chain at the top is too heavy to be held by the two ends so it keeps sagging down and hit the belts. You have to make something to hold it up. - The filament guiding tube connects the printer head (extruder) and the extrusion gear also sag and touch the belts making an uncomfortable sound during printing. - The empty-filament sensor and its mechanism is a joke. I mean it does tell you when the filament is out. However, it is difficult to replace the new row of filament without reprint. What happened was it tell you that the filament is out. However, to replace it you need to somehow cut part of the leftover filament to put the new one in. The only way for this to work is you have to remove the guiding tube, cut the filament shorter than the tube itself, put the tube back, then insert the new filament. I tried to insert the filament pass the sensor and keep pushing the filament up while printing with the hope that the new filament follow the leftover one. Unfortunately the new filament stuck somewhere in the extrusion gear and never get pushed up. There are a few assembly problems: - Some of the parts were incorrectly preassembled. Like the screws for the bed harness chain. - The position of the bed leveling sensor is a bit too low which created all sort of problems (I will mention them in the operational problems). - There are other minor things that I don't remember now. It has been a few months. There are a few operational problems: - The bed leveling sensor was incorrectly pre-mounted. This caused the z offset to be a little bit high so the first layer never touch the bed when I printed it directly from the slicer software. If I print it from the SD, I have to manually adjust the z offset every time. - Occasionally, when adjusting the z-offset to the correct thickness before printing, the printer somehow drill down to the bed then drag along the bed on its way to the home position and damage the black sheet that glued onto the aluminum plate. This happened to me like times. - The black sheet on the aluminum plate peels after several uses. - The print does not produce the tolerance as stated in the description. When printing a circular tube it became ecliptic tube. The tolerance can go up to 1mm. - There are other problems leading to bad prints such as lifting, etc. It happens on almost every 3d printers so I don't mention it here. Lastly, if you buy this printer don't bother sending in your free filament code. Tronxy don't send you the filament. They keep making excuses, try not to reponse to your email, and never send the filament as they promised.
M**S
Broken parts - making the printer uselss until replacements arrive.
I will start this off by saying I have had an Ender-3 for 2 years now. A printer that has minimal setup. I do not consider myself and expert. At best I am slightly above proficient. I received my printer yesterday. While putting it together I noticed I had a broken part and a missing set screw. I pushed forward with the build because of excitement. I got the printer all set up and the belts tensioned. I plugged it in and had a loud pop and a spark. After unplugging the printer and checking all connections everything looked fine. I plugged it back in, leveled the bed and set my Z-offset. It was time to print. I loaded up the test print and hit print. The bed started to warm and about 15 seconds later an alarm went off. "Not enough power for sensor." After doing some trouble shooting I narrowed the issue down to the hot end sensor. I watched a few Youtube tutorials and saw what some of the issues could be. When I looked in the power bank that houses the connection for the hot end I noticed 1 wire wasn't even attached. After 5 minutes tearing that apart and hooking up my wire I was up and running with my prints. Pros - Good price for a Core XY printer. Easy to put together, just read 2 steps ahead and all the little notes Pretty easy to level(NOTE: this does not have automatic bed leveling. It shows you a grid of 12 points and you have to zero it) First print had no bed adhesion issues and seems to be printing great. Customer support responded to me within 24 hours of my request for replacement parts. Cons - Broken parts out of the box Some of the holes don't line up making some tasks even more tedious Not automatic leveling Belts can be tricky to get right After my first print is done I will look at updating this review to give a better idea of the printer and it's capabilities. Update: A day later and now the leveling sensor doesn't work. Everything is hooked up correctly but it no longer detects where the nozzle is. The sensor has a broken wire in it where I can't get to solder it. This makes the printer useless as it won't print with out the sensor working that acts as the Zstop.
S**J
First of all, I want to thank Amazon for a very fast and intact delivery. This 3D printer arrived within 2 days and in a very compact rectangular box. When I first opened the box I was impressed by the packaging. All parts were packed nicely and in order. This is my fourth 3D printer and first from Tronxy. And till now this was the nicest packing. Now the Assembly: It took me 8 Hours for the whole assembly process and quite a large space to accommodate all the assembly parts and to perform main 3D printer assembly. My Recommendations and remedies for the assembly process: First perform the Base frame assembly and then the Sliding plate assembly. Then install X-axis using basic frame, X axis guide, print head parts and 6 screws for it. Then you can move forward to Print Head Assembly. Be careful with the XY axis motors and wheels, don’t forget to lock the parts. Then you can perform the Belts assembly and be very particular with the belt tensioning. The tensioning of the X- and Y-belts, is bit complex than my previous printer. You need to get a perfect square motion system. You even need to cut the two belts to get to the exact size if you have belt length more than required. And Here you need experience. Try to watch videos before doing this in order to get an idea how to do it perfectly. Or you may end up with a non-squared printer machine. After that you can assemble Z-axis components and controller box. They are easy to do. The next easiest thing you have to perform is Print Plate assembly and Feeding Motor assembly. Then within couple of minutes you can do Switch, filament bracket, Black sticker and seal assembly. The most important part is this assembly process is wiring, don’t mess it up, first put all the wirings separate and label them with their names in order to avoid any mistake.Then connect all wires to the respective places. Then go through the interface operation given in user manual and install the Slice software by double clicking on TronxyInstall.exe file in the SD card given. Now you are ready for your first print. I would say If you want to assemble it then you need almost one complete day for its assembly and if you are new don’t try it without under guidance, you are probably going to break something. You can get help from Tronxy website, user manual and even from videos on youtube on its previous 2019 version. Pros of this Printer:- Motor Drivers makes the axis movement inaudible or noiseless. The quality of the print is average. But it also depends on the user skills. If you are beginner then you should first learn about 3D printing and Printing principles. In this printer Fused Deposition Molding principle is used. This printer facilitates very large print size ( 330*330*400), and is perfect for designing medium sized robotics parts also. It comes with 100mm/s print speed but I would recommend to go maximum unto 70 mm/s. This printer comes with an auto level sensor and it is capable of measuring 16 points and displays the values on the screen. You can use different filaments with this printer such as PLA,TPU, ABS, wood, pc and HIPS. The Slice software is user friendly. And if you are familiar with CNC programming then the good news for you is that its output format is G Code. Cons of this Printer:- Bad Layer adhesion in some prints. You need to set Z-offset after levelling or you will end up with a scratch on print plate. Thick Filament Clumps between Nozzle and Sensor in some prints which I fixed by increasing the nozzle temperature. You can expect the Noise from the Fan as high as 63 db. In conclusion: This is a perfect choice for beginners who want to learn and grow in this field and average product for experienced people.
C**N
Hallo zusammen. Nachdem ich in Vergangenheit viele Drucker bessen habe muss ich sagen, das diese Drucker mich echt beeindruckt hat. Er ist in sehr kurzer Zeit auf zu bauen, hat eine hervorragende Druckqualität und ein sehr großen Druckbereich. Die Bedienung ist sehr einfach und intuitiv. Andere Drucker lassen sich deutlich schlechter/umständlicher bedienen. Was den Drucker auch für viergeschritten interessant macht sind die Zusatz-/Erweiterungs Sets um diesen Drucker z.B. zu einem Zweifarbdrucker um zu bauen. Daher ist er für Anfänger und Fortgeschrittene sehr zu empfehlen. Wenn jemand nicht weiß, ob das 3D drucken etwas für einen ist, dann kann man mit diesem erst einmal probieren und wenn man merkt, wie viel Spass das erstellen eigener Teile macht, muss man sich nicht nach einem Neuen umsehen, sondern kann diesen Erweitern. Grüße an alle und viel Spass beim Drucken
S**Z
Um es gleich vorab zu sagen, es ist nicht mein erster 3d Drucker und ich bin der Meinung dass ich eigentlich gut mit der Materie zurechtkomme. Ich hab den Drucker ausgepackt und aufgebaut (ca 3 Stunden) Bett gelevelt, Test Datei rein und einen testdruck gestartet. Bei dem 20x20 Würfel direkt ab der dritten Schicht ein Layer Shift von 2 mm. Gut dachte ich vielleicht ist etwas an der Mechanik (Motor, Riemen, rollen) Alles kontrolliert und den Druck neu gestartet. Wieder das selbe. Nun dachte ich es sind die Stepper driver, also Multimeter rausgeholt und nachgemessen. Da hatte ich schon den ersten Fehler gefunden, x und y Achse hatte eine unterschiedliche voltzahl. Das ganze eingestellt und wieder ein testdruck. Siehe da der würde (20x20) sah ganz gut aus. Bis ich das erste größere Objekt Testdrucken wollte. Da war mein layershift wieder und wurde immer stärker. Logische Schlussfolgerung, Drucker wieder auseinandergenommen. Geld zurück in was besseres gekauft
M**R
Mir hat der Drucker nicht gefallen weil die Druckplatte und die Glasplatte uneben und ungleichmäßig waren. Nach Stunden langem Leveln wer die Druckplatte immer mit 0,5mm+/- im Unterschied und das im Kalten Zustand, im geheizten Zustand hatte ich sogar noch höhere Toleranzen. Dieser Drucker ist von meinerseits nicht empfehlenswert.
T**L
Habe mir den Drucker gekauft weil ich mich in die core xy Struktur arbeiten möchte. Der Aufbau war einfach und ist auch für Anfänger gut durchzuführen. Es muss aber auf winkligkeit der verschraubten Profilen geachtet werden. Nach dem Aufbau folgte die Inbetriebnahme. Diese war nicht so einfach da das Bett einfach nicht gerade ist levelt man das Bett von Hand sauber aus steht es in der Mitte zu weit nach oben. Also musste ich das Bett so leveln das in dem Druckbereich der Abstand passt dieser beträgt ca 7 auf 7 cm mittig vom Bett. Auto leveln funktioniert nur bedingt da der Drucker bei einer Abweichung von der höchsten zur niedrigsten bei 0.5 mm Abweichung einen neuen Versuch möchte. Habe ich nach dem 10 Versuch aufgegeben und manuel in dem kleinen Bereich gelevelt. Erster druck war einigermaßen in Ordnung.
Trustpilot
2 weeks ago
1 month ago