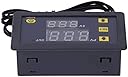
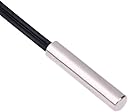
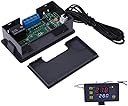
I have had this for a project for years, never got around to the project. Now looking at using it for cooling/heating/ventilation for garage & power/battery charger. Hope this helps others in their setup. Look up: Twins Chip W3230 Digital Microcomputer Temperature Controller. Usage method: After connecting the power supply and equipment, power can be supplied to the controller. At this time, the display shows the measured temperature. Press the SET button once, and the display screen temperature will flash. (Note: You have to be very quick, otherwise the display returns to previous) Press+ - to set the required temperature (press and hold+ - to quickly rise and fall). After the setting is completed, press the SET button to confirm and return. At this time, the controller will automatically execute the relay on/off according to the setting! The output of the temperature controller is a 7A relay, which meets various high-power loads. After connecting the control circuit, the temperature controller can be powered, and the display screen shows the ambient temperature. Strongly suggest adding an 8 or 11 pin relay for controlling mains voltages. Status description of indicator light and Nixie tube: Indicator light: flashing indicates a delay in starting cooling or heating, and a constant light indicates that the relay is closed Display: Relay light (Top RHS corner) indicates that the sensor is open circuit, please connect the sensor according to the instructions; The display HH indicates that the temperature controller will forcibly disconnect the relay if it exceeds the measurement range; Display - - High temperature alarm. Parameter Function Description: Press and hold SET for 5 seconds to enter the main menu settings. Press+- to switch between P0... P6. Press and hold SET for 10 seconds or the controller will automatically confirm and return without any button action. P0 cooling and heating modes: Press and hold SET for 5 seconds to display P0. Press and hold SET once to set the working mode. Press+- to switch between [H for heating mode] and [C for cooling mode]. Press and hold SET once to return. Press and hold SET for 10 seconds or the controller will automatically confirm the completion of no button action. In refrigeration mode: when the temperature measurement value is ≥ the temperature set point, the refrigeration relay is engaged and the refrigerator starts; When the temperature measurement value is ≤ the temperature set point return difference, the refrigeration relay is disconnected and the refrigerator is turned off. In heating mode: when the temperature measurement value is ≤ the temperature set point, the heating relay is engaged and the heater starts; When the temperature measurement value is ≥ the temperature set point+return difference, the heating relay is disconnected and the heater is turned off. P1 return difference setting: Press and hold SET for 5 seconds to display P0, press+- to switch to P1, press SET once to set the return difference, press+- to set the return difference to 0.1-15, and then press SET once to return. Press and hold SET for 10 seconds or the controller will automatically confirm the completion of the keyless action. In refrigeration mode: when the temperature measurement value is ≥ the set value, the relay is engaged and the refrigerator starts; When the temperature measurement value is less than or equal to the set value return difference, the relay is disconnected and the refrigerator is turned off. For example, if the environment is set to 30 ℃ and the temperature difference is set to 25 ℃, the relay will close and the refrigerator will start after being powered on. When the cooling reaches 23 ℃, the relay will disconnect and the refrigerator will close. At this time, as the refrigerator has already been disconnected, the temperature will start to rise. When the temperature rises to the set value of 25 ℃, the relay will close and the refrigerator will start again, and the temperature will be controlled repeatedly to not exceed 25 ℃. In heating mode: when the temperature measurement value is ≤ the set value, the relay is engaged and the heater starts; When the temperature measurement value is ≥ the set value+return difference, the relay is disconnected and the heater is turned off. For example, when the environment is set to 10 ℃ and the value is set to 25 ℃, the return difference is set to 2 ℃. After being powered on, the relay closes and the heater starts to start. When the heating reaches 27 ℃, the relay disconnects and the heater turns off. At this time, the temperature starts to decrease because the heater has already been disconnected. When the setting value is 25 ℃, the relay closes and the heater starts again. This repeatedly controls the temperature not to be lower than 25 ℃.