


🏡 Slide into smarter storage with style and security!
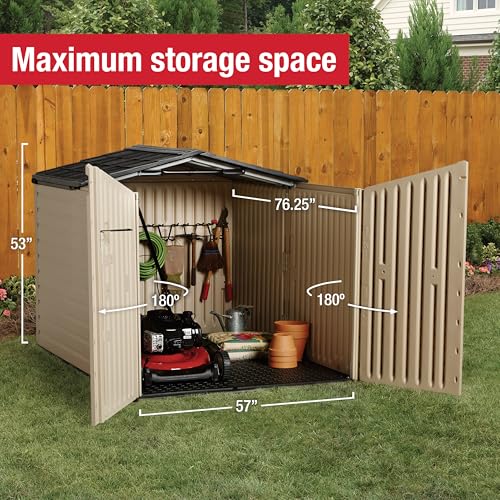
The Rubbermaid Plastic Slide Lid Outdoor Storage Shed offers a spacious 96-cubic feet capacity with a weather-resistant, UV-protected double-wall resin construction. Featuring a smooth sliding lid on rollers for easy access and a secure cane bolt locking mechanism, this compact 53-inch tall shed fits neatly under standard fences, providing durable, rust-free storage for bikes, lawn equipment, and outdoor essentials.


| ASIN | B007KL9PBW |
| Assembly Required | Yes |
| Base Material | Resin |
| Batteries required | No |
| Best Sellers Rank | #82,808 in Patio, Lawn & Garden ( See Top 100 in Patio, Lawn & Garden ) #202 in Storage Sheds |
| Brand | Rubbermaid |
| Color | Sandstone |
| Customer Reviews | 4.0 4.0 out of 5 stars (1,025) |
| Door Style | Sliding Doors |
| Frame Material | Plastic |
| Global Trade Identification Number | 00071691449508 |
| Item Weight | 169.6 pounds |
| Item model number | 1800005 |
| Manufacturer | Rubbermaid |
| Material | Plastic, Resin |
| Number of pieces | 1 |
| Product Dimensions | 76.25"D x 57"W x 53"H |
| Style | Slide Lid Shed |
| Top Material Type | Resin |
| UPC | 071691449508 |
| UV protection | UV Protection |
| Warranty Description | 1 year limited warranty |
| Water Resistance Level | Water Resistant |
| Weight Limit | 96 Pounds |
C**K
Good design with plenty of space and good access
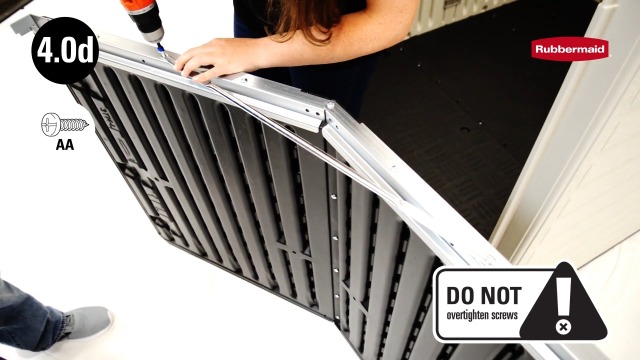
We needed outdoor storage that was shorter than our privacy fence, due to POA rules. We wanted something fairly large for outdoor equipment, and this fit the bill. The directions call for a concrete pad or solid surface underneath, to prevent damage to the floor. We got a bunch of concrete square tiles, some edging, and sand and made a pad. It really made a difference. The floor is relatively thick, but if you’re putting heavy metal tools and equipment in, or even rolling it in and out, you’d tear the floor up over time, without support. The rest of the construction was pretty straightforward. There are a lot of screws, and it’s very helpful to have a second person hold parts in place and stabilize things, as you screw everything together (LOTS of screws), but it’s not a hard process. I definitely recommend a power screwdriver or drill with screwdriver tip, just be careful not to overtighten and strip out the holes. Also, it was cold when we assembled this, and it was super helpful to use a small lunch and tap a starter hole before putting in the screws. Otherwise, you and your screwdriver will be working really hard to start every single screw. Overall, very happy with the quality, and it came together as expected. Over time, we will probably paint every year or so with a paint that has UV protection, to keep it from breaking down in the sunlight. Other than that, solid stuff that should last for years.
G**N
Well designed shed and easy to assemble.
I needed a shed to store my lawn mower and barbecue grill for the winter months. This Rubbermaid shed fit the bill perfectly. I did install a wooden shelf to store my hedge trimmer and leaf blower. The retractable roof is a great feature, it allows easier access to get to the back of the shed. The shed looks nice, and went together in about 3 hours assembling it by myself. The most difficult part was preparing the ground to make it fairly level. I used 16 bags of pea stone to level off my slopped yard. This took almost 6 hours by itself. I tampered the stone to pack it well into the soil. When the ground was close to level I installed the resin floor on top of the pea stone. When the doors and roof are closed the shed is very solid. When you open the doors and retract the roof the side panels get a little wobbly. But I am not too concerned as you are not putting any pressure on the side panels. The floor seems very solid. So far I am happy with this shed. I have another larger 8x8' Rubbermaid shed that is 18 years old and it is still working well. Hopefully this new shed lasts as long as my 18 year old one.
T**.
Good customer support
Mine was defective. One of the sliding roof panels (Panel N) was 5mm shorter than spec. It would not align properly even with a little ungentleness. I contacted Rubbermaid (instead of Amazon) and talked with their representative. They wanted a lot of unnecessary info, pictures, etc. I was a little worried they would ignore me as their instructions definately state "Be sure to maintain roof alignment". But boy did they deliver. They sent me both roof panels, the joing bracket, and an entirely new and complete hardware kit. The completed shed works great. Some construction notes: 1. Read the instruction page headers carefully. They do have critical steps in small letters there that you will miss if you just look at the pretty pictures. There are two or three gotchas. 2. When they suggest you should pre-drill a hole you should pre-drill it. 3. When they say "two person" assembly they mean "two person assembly". You just need them for 5 minutes. I used a big rock, but really I should have used a second person. Speaking as a person who usually ignores "two person assembly". Yes, it looks like it's on correctly until you've screwed it in and look at it from the outside. 4. This is pretty easy to assemble with a power drill. 5. It comes with extra screws which is always a show of good faith from the manufacturer. 6. You bought a shed with a sliding roof. Use it. The roof bracing bar is a punishment for the backs and shoulders of those who ignore this. 7. From talking to their support rep, I'd guess at least half of people's problems with this shed are building it without a flat, sturdy foundation. 8. Lift the roof when installing the roof rollers. Pull the wheels down as far as you can to get best rolling action. This is easy to fix if you get it wrong. This little shed is great. It tucks under our fence even on the elevated platform I built for it. It fits everything I was planning for it. Next year I may buy a second one to put next to it.
T**D
Really poor design - top lid will not open without physically lifting
I bought this slide top shed to replace a 15+ year old Rubbermaid slide top shed that was damaged in a hail storm. Old shed worked great for those 15 years. It consisted of maybe 10 parts total that snapped together very easily. This new shed consists of what feels like 1000 parts, most of them screws. It took a long time, with careful reading of the instructions, to complete. Here are my issues, some of which are comparisons to the previous design: - Base is very flimsy. It requires the building of some form of foundation. The prior slide lid shed had a base that was very sturdy and could be laid straight on the ground. - The front doors cannot be opened without first opening the top. Which would be okay, except... - The top slide lid cannot slide over the bottom slide lid section without being pushed up from the inside of the shed. Seems like an incredibly poor design that the top section hits the bottom section and cannot be moved without physically lifting the top section up over the bottom section. Which is in turn very difficult since you cannot open the front doors without opening the top section! Talk about a catch-22. I have resorted to installing a cheap handle on the front door so have something to pull on to open the front so I lift up the top lid section to push it open. Makes no sense at all. The prior shed design worked very well. It was simple, sturdy, and it worked. This new design is unnecessarily complex (too many parts) and honestly it does not work.
V**2
It was relatively easy to set up and the quality is generally quite good. I can see it lasting a long time. The only thing, as others have posted, is that the roof becomes difficult to slide back pretty quickly. It ends up dipping down in the middle, so you end up having to reach over the top, pull it up and open just a bit before you can slide it open normally. I'd still buy it again, as it's nice to have a short shed that isn't visible over the fence. And because it's short, you do need the roof open in order to easily get in to stuff at the back.
C**C
I was very happy at the receipt of my shed. Everything was clearly marked and the instructions were extremely clear up until one point on putting the roofing brackets on, but a quick search on You Tube, and my answer to my quiry was there. ( they also mentioned that the instructions at this point seemed a bit confusing) The assembly in total took me approximately 5-6 hours, and is the Perfect size for my snow blower!!!
A**R
It's an ok design the roof could have been made better
Trustpilot
1 day ago
2 days ago


