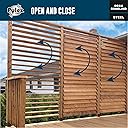
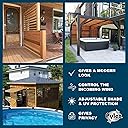
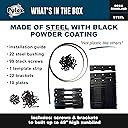
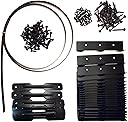


🌟 Elevate your outdoor vibe with shade that moves with you!
The Pylex Deck Sunblind System 11060 is a robust, black powder-coated steel louver bracket kit designed for decks, gazebos, and fences. Supporting up to 11 boards of 48" height, it offers adjustable shade and UV protection with a sleek, minimalist design. Easy to install with included hardware, it provides durable, rust-resistant performance and customizable sun and wind control for a comfortable, stylish outdoor experience.


| ASIN | B0754D1F99 |
| Amazon Bestseller | #514,325 in Home & Kitchen ( See Top 100 in Home & Kitchen ) #422 in Horizontal Window Blinds |
| Batteries Included | No |
| Batteries Required | No |
| Brand Name | Pylex |
| Color | Black |
| Customer Reviews | 4.7 4.7 out of 5 stars (711) |
| Date First Available | November 9, 2017 |
| Item Weight | 3 Pounds |
| Manufacturer | Pylex |
| Material | Steel Black Coated Powder |
| Material Care Instructions | Spot Clean Only |
| Model Number | 11060 |
| Package Dimensions | 19.9 x 19.5 x 3.9 cm |
| Package Weight | 1.38 Kilograms |
| Size | 長さ21cmx幅21cm |
| Special Features | UV Protection |
し**し
また今度追加リピします!
D**Y
素人DIY者ですが、とても素晴らしいルーバーで取付も上手くできました!パーゴラに目隠し用として設置しました。完全に壁にしてしまうと解放感がなくなるので、ルーバー機能によって解放的にもできるようにしました 日本語の説明がないので、色々と不安でしたがしっかり調べて購入。ガイド通りに施工して2×6を使用すると鎧壁のようになりました。2×4で隙間なくやりたい場合は付属のガイドは使用できませんが模索すれば可能です。また、柱は90角にしましたが、105角の場合はリベットが必要になります(柱が太いと柱が邪魔して物理的に板にビスを打てなくなるため)。それとビス穴が四角だったので、四角ビットを買いました。1セットで11列分ですが、11列を全てつなげる必要はなく、5列と6列、のように分割も簡単にできます。逆に2セット買えば12列以上も可能ですが、少し動きが重くなるのでお勧めはしません。設置して半年以上たちますが、錆や損傷は起きていません 商品としてはとても満足で最高に格好良いルーバー壁ができました。ご近所の方や大工さんからも「見たことないし、発想もなかった」と称賛いただきました。まだ日本で我が家だけかもしれません!
K**E
Top, muss nur beim ausmessen genau arbeiten
S**E
Easy product to use-does the job but costly for the components that come in the box.
T**S
Los tornillos no son de cabeza de cruz y son un poco delicados se barren muy rápido, pero puse otros y solución .
J**C
Went with this system instead of a DIY fixed slat setup. Super happy with it, they pivot flawlessly. I needed to install them on an angle, and I think it turned out really great, has a cool MCM look. Keeps rain off the side of the patio and adds privacy. I used cedar fence planks and finished them with Ready Seal. Definitely recommend using a self leveling laser, it will make lining up the bracket mount holes from one side to the other side easier. I would measure the distance between all the brackets before cutting your boards, if there's more than 0.25" variation you may want to cut multiple boards lengths....really just depends on how straight you installed your side support posts beforehand. Overall, one of the better hardware values I've come across in a while.
G**.
Put these on, using 4x4 Posts, yesterday and it was a breeze! The ONLY thing I found, as you can see in my pictures is you should measure from the "inside of the bracket" "to inside of the bracket", NOT from screw to screw that fastens the bracket to your 4x4/6x6. I even cut out a notch, on some boards/louvers so it sat flush on the fastened hardware bracket, this allows the fastener screw to fit inside your board/louver, not just up to the screw used for this bracket. (Should have done this to all of my boards/louvers). This makes the wood sit properly without forcing the bracket to twist and catch on the side of the 4x4. Doing so will put pressure on the screw and twist your side brackets and in turn, will rub against your 4x4. Also, if you have a twisted 4x4 OR 6x6 you will bind the hardware and boards/louvers will not move up/down. This will NOT allow you to use the connecting hardware that allows you to move ALL the louvers at once. The side brackets/hardware catch's on the 4x4's and there is NO space to close the louvers all the way up/down. As you can see in my photos, some of the wood boards/louver planks are not flush, with the side brackets, nor can you see the connecting hardware, to move all louvers at once, this is due the the tight fit from the brackets to 4x4 so I was not able to move the louvers/boards closed either way. Also, I would suggest NOT placing the brackets exactly in the middle of your 4x4/6x6 (as shown in directions) I suggest trying one louver/board/brackets and move them a bit out (forward) so you then can attach the moving side hardware to operate ALL the louvers at one time. If I would have moved the swivel brackets a half inch forward, I would have been able to attach the connecting hardware and in turn move ALL the louvers at once and close the boards/louvers completely. No big deal though..., I now can move the louvers individually so I can have some open and some closed. Works for me.... I would experiment with just one louver/brackets first and make sure you have enough clearance to use the side hardware to swivel ALL the boards/louvers together. It takes time and some patients but it looks great and my neighbor has already complimented me on this project. Looks great! I was told... I will now place a privacy screen along the bottom portion of my rail under the new louvers to increase the privacy even more. Will follow up on that picture later. I hope this short documentary has given you an idea of what to expect and knowing that it's not hard to put these up. It works well using two people...trust me! The total length of the boards/louvers I used where about 49". It says you can use up to 7feet but at the length I have now, it's good enough because any more, it will sag in time and at 7feet, you bet it will. I had to ordered two kits for this project. Go online/utube and do your research first and make sure you know what to do. The directions in the kit are great as well but seeing it put together is a great idea. I hope this helps....I recommend this product and I would purchase these again.
Trustpilot
2 weeks ago
1 month ago