


Buy anything from 5,000+ international stores. One checkout price. No surprise fees. Join 2M+ shoppers on Desertcart.
Desertcart purchases this item on your behalf and handles shipping, customs, and support to Kyrgyzstan.
๐ช Elevate your throneโbecause your chair deserves a glow-up!
This Office Chair Gas Cylinder Replacement Kit features a heavy-duty Class 4 hydraulic piston supporting up to 1,000 pounds, with a 4.7-inch adjustable stroke for customizable height. The universal fit works with most office and gaming chairs, and the kit includes all necessary tools and gloves for easy installation, making it a cost-effective, durable solution to extend your chairโs life.


| ASIN | B072BKJN34 |
| Assembled Height | 12.2 inches |
| Assembled Length | 3.15 inches |
| Assembled Width | 3.15 inches |
| Best Sellers Rank | #31,528 in Office Products ( See Top 100 in Office Products ) #746 in Office Furniture Accessories |
| Customer Reviews | 4.3 4.3 out of 5 stars (2,842) |
| Date First Available | May 5, 2017 |
| Is Discontinued By Manufacturer | No |
| Item Weight | 3.02 pounds |
| Item model number | 9bc6933e-c2a5-44f2-8f5a-6e21968a2ff4 |
| Product Dimensions | 1.97 x 1.97 x 11.22 inches |
D**R
Worth the price. Seemingly Good Quality.
Worked great. Was definitely worth spending a few bucks to get the removal tool. I used the interior piston only for my chair which makes the installation process even more easier.
U**S
Worked Perfectly, Needed Stubby Hex Keys
During the pandemic, safer at home days, I started to notice that my posture was a little off and my lower back was starting to hurt. I then noticed that the chair wasn't in the proper position any longer and I was not able to raise it any higher. I knew immediately that I needed a new chair or the back pain would progressively start getting worse. However, knowing that Amazon sells everything, I decided to see if they sold just the cylinder replacement since a new chair would cost me about $200 (and my current chair was in really good condition other than the cylinder height). I opted to purchase this item due to it being a full kit as well as offering a coupon discount. When the kit arrived, my initial install try failed miserably. First, I was not able to remove the chair as I couldn't slip the hex key between the bottom collar and the stock plastic sleeve that covers the "unsightly" cylinder. I know I could've cut the sleeves off, giving me the clearance. But, I wanted to maintain the original look of the chair as much as possible. Second, no matter how hard I hammered at the bottom of the cylinder with the rubber mallet, it refused to budge and I couldn't get it to detach from the base. I even soaked the seam with WD-40 and let it sit overnight. Still, no movement at all. Try number two. I turned back to Amazon to see if they sold stubby hex keys, which I immediately ordered. Day number two, the stubbies were delivered and voila, fit perfectly between the collars and the plastic sleeves. Next thing you know, the chair was detached. I then turned my attention back to the base... I took the base and placed it on top of a five-gallon bucket and again, soaked the seam with WD-40. After an hour, I hammered the cylinder again with the mallet and to no avail. I finally turned to a metal hammer and used the side of the hammer to equally disperse the energy to the edge of the cylinder base. After a couple of strong strikes, the cylinder popped right out. Excitedly, I cleaned off the WD-40 from the base, installed the new cylinder on the base, removed the plastic button cap, and installed the chair. The cylinder worked perfectly and at its highest height, I couldn't even place my feet flat on the ground (and I'm 6'1"). This cylinder replacement, even with the stubby hex key set purchase, saved me about $140. For those who prefer a tl;dr version/tips: 1.) Buy a stubby hex key kit if the included hex key will not work between the bottom collar and plastic cylinder sleeves 2.) Remove the chair using the included collars 3.) Place chair base and cylinder upside down into a five-gallon bucket 4.) Hammer the cylinder through using the flat side of the hammer (or use a block of wood between the cylinder and hammer) 4a.) A rubber mallet was not strong enough
J**N
Nice Cylinder, Good Support, DOES NOT Work with Steelcase Leap Chair v1 out of box
I ordered this cylinder to replace the cylinder that came with my refurbished Steelcase Leap Chair v1 that I ordered in March 2020. TL;DR The cylinder needs modification in order to work with the Leap Chair v1. You may want to look at different cylinders if that is the chair you have. The cylinder fits in the chair perfectly and seems higher quality that what came with my refurbished chair. The installation kit was excellent, the hardest part was removing the old cylinder from the base. If you don't have a rubber mallet, go to Harbor Freight and get a cheap one. It makes removal much easier and quieter than using a board and hammer. With regards to the Steelcase Leap Chair v1 issue: the plastic button at the top of the cylinder that activates moving the chair up or down is too tall for the Leap v1, the button ends up always being activated. If you take a hacksaw to that plastic button and cut it off flush with the metal cylinder housing it will work. The portion I cut through was all plastic so I don't expect any issues. I did have to put the set screw under the seat almost all the way down after cutting the cylinder activation button. Prior to that I had almost removed the set screw to attempt to get the cylinder to work. When I initially got the cylinder I contacted support and they got back to me within 24 hours and once they had a good understanding of the issue they sent me a second cylinder to try. This cylinder had the same issue when it came to my chair because the issue is not a defect but rather an aspect of the design. I was offered a refund, but at this point I decided to try cutting the button down and seeing if it worked. It did, so I declined the refund. While I wish the process had been a bit faster and it had worked with my chair out of the box, I can't complain too much since my chair works at this point.
B**D
WORKS FOR NOW
I received my office chair cylinder replacement quickly. I'm usually impressed by the fast delivery by Amazon and its vendors. I was cautiously optimistic regarding taking the old cylinder apart from the chair after reading reviews by peoples experiences. I' a good sized cro-magnum 6'3" 230 lbs and the chair had worked well 5 or more years so the cylinder was well seated into the chair frame and base. I had necessary tools pipe wrench, rubber mallet, WD-40 etc... watch a few videos before attempting to remove the defective cylinder, it will help and set some expectations. Put an old blanket or large piece of cardboard down so the WD-40 doesn't get on your floor or carpet or better do it in the garage. After spraying the chair base where the cylinder goes in to it, I firmly tapped each leg of the chair to start loosening things, then turned the chair over and beat it quite hard 8-10 times and the base of the chair came free. Don't be shy about banging on that base. Some videos suggested using a hammer to separate the cylinder from the chair back? not easy to do and a small surface to get at with a hammer. The disks provided with your new cylinder were a great idea. Start by getting some WD-40 around the cylinder. I put one of the round rings around the cylinder as close the the chair bottom as possible, using the longer screws provided, you use the allen wrench to tighten the screw till you feel it's quite snug, then do the same with the other longer screw. It is a slow process but each time you tighten the screw it is slowly pulling the cylinder away from the chair bottom. Be patient and just keep turning the screws in a little on each side. I was not able to use that process to remove the cylinder completely, but I got enough of it away from the chair bottom to use the pipe wrench to twist it enough to remove the cylinder. Don't worry about scaring the old cylinder up get the pipe wrench on it good and if you can't move it with one hand you can hit the wrench with a hammer or get another person to hold the chair bottom so you can use two hands and keep using the WD-40. Once the old cylinder is removed the rest the process is very easy. Put the chair base on the floor with the casters or wheels on the floor. Put the new cylinder in make sure the clip on the cylinder is pointed at the floor. On the other end (MAKE SURE YOU REMOVE THE BLUE PLASTIC CAP) on the top of the cylinder before putting the chair on top of the new cylinder very important. Once you've done that you should be good to go. As others have mentioned and in my situation, this after market cylinder is longer than original cylinder in my chair, it works fine but at its lowest point it is where my original chair would be at the highest point. Just depends how much leg room you have under a desk. One other tip I read was every week or two, raise and lower your chair to move the cylinder up and down, that will keep the cylinder and seals lubricated. Trust me I'm not an engineer, but that makes sense that leaving your chair in the same position for years the seals could dry out, you get a crack and lose pressure in the cylinder. OK Mates... sorry for the long review best of luck. In all it took me maybe 40 minutes to do this
T**A
Grab a pipe wrench and some penetrating oil
First of all. The piston itself is fantastic and sturdy. It is a little longer/taller than my old one so it makes my chair taller at the full extension. I don't mind this, I like my feet to dangle since I put my feet on a footstool. Do make sure to take off the small plastic cap at the top of the metal rod of the cylinder before installing or the mechanism to lift and lower will not work. That being said, the cons have nothing to do with the product itself. The hardest part of this whole process is getting your old cylinder out of your chair. At least, it was for me. After watching a couple videos of how to remove the old cylinder from the chair, I set down to take it apart. Mind you, I'm no small girl at 5'5" and 250+ lbs. Taking the star base of the chair and cylinder apart was easy. I just alternated pounding the bottom part of the cylinder and the star itself until I could pull it off. The casters came off during the process, making my cats scatter in pure terror. So...pro tip. Take off the casters. Next came the detachment of the cylinder from the bottom of the chair. I used the items they gave. The two collar type mechanism where one is supposed to be loose against the bottom of the chair and the second one is tight on the cylinder itself. In essence and theory, the tight collar is supposed to stay still while you thread the bolts through the threads and push the cylinder out of its snug little home. Sounds easy right? It should have been but the tight collar kept slipping for me. Threading the bolts only pushed the tight collar down the cylinder rather than pushing the cylinder out of the bottom of the chair. It was a rather ineffective way to pull the cylinder out for me. Frustrated and with the might of Thor running through me, I got a mallet and tried to lift the chair as I hammered the bottom of the chair. Much to my chagrin, the cylinder would not budge. Even after the application of penetrating oil. I even tried a regular wrench but only succeeded in scratching up the old cylinder. Fast forward two days later and I went to Lowe's and bought myself a 14" pipe wrench. Who doesn't need a pipe wrench in their tool box? I felt like a true, diy woman of distinction as I bought these heavy inches home. As I sat down and put the wrench to the old cylinder, I knew I was going to make it my new female dog. It was reluctant at first and I had to figure out the best position for leverage and I pushed and pulled with all my weight. After about a minute, the cylinder was out. As I belted my yell of victory and raised my hammer...er wrench above my head, I stood over my defeated enemy. My cats could finally live without the fear of loud pounding and they swarmed the enemy to further humiliate the old cylinder. Attaching the new one was easy, simply slipping into place so that I could finally claim my throne. So...tl;dr. Get yourself a pipe wrench, some penetrating oil and some brawn. The product itself is great but the tools provided may or may not work.
K**N
Poor Quality Kit
Poor quality kit and removal collars. My kit was missing one M6 hex head screw needed to hold one of the two collars together, so I had to order an assortment of hex head screws from Amazon to find a screw that fit. It would have been a little more helpful if the kit manufacturer listed the screw sizes on their instruction sheet. The cut threads for one of the longer hex head screws were not cut cleanly and I had to force the screw through the hole, stripping the threads on the screw off. The collars did not budge the shaft from the seat bracket, so I found it easier to remove the bracket and roller assembly from the bottom of the seat and disassemble the piston by removing the retaining clip. Once the piston was disassembled I put some 3 in 1 penetrating oil on the seat bracket, let it sit overnight then wacked the end of the piston shaft with a carpenter's hammer. The piston popped right out of the bracket with one hit. This was the second kit that I purchased from this supplier. I purchased the first kit used and when it arrived one of the collars were missing, there were no screws, and there was a loud rattling sound coming from inside the piston. I returned it to Amazon as is, but somebody should have examined this used kit before it was resold to make certain all the parts were there.
P**K
Unless you want a 2 hour fight using plyers & prybars all while inventing new swear words.....
..get the one with the removal tool! Take all your measurements (twice) and make sure everything will fit. Then use the included tool to take the old chair apart and the new piston is installed in mere minutes, fit perfectly, super easy, and your back to your favorite MMORPG in seconds! This cylinder is strong and stable, holds plenty of weight. Also, I ordered this one because I wanted my chair to be a bit taller to fit my size (after measuring I bought a longer one on purpose, yes you can do that- within reason). Good price and highly recommend! (and no new swear words!)
9**S
Its lifespan only two years.
I purchased this item in October 2023 to replace the leaking original gas cylinder on my computer chair. Installation was very convenient thanks to the included tools; however, its lifespan fell far short of my expectations. The original cylinder lasted four years before it began to leak oil, whereas this product started slowly losing air after just two years of useโmeaning it is unable to maintain its set height. Given that this gas cylinder was not inexpensive, I am extremely disappointed.
N**N
Excellent large chair cylinder
The chair cylinder is perfect so far, it was easy to install (not that chair cylinder's are hard to install anyway). The chair cylinder removal tool at first didn't work the way that the instructions intended, however, using just one of the clamps and using the bottom of the chair for the screws to push off of worked perfectly and was the easiest I've ever removed a chair cylinder. For those buying, you do absolutely need to make sure that this chair cylinder's height matches your old or or at least is fairly close, otherwise you will find your chair is way too high compared to before. You can find the dimensions in the product info or the images.
C**O
Junk that sags from day 1 - don't risk it
After battling with it and finally getting it done it sags. 160lbs on a heavy day, all installed correctly, and I can literally feel it going down as I sit here. I had to bust the retainer clip on the bottom of my old piston to get it off so....now what do I do? Replace and get a refund on this waste of time and effort and leave my chair out of action or just suck it up?? Pfft not impressed.
S**N
Perfect!
Quality, Packing, Instructions and even the accessories were perfect and top quality. Recommended +++
P**.
Works perfectly in 1998 Aeron Miller Classic (Size B)
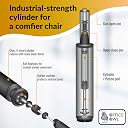
I asked a question about this, and got some feedback that it might not fit my chair, as the taper at the bottom of the cylinder might not be pronounced enough. I saw that the seller offered free returns if the lift didn't fit, and that it fits 95% of chairs out there, so I thought that I had nothing to lose. I've given it Comfort 5*, as it's made such a difference to my chair. The old lift had a cracked bushing, so flopped backwards and forwards, and side to side, and made a hideous clank noise when you sat down or stood up. I gave it 5* value for Money, as it's half the price of the next closest lift, and comes with a fitting kit and gloves. I gave it 5* ease of assembly, as once you've got the lift off the old chair, it's literally a case of dropping it in to the base and then putting the chair seat on top and pushing down. I didn't even have to adjust the offset screw for the height adjuster lever. One thing I will say is that this is *slightly* wider than the standard Aeron lift taper. This has the advantage that the bottom of the lift isn't 3mm off the floor (which is something that always bothered me). It has the disadvantage (if you can call is that) of the height of the chair being ~3-4cm higher on the minimum than it used to be. For me, this isn't a problem at all, and I have a fairly low desk. As with other reviewers, I did have a bit of an issue getting the old lift out - this is nothing to do with this new lift, so I can hardly mark them down for it. I had the same problem that everyone else had, in that the top of the lift won't come out of the chair base. The locking ring slid down the lift slightly as the bolts were tightened. Unlike others, the ring didn't slide down too far - the bolts themselves deformed the top ring, making deep holes in it. In the end, I removed the clip from the bottom (to remove the base and lower shroud). A standard hammer had no effect at all, so I ended up using a sledgehammer. It popped out with a single blow. I removed the seat from the top of the lift using a plumbers wrench. I was unable to do it by hand, but again, a quick smack from a sledgehammer took it right off. At that point it was a case of wiping out the upper and lower holes, putting the new lift into place, taking the plastic cap off, and putting the seat on top. My getting on for 25 year old Aeron is now as good as new!
A**E
Perfect for what i needed
The removal collar works perfectly, and the new cylinder is very strong, adding another 5cm to the total heigh if my chair which is perfect.
Trustpilot
3 days ago
2 months ago