


๐ก Build Bold, Build Smart โ Your Custom Shed Awaits!
The 2x4basics 90192MI Custom Shed Kit offers a modular, easy-to-assemble solution for creating durable outdoor storage up to 22 feet long. Featuring galvanized steel brackets that require only straight cuts, this kit simplifies construction while ensuring weather-resistant strength. Ideal for DIY enthusiasts seeking customizable, scalable sheds with clear instructions and a stylish peak roof design.


| ASIN | B000E3XNC0 |
| Base Material | ['Galvanized Steel', 'Wood'] |
| Best Sellers Rank | #441,542 in Patio, Lawn & Garden ( See Top 100 in Patio, Lawn & Garden ) #1,057 in Storage Sheds |
| Brand | Hopkins Towing Solutions |
| Brand Name | Hopkins Towing Solutions |
| Color | Gray, Ivory |
| Customer Reviews | 4.0 out of 5 stars 1,265 Reviews |
| Door Style | Single Hinged Doors |
| Floor Area | 56 Square Feet |
| Frame Material | Galvanized Steel,Wood |
| Global Trade Identification Number | 00817739010459 |
| Included Components | 39 Connector brackets , Materials needed list , Lumber cut list , Assembly instructions (enough to complete one 7x8 foot shed) , Lumber Not Included - must purchase lumber separately. |
| Item Dimensions D x W x H | 5"D x 11.5"W x 6.7"H |
| Item Type Name | Custom Shed Kit with Peak Roof |
| Item Weight | 4.4 Kilograms |
| Manufacturer | Blitz USA |
| Manufacturer Part Number | 90192 |
| Manufacturer Warranty Description | 2 Year Manufacturer |
| Material | Wood |
| Material Type | Wood |
| Model Number | 90192MI |
| Product Dimensions | 5"D x 11.5"W x 6.7"H |
| Required Assembly | Yes |
| Style | Peak Roof |
| Style Name | Peak Roof |
| Top Material Type | Alloy Steel |
| UPC | 646847239809 817739010459 |
| Unit Count | 4.0 Count |
| Water Resistance Level | Waterproof |
E**N
Large shed is like having an Outdoor Workshop; we bought a second one for storing firewood and trash!
We liked it so much, we are purchasing another one to store fire wood and house Trash so bears and dogs donโt destroy our trash cans (even bear resistant ones they try to take apart, but not in the shed!) Originally, I had a mid-twenties handyman build and complete for a vacation rental home in the Mountains. It turned out well and there is plenty of room for tools, supplies, painting equipment and things the guest doesnโt need access to so we can lock it up and keep the guests and bears out of it. We are added electricity and heat because there arenโt any windows. It is cute and fits together well, especially the floor and the door. We also added a vent, but it is sturdy, handy, the right size, versitle, roomy with storage in the rafters, too, and turns out great with detailed instructions, including the wood you need. No guessing or endless projects filled with excuses and cost over runs!
D**N
It make a project possible for the Basic DIY person
This kit is designed to help the basic DIY builder. You do not have to cut angles or figure out how long to cut the lumber or where to place each piece. Yes the brackets are flimsy, but the function of the brackets is to hold the rafters at the correct angle. We built each rafter assembly on the ground and then attached them to the floor. It helps to have a couple of people to hold them in place until you secure them to the floor with screws. There will be back and forth movement but they had excellent compression strength and they held my 200 pound frame as I hung from it to test it. Once you attach the 3 cross braces the structure will be strong enough to support itself as you finish it. When you install the 4 by 8 roofing and siding the structure will be extremely strong. The instructions were simple and clear, if a bit basic. However they got the job done. Once you get the frame done you really don't need them much. You can youtube how to roof it with your preferred material and best to buy a cheap door and frame around it. I modified mine to be a kids play house. I used it as an opportunity to learn how to tile and practiced by placing a tile floor in it. As long as you make sure everything stays square and level then you won't have any issues.
M**.
Worked good, but instructions not the best
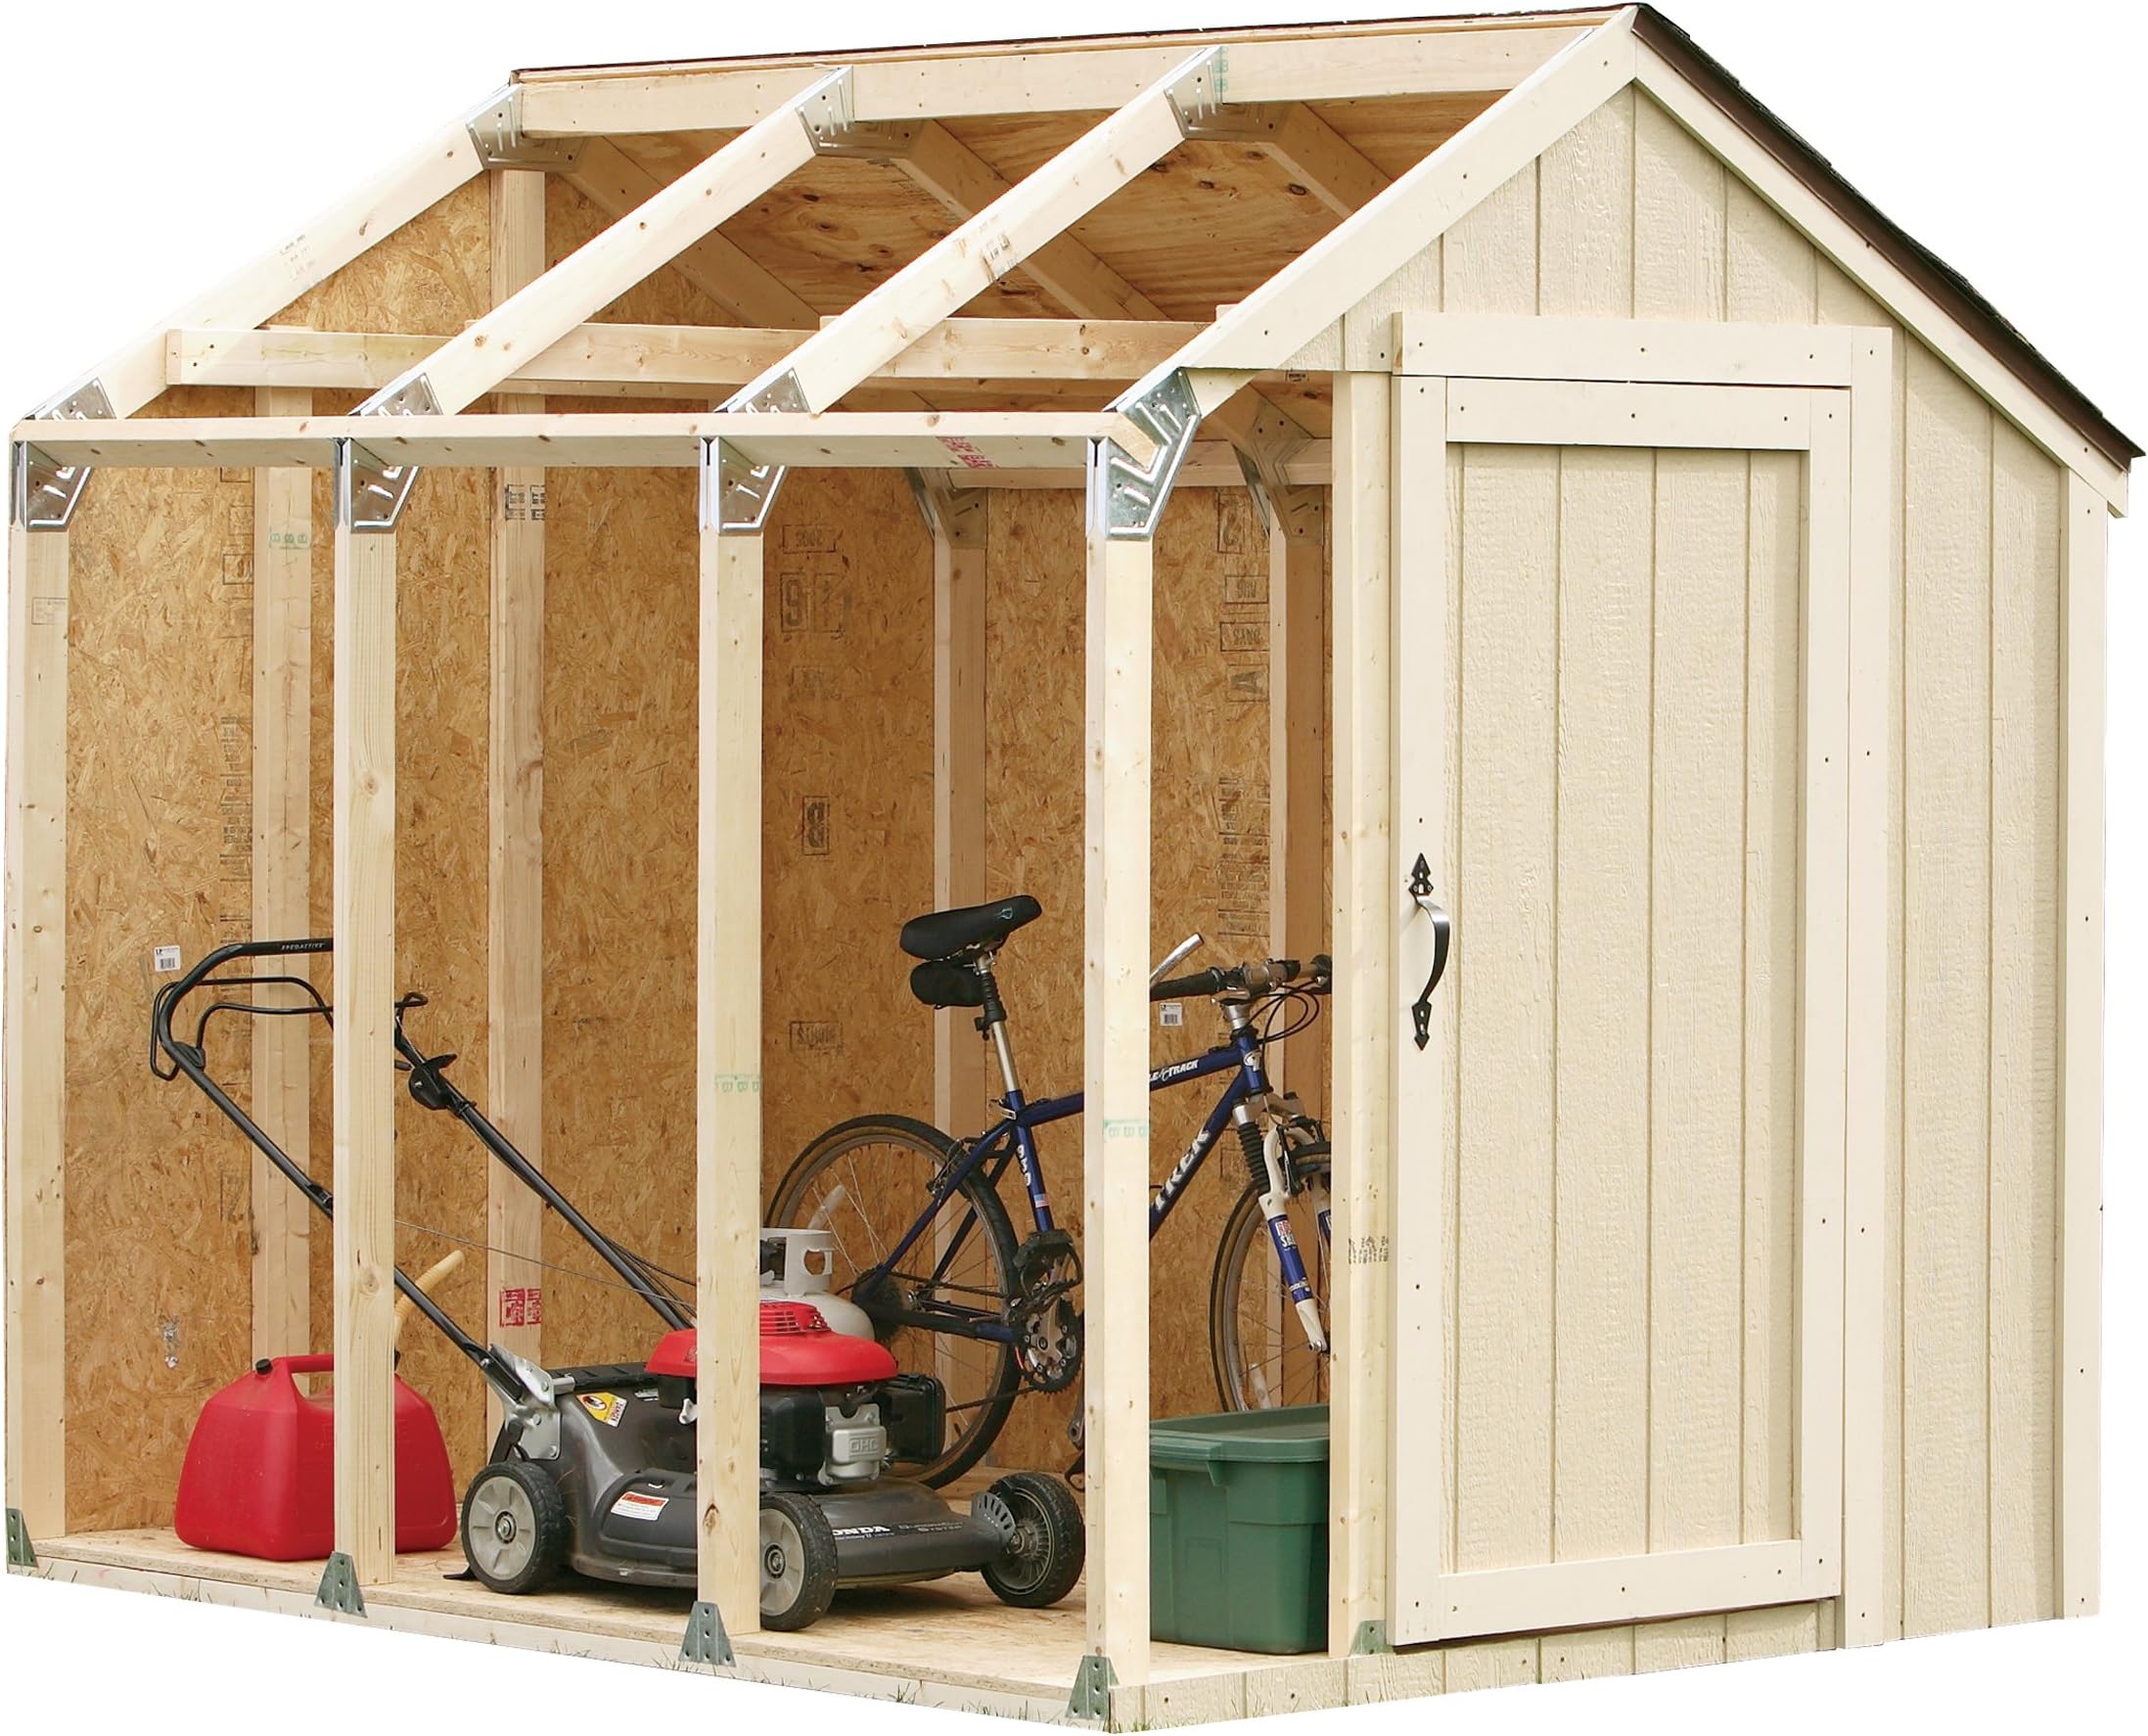
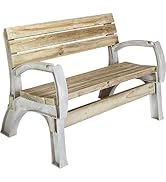
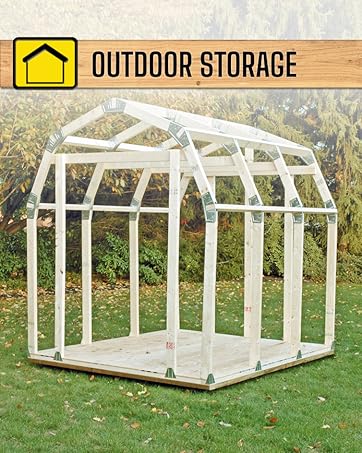
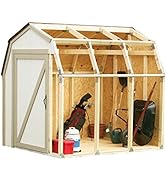
Bought the smaller shed kit that can build a 10x 8 shed, and modified it to a 6x5 without flooring so I can build a well house. So for me, it took a bit of extra time reading and trying to understand the directions, which aren't the best, so I could modify the build. The angled roof brackets are thin, but they are mainly meant as guides to provide the correct angles. I dont think they are meant for anything structural really- the 2x4s do that. So even though you don't have cut any angles on the 2x4s with this kit, I did angle cut the ends so they fit in inside the brackets better, which internet makes it a bit sturdier. For this kit, its a 30 degree slope/cut. Once I figured out the correct lengths of each board for the base, the trusses, and height I wanted it, I pre-assembled the trusses and base. Then I started adding the wall studs. Besides the flimsy anchor brackets included, I bought 2x4 angle brackets to help keep the studs upright. Then I added the trusses, and the 2x4s across the top. I started to add the plywood exterior afterwards. Because this is at a cabin in remote woods, I didnt have the rest of the wood needed to finish the shed, as it was getting late, so the pictures show whats been completed - in 1 day by the way - as of this review. Overall, this is my 1st real project building something, and although I am mechanically inclined, this kit definitely helped in getting this project started. So depending on your own project, take your time, get things prepped with the tools needed and enough area to work in, and measure 3 times because you only get 1 chance to cut correctly. Finally, you WILL need a 2nd person to help at various stages, even if just holding something in place.
A**R
Waste of time and money. Don't do it
Just tried this out when i built another shed. On my last shed i cut and built the trusses from scratch. We were working up in the mountains this time and I thought this kit would save time and hassle for the trusses, but it actually was the opposite. I can truly say i HATE this product. Building my own trusses would have been much faster and easier, and would have turned out better. And much cheaper. The instructions included were confusing and worthless, I ended up throwing them away and just figuring it out. The brackets themselves were very thin and flimsy. I was expecting something in a heavier gauge, made out of steel, instead of the thin aluminum they turned out to be. But I still decided to try them. All they were was a big pain in my butt. If you know how to build a roof save yourself time and money and skip this. If you don't know how then find a friend who does. We built the shed up in the mountains where it can snow 10 feet so we used 12 inch spacing on the walls and roof. These kits are designed for 24 inch center so we needed 2. We marked the header every 12 inches and used wood screws to attached the hardware. Then we tried to put the wall studs in each bracket but had no luck. The thin aluminum brackets needed to be tweaked a little to get the wall studs to fit. We ended up taking the brackets off the header and putting them on the studs first, then reattaching them to the header. Thank goodness i used screws instead of nails. Due to the snow load i didn't feel comfortable with the "no cut" idea of attaching the individual roof beams so we ended up cutting them at the necessary angle anyway to get the most wood in the metal bracket. I ended up shooting a nail into these boards to attach them to the header as well since i didn't trust these flimsy brackets. All in all, this kit was flimsy, had horrible confusing instructions with too many pictures for different size sheds, and not enough written text. It was expensive, hard to use, took much longer, and I didn't trust them to stand up under heavy snow. I am sorry I ever tried these.
J**R
Nice plans but a little flawed
Simple plans once you realize schematics apply to one or the other floor plan. I built the 8X7 model (with lower walls so as to stay within the HOA's height restrictions). The reason for not giving it a 5 out of 5 rating is that: 1) The plans call for a floor that is 8' long and also a roof that is 8' long. Wow! No overhang? No tolerance for walls that may not be perfectly upright? 2) The hardware that keeps the studs upright are not strong enough. You may need a second person to hold things up for you or you may have to add small angle brackets on the inside as you go. I reduced the floor by 6 inches in length. I used almost 5 pounds of 2 1/4 screws. I also pre-drill the holes so that I do not have to deal with 2X4s splitting. Suggestions for other buyers: 1) Use the excessive roof cutoffs for racks. 2) Put a sheet metal angle piece on the exit to save the floor. 3) If the shed will be put on a concrete slab, put wheels on the floor frame (at the time you build that). That way you can push the shed around as you wish. I thought about the wheels too late and ended up put ting2 inch PVC pipes under the shed to move it back and forth to be able to get to the back that was up against a wall. 4) Whatever other plywood cutoffs you have, put them down on the floor. That way you do not waste them (you will have a use for them later on), they help protect the floor and they do not take up any valuable space..
H**R
Makes it easy and quick.
Vary easy to build, By my self I framed a 8x14 in less than a day. We got 50 mph winds over night and it twisted the frame pretty good. I put straps on it and pulled with my truck to straightened the frame. Still windy I put the siding on and the made rock solid. Next day roofed it. 2 1/ 2 days I had a shed. It is now 8 years old and looks perfect with the dessert heat, wind, and rain. Doesnโt leak a bit. People complain about 2x4 not fitting, donโt use green wood.
B**S
Nice kit with effective hardware and good instructions with lots of pictures.
I took my time to build this shed and am happy with the results. The simple cuts are appreciated. My advice is not to get ahead of yourself in cutting the lumber and always check that you are following the instructions for the correct shed size. The instruction booklet covers multiple sizes. As the shed was erected (I did it without help), I found that a couple minor misalignments on my part required adjustments to the lengths of cuts. So as you get past raising the wall frames, start making measurements to confirm your cuts beforehand. Even so, I did have to trim a few installed pieces which was not difficult. The more carefully you measure and true the frame, the more likely your roof with be even on both sides.
C**A
Easy to use very sharp
Worked good I modified the size itโs very easy to use I have never built a shed and it definitely made the process easier instructions could be better but then again a lot of it was useless since the size was different it is flimsy at first but as you continue to build it gets sturdy
Trustpilot
1 month ago
1 month ago