Desertcart purchases this item on your behalf and handles shipping, customs, and support to Kyrgyzstan.
🤖 Build. Control. Impress. The future of robotics is in your hands.
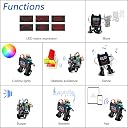
The Freenove Bipedal Robot Kit features a powerful dual-core 133 MHz Raspberry Pi Pico board and Bluetooth connectivity for wireless control via Android or iOS devices. This modular kit includes servo motors, an LED matrix for expressive animations, ultrasonic sensors for obstacle avoidance, and integrated audio components. Designed for hands-on assembly with comprehensive digital tutorials, it offers a cutting-edge robotics experience perfect for tech-savvy creators and professionals eager to showcase their innovation.


| ASIN | B0D255WG7M |
| Best Sellers Rank | #4,482 in Single Board Computers (Computers & Accessories) |
| Brand | FREENOVE |
| Built-In Media | Bipedal Robot Kit |
| CPU Model | None |
| CPU Speed | 133 MHz |
| Compatible Devices | Android, iOS devices |
| Connectivity Technology | Bluetooth |
| Customer Reviews | 4.4 out of 5 stars 19 Reviews |
| External Testing Certification | Não aplicável |
| Manufacturer | Freenove |
| Model Name | FNK0033A |
| Model Number | FNK0033A |
| Number of Items | 1 |
| Operating System | Embedded |
| Processor Brand | Freenove |
| Processor Count | 2 |
| Processor Speed | 133 MHz |
| RAM Memory Installed | 2 KB |
| RAM Memory Technology | SRAM |
| Ram Memory Installed Size | 2 KB |
| Total Usb Ports | 1 |
| Warranty Description | 1 year |
| Wireless Compability | Bluetooth |
K**B
Fun project to build; very educational for the technically minded
This was a very fun project. It requires you to download a zip file, that contains the full tutorial, and includes instructions, and all the software projects. You will be directed to download and install the Arduino Integrated Development Environment (IDE), and all the instructions to do so are reasonably clear. Note: Depending on your PDF viewer, if you've zoomed in on the PDF tutorial further than a full page view, your mouse wheel may not scroll through the pages. You'll want to ensure that mouse wheel scrolling changes pages, because not all pages are listed in the index at the left. You begin by setting up the Arduino IDE and loading a sketch (program) and installing it on the raspberry PI, which will set all the servos to a known angle, after you connect them. Then comes the hardware assembly. There are a few minor mislabels, and you will need some patience, and some tweezers would be useful, as some of these nuts and very very small and need to go into places that were too small for my fingers. Half way through assembly you will be directed how to connect the servos to the PI and turn it on, which runs the program you already loaded to set the servo angles to 90 degrees, so that you can mount the legs in the proper orientation. Once it's all together, the software tutorial starts. They have included a large number of simple programs to load, each of which demonstrates how a single component is controlled (eg the speaker, the buzzer, the led displays, the coloured LEDs, etc). I was already familiar with the Arduino IDE, and controlling hardware through sketches, but I think they did a great job of simplifying it, and walking you through installing and running each sketch. You can either just use them as a set of component tests, or follow into their detailed explanation of how the software works, right down to what signals the IR remote sends, etc. It's not important to understand everything right away, you can go back later and re-examine it all, and learn it as deeply as you like. There are a few glitches and omissions, but for the most part everything was well documented, and easy to follow. eg 1: For the Chapter 1.5 LED matrix sketch, the instructions appear to have left out a library you will need to install to compile the sketch: the "adafruit_gfx" library. Install it when you see the instructions for installing the Freenove_VK16K33_Lib, by following the same procedure. eg 2: In chapter 4, it says "Sketch 04.4_Multi_Functional_Robot.ino is almost the same as 04.3_Multi_Functional_Robot.ino, except that it is added with the music play function." I found that the 04.3 sketch worked fine, but the 04.4 sketch didn't work well - the robot would stop responding after almost any button press, and the music functions didn't work at all in this sketch. As I said, I was familiar with the environment, so I pushed through the entire tutoral in one session, testing each component, and finally running "full control" via the IR remote-control and the phone APP. Start to finish, this took me 4 hours. The robot walking movements are fairly bad, and sometimes it's feet even collide with each other, but this project isn't really about making a walking robot - it's about learning. Learning how to put hardward and software components together, how hardware is controlled via low level software, and learning how to make it do new things yourself. I was really impressed with the whole package, and had a blast playing with it. I would definitely recommend it for anyone who wants to learn, on a detailed level, how things work.
P**N
Fun for programming
Well made for the electronics hobbist. I would like to see more documentation for this unit.
U**R
説明書が英語のPDF70ページ以上
自由研究に買いましたが、解説動画も説明書も全部英語です。
A**O
excelente compra
excelente
G**N
Christmas present
Great model, instructions could be better.
Trustpilot
2 weeks ago
2 days ago