


Buy anything from 5,000+ international stores. One checkout price. No surprise fees. Join 2M+ shoppers on Desertcart.
Desertcart purchases this item on your behalf and handles shipping, customs, and support to Kyrgyzstan.
⚡ Level up your 3D printing game—precision, speed, and reliability in one kit!
The Creality Official CR Touch Auto Bed Leveling Sensor and 5 Nozzles Kit is a precision-engineered upgrade for Ender and CR series 3D printers with 32-bit V4.2.2/V4.2.7 boards. Featuring ≤0.04mm positioning accuracy and compatibility with multiple bed materials, it automates bed leveling for flawless prints. The kit includes versatile mounting brackets and five nozzles, designed for easy installation and over 100,000 reliable uses, making it a must-have for serious 3D printing enthusiasts seeking consistent quality and efficiency.


| ASIN | B09QPFYN6Y |
| Batteries Required? | No |
| Batteries included? | No |
| Best Sellers Rank | 8,884 in Business, Industry & Science ( See Top 100 in Business, Industry & Science ) 210 in 3D Printer Accessories |
| Colour | CR Touch Nozzles |
| Customer Reviews | 4.4 4.4 out of 5 stars (1,204) |
| Date First Available | 19 Jan. 2022 |
| Item Weight | 130 g |
| Manufacturer | Creality 3D |
| Manufacturer reference | EU CL-CR Touch 5 Nozzles |
| Package Dimensions | 10 x 6 x 4.4 cm; 130 g |
| Part number | EU CL-CR Touch 5 Nozzles |
N**C
Excellent upgrade after initial annoying setup.
Fitting & firmware installation simple. Absolute pain in the A*** to setup the Z offsets, but once done this makes using the Ender 3 pro so much simpler to use. Along with the silent board, this is an absolute must upgrade.
D**V
Works great IF you enable everything.
This was easy to instal, especially as I had watched a youtube video right before! If your printer doesn't already have the ability to use a BL/CR touch, You will need to update the firmware! Which is easier than installing the CR-touch! One thing that I had spent hours trying to firgure out! That no one really talks about... I set everything up it and it homed and leveled and printed great.. But it wasn't going up or down using the mesh leveling! You NEED to go into Cura or your slicer of choice and Enable the use of your CR touch! I use Cura, So... Goto, Preferences.. Printers.. Select your printer, Then click Machine settings. Bottom right you will see a window "Start G-code" In that window scroll down untill you see "G28 ;Home" Click there and press enter to make a new line underneath it. Then type... "M420 S1" ... NO "" marks. Then click the X and close the window After setting everything up on your printer, Adding that M420 S1, Everytime you slice your model it will tell your printer to use your auto mesh bed leveling. THEN......... Everything works great!
P**S
Excellent bit of kit
I have an Ender-5 Pro and, unfortunately, I had issues with the bed being uneven or warped - something I'm sure a lot of Creality Ender owners have seen (especially the older models). I first bought the Glass bed to see if this would help, and whilst it did make a bit of a difference, it didn't fix the issue fully. Buying this CRTouch was the best thing I could have done, the installation can sometimes be a bit finicky as I had to download Firmware from the Creality website and edit the file (I searched online for the issue I was seeing, it seemed to be somewhat common). However, installing the CRTouch hardware was easily done. At the end of all this, you still level the bed manually to the best of your ability, and then the CRTouch takes over the rest by probing points of the bed and noting the warping - my prints are much better now!
N**S
life changer, if you do not have one you need one
This is a game changer...life changer. My Creality Ender 3d V2 did not have an auto-level and doing the levelling every time with the paper technique was painful and most of the prints were failing (not sticking on the bed). Installation is quick- very quick - but the instructions on how to upgrade the firmware of the printer to work with it were simply horrible - almost impossible to follow if you are a regular user - very hard even if you consider yourself a techie - really hard to understand what to do if you are not familiar with hacking your devices . i had never upgraded the firmware of my printer so that added extra difficulty. once this is in place, and you calibrate it according to the instructions and save the new profile on your printer, EVERY print performs auto-levelling at the beginning and not a single print has failed ever since. none. I cannot and would go back to a printer without auto-levelling.
M**S
Pain in the backside to install new firmware
Had to follow a YouTube tutorial to follow how to install the hardware. But installing the firmware was such a faff I nearly gave up. Many failed attempts before finding tip to rename file to firmware1234.bin First working attempt loaded firmware that didn't work - couldn't move z axis down. Second attempt with different firmware file worked. But sweaty and annoyed by this point. Shame the creality manuals are so crap. Hardware is good.
L**Y
Makes bed levelling a breeze.
Easy to fit on an Ender 3. Be aware though, that unless you have a Creality controller board, you will need to verify the pin outs before connecting. Also be aware that the pin-outs may not be the same as a BL-Touch. My board (SKR mini e3 v1.2) does not have a 5 pin connector for a probe so I had to de-pin the connector to split it into a 2 and 3. Once fitted and with offsets calculated, and firmware re-flashed, it’s very easy to use. Improved print quality as you can level the bed as often as you like. Good value, durable little probe.
K**S
good product, needs better instructions.
Got this to upgrade my ender 5 to auto level the bed. Used this along side Klipper and a few other components. A bit of a pain to program as there is not many guides but i got it working and it is great. a lot less print fails now.
S**N
Works exactly as hoped
After years of manually levelling, printing "1st layer tests" and live adjusting almost every other print, I finally decided to save myself the headache and just get one of these. If you know how to custom build Marlin I'd advise enabling a bunch of other features such as the tramming wizard and the z-probe wizard, which are absolute gamechangers. You still need to tram your bed somewhat level every now and then, and you're going to have to configure a bunch of custom options relating to the probe position. You can also use the pre-built Creality firmware but as I didn't do that, I can't speak to it's accuracy - latest info I have on these says they don't include the optional features above (but perhaps they do, now). Very impressed.
T**S
Creality firmware or compile your own!
It really made leveling the bed a cake walk. But it is really important to select the correct firmware from Creality or compile your own for it to work as intended.
J**I
Consiglio
Il Creality CR Touch è un sensore di autolivellamento per stampanti 3D che è compatibile con una varietà di modelli, tra cui Ender 3 V2, Ender 3, Ender 3 Pro, Ender 5, Ender 5 Pro e CR 10. Il sensore utilizza una sonda di rilevamento magnetica per misurare la distanza tra la testina di stampa e il piano di stampa e quindi calcolare gli offset di livellamento. Questo processo è automatizzato, il che significa che non è necessario livellare manualmente il piano di stampa prima di ogni stampa. Mi ha migliorato notevolmente la qualità delle stampe. I vantaggi del CR Touch includono: Livellamento automatico del piano di stampa: questo elimina la necessità di livellare manualmente il piano di stampa, che può essere un processo laborioso e dispendioso in termini di tempo. Maggiore precisione: il livellamento automatico consente di ottenere una maggiore precisione nelle stampe, con meno probabilità di problemi come gli strati non uniformi o le stampe che si staccano dal piano di stampa. Maggiore facilità d'uso: il CR Touch è facile da installare e utilizzare, anche per i principianti. I potenziali inconvenienti della CR Touch includono: Prezzo: la CR Touch è più costosa di un tradizionale sensore di livellamento manuale. Richiede una stampante 3D compatibile: il CR Touch non è compatibile con tutte le stampanti 3D. Richiede l'aggiornamento del firmware della stampante: per utilizzare il CR Touch, è necessario aggiornare il firmware della stampante. Nel complesso, il Creality CR Touch è un ottimo sensore di autolivellamento per stampanti 3D. Se stai cercando un modo per migliorare la qualità delle tue stampe il CR Touch è una buona opzione da considerare.
F**T
harika çalışıyor
tablası tam düz olmayan ender 3 v2 de bile sorunsuz baskı alıyorum, mükemmel bed leveling yapıyor. kesinlikle tavsiye ederim.
J**B
Prima product
Makkelijk te installeren als je het juiste moederbord hebt vanaf hardware versie 4.2.2 of 4.2.7 als je die ook moet plaatsen vergt het wel wat programmering.
K**Z
Das wohl beste Upgrade für jeden Drucker!
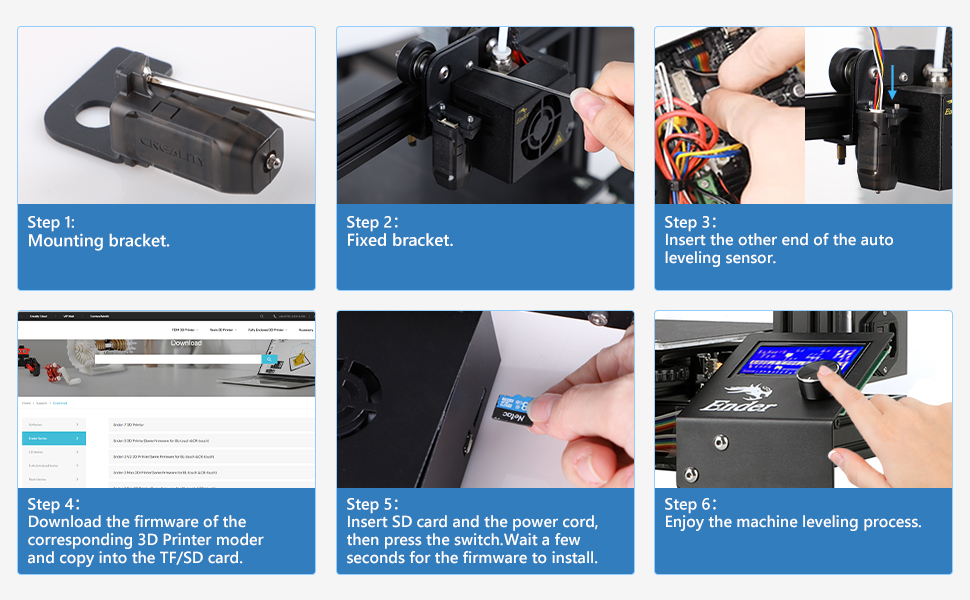
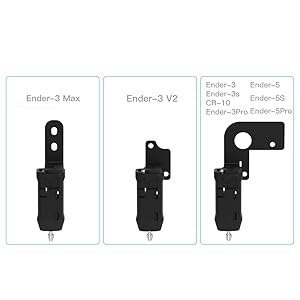
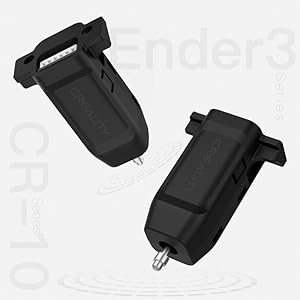
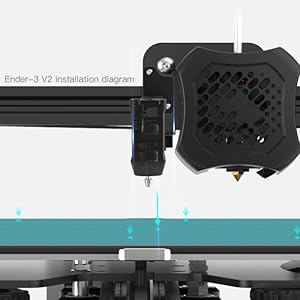
Zusammenfassung: Das wohl beste Upgrade, was man in jeden Drucker verbauen kann! Der Einbau dauert ist in ca. 20 Minuten erledigt und die Firmware anzupassen ist durch unzählige Videos und Forum Beiträge ebenfalls schnell erledigt. Für 45€ bekommt man hier ein Upgrade, welches einem Das Leveln des Druckbettes fast komplett abnimmt. Ich kann es jedem der noch kein Auto Bed Leveling verbaut hat nur dringend empfehlen eins zu kaufen und zu verbauen, denn die Erfolgsquote steigt und die erste Schicht sieht immer perfekt aus. Also kommen wir zu dem ausführlichen Teil. Bestellt habe ich mit den CR-Touch für meinen Ender 3 V2. Dieser läuft zum Zeitpunkt der Review auf Marlin 2.1.2.Nach dem Auspacken sieht man direkt das alle benötigten Teile im Karton enthalten sind. Die diversen Halterungen passen auf verschiedenste Ender Drucker, welche ich jedoch nicht benötigt habe, dass ich diesen direkt mit dem Mod vom Hero Me Gen 7 MS2.1 verbaut habe. Der Einab ist zwar sehr einfach jedoch etwas fummelig das man den "dicken" Stecker durch den gesamtem Kabelkanal durchbekommen muss. Mit etwas Geduld war jedoch auch das nach ca.10 Minuten erledigt und ich konnte ihn am Drucker montieren. Danach muss die Firmware richtig eingestellt werden. Ich benutze dafür Marlin 2.1.2 wo es genügen Videos auf YouTube und ca. gibt die alles Schritt für Schritt erklären. Danach hies es die Firmware neu flashen und siehe da, er fährt aus! Beim ersten Mal muss man dann erstmal den Z-Offset am Drucker einstellen und alle 4 Ecken noch einmal grob per Hand Leveln, dazu habe ich mir die passende Funktion in Marlin aktiviert, sodass ich es direkt über das Display am Drucker machen konnte. Danach habe ich das Bett das erste Mal gelevelt, da habe ich mich für ein 4x4 Muster entschieden, also 16 verschiedene Messpunkte. Alles verlief ohne Probleme und die erste Schicht sieht absolut perfekt aus. Wichtig, bei mir gab es Probleme das, das Mesh zwar erstellt wurde, beim Druck dann aber einfach nicht benutzte, solltet ihr also Marlin benutzen aktiviert unbedingt die funktion "#define RESTORE_LEVELING_AFTER_G28" ansonsten verliert er nach jedem Home wieder das Mesh + schreibt in die letzte Zeile eures Start G-Codes M420 S1, damit lädt er das Mesh erst in dem moment wo der Druck beginnt. Also zu guter Letzt, es bekommt von mir eine klare Empfehlung, es funktioniert seit etwa 2 Monten ohne die kleinsten Probleme und verrichtet seine Arbeit immer zuverlässig. Jeder der also drüber nachdenkt sich einen CR-Touch zuzulegen, der sollte es jetzt tun und sich dieses nervige Leveln ersparen!
Trustpilot
1 week ago
2 months ago