


๐๏ธ Elevate your collection game with Oskar โ where style meets storage mastery!
The Atlantic Oskar 1080 is a large-capacity, engineered wood media storage cabinet designed to hold up to 1080 CDs or 576 Blu-rays with adjustable shelving and a slim footprint. Its laminated finish offers easy cleaning, while the extended base and included wall anchors provide enhanced stability. Ideal for organizing diverse collectibles, it blends effortlessly into modern home or office spaces and comes with dedicated US-based customer support for a seamless ownership experience.


| ASIN | B0058O8GUO |
| Additional Features | Adjustable & fixed shelves to maximize storage space, Easy-to-clean laminated surface, Extended base & included wall mount anchors for added stability, Flexible shelving options to hold optical media and other collectible items, US-based customer support team offers voice/email support |
| Age Range Description | Adult |
| Assembly Instructions Description | The product requires assembly. Follow the instructions provided in the user guide included with the cabinet. |
| Back Style | Closed Back |
| Best Sellers Rank | #875,834 in Home & Kitchen ( See Top 100 in Home & Kitchen ) #1,442 in Storage Cabinets |
| Brand Name | Atlantic |
| Color | Espresso |
| Customer Reviews | 3.9 out of 5 stars 5,929 Reviews |
| Finish Types | Laminated |
| Furniture Finish | Espresso |
| Included Components | Cabinet side panels, Cabinet shelves, Cabinet backboard, Assembly hardware, Wall anchor brackets, User Guide |
| Installation Type | Wall-Mounted |
| Item Depth | Shelf Depth = 4.5" | Base Depth = 9" |
| Item Dimensions | 45 x 14.25 x 7.5 inches |
| Item Dimensions D x W x H | 9"D x 40.25"W x 72.5"H |
| Item Type Name | Media Storage Cabinet |
| Item Weight | 62 Pounds |
| Manufacturer | Atlantic, Inc. |
| Manufacturer Part Number | 38435714 |
| Manufacturer Warranty Description | 1-year limited. |
| Material | Engineered Wood |
| Material Type | Engineered Wood |
| Minimum Required Door Width | 36 Inches |
| Model Name | Oskar |
| Model Number | 38435714 |
| Mounting Type | Wall Mount |
| Number Of Shelves | 1 |
| Number of Items | 1 |
| Number of Shelves | 1 |
| Product Care Instructions | Wipe with Dry Cloth |
| Product Name | Media Storage Cabinet |
| Required Assembly | Yes |
| Room Type | Hallway, Home Office, Living Room, Playroom |
| Set Name | Oskar 1080 |
| Shape | Rectangular |
| Shelf Thickness | 1 Inches |
| Shelf Type | Tiered Shelf |
| Size | Large |
| Special Feature | Adjustable & fixed shelves to maximize storage space, Easy-to-clean laminated surface, Extended base & included wall mount anchors for added stability, Flexible shelving options to hold optical media and other collectible items, US-based customer support team offers voice/email support Special Feature Adjustable & fixed shelves to maximize storage space, Easy-to-clean laminated surface, Extended base & included wall mount anchors for added stability, Flexible shelving options to hold optical media and other collectible items, US-based customer support team offers voice/email support See more |
| Style Name | Freestanding storage cabinet |
| UPC | 031742357145 |
| Unit Count | 1.0 Count |
J**S
One of the best gaming storage centers I have found
I have a decent sized gaming collection of over 1500 physical games from a large variety of gaming consoles I have collected over the years. I purchased two of these cabinets to help me with storage. I also have two other storage cabinets that are much shorter. I have a lot of good things to say about these cabinets, and just a couple of issues with them. Let's discuss the good first. GOOD POINTS 1) The cabinets shelves are just right for storing games, blu-rays, etc. They are at a good depth so that the games are not hanging over the edge, but not so deep that space us wasted. 2) The shelves are adjustable for height, at least for the most part. (One of the issues will be discussed under the not-so-good points.) So not all video games cases are the same height. These shelves all adjust height, which is perfect for some of the more unique video game requirements. All of the standard sized cases fit within 7 inches of shelf height. In the PS4, Xbox One, Switch generation the cases are not as tall. You can either shorten the shelves to make space, or stack the games flat with their spines out if you have too many. The issue comes with games like Sega Genesis and Nintendo 64. They are not nearly as tall and they have rounded tops that makes stacking them difficult. To solve this I was able to split the shelves into 3.5" height and then store those games on their flat bottoms. It works very well and keeps dust out of the contacts. I know there are cases you can buy, but I currently have 88 N64 and 50 Genesis games and it's just too expensive to buy cases for all those games. 3) Once the units are assembled they are very stable. They even have a way to attach them to the wall if stability is a concern. Without the shelves in place the cabinets can seem a little flimsy. But the shelves are part of the structure, and once they are in place everything firms up quite nicely. 4) I really like the look of the units. They are clean and sleek looking and fit really well in the room. Also since they don't stick out far into the room they are efficient and compliment my collection rather than dominate the wall as some cabinets I have tried in the past. NOT-SO-GOOD POINTS 1) The top, bottom and middle of the units is not as flexible for placing shelves. The holes on the sides for placing shelves stop quite a ways before the top and bottom of each section. This means you have to plan your needs to have taller items in those areas, whether you like it or not. So that means you are forced to have taller shelves in four areas of each cabinet. It's not terrible, but it is something to be aware of, especially if you are trying to keep games from of smaller size or of same manufacturer grouped together. 2) This is a small but annoying problem you should be aware of when putting everything together. I recommend studying the diagram very carefully so that you don't put anything together upside down. Pay attention to the holes for the sides and how they should orient together. Also know that the bottom goes on before the back, which creates an issue with getting the back nailed on since the unit wants to come apart in the middle since the front of the unit is not flush with the bottom (it's the back of the unit that's flush). My first cabinet did not go together so well because I did not fully understand what the diagram was showing me and because one of the metal twist rings that hold the top on crumbled The moment I turned the screw. The second one was much easier. Fortunately when the back is on and the shelves are in place it firms up nicely. Just be careful moving the unit when the shelves are not in it. Please understand that the good points far outweigh any not-so-good points. If I ever get rid of my other game cabinets I would not hesitate to get another couple of these shelving cabinets. I highly recommend them for storing games and movies.
A**.
Looks good, decent quality. Easy assembly
There are some terrible reviews of this on YouTube. This works pretty well, it comes with plentiful shelling so I am pretty certain you could fill it with only CD cases and Have enough shelves. Some of the holes for the pegs that hold the shelves up were oversized but were oversized but only a couple out of the entire assembly. I did not have any issues with shells falling down The unit will be very flimsy without the back on, you should put the unit face down to hammer the back on, do not try to do this with it standing up because you're not going to get it aligned correctly The wood is very thin, easy to overtighten things so just take your time period I do not expect this to hold up to abuse but once assembled if it is not beat on or climbed on, I would expect it to last a decent amount of time The dowels that align the wood sides together were Undersized. They wobbled around in the holes but I used a bit of wood glue and they seem to be holding just fine now. This is very tall and shallow so be sure to affix it to a wall, do not trust it to be free standing. The space in this goes fast so I have not tried it yet but I'm considering ordering the smaller versions of this to stack on top For the price I don't think you can beat this, any storage unit that is going to be bigger or better built will easily be triple the price of this
K**E
Complete Garbage; DO NOT GET THIS!
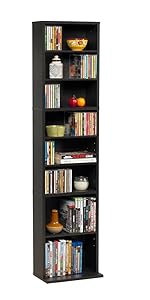
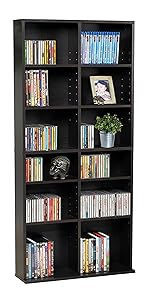
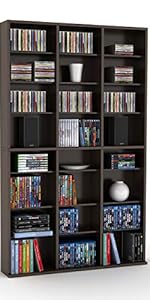
I was not looking for "premium" furniture. After all, I was looking to get a shelving unit for my DVD and Blu Ray collection on Amazon. I knew it would be particle board or the like and it would come "some assembly required" and all that. I wasn't looking for anything fancy -- just functional. In the realm of sub-prime, built-it-yourself pieces, there are "inexpensive" pieces of furniture, and their are "cheap" pieces of furniture (which may or may not be inexpensive). But, few feet below those categories, lies "crap" furniture. The Atlantic Oskar 1080 Media Storage Cabinet lies somewhere near the bottom of the "crap" furniture pit, awaiting its next victim. From the instructions not being clear (causing several "back-up and try again" moments), to the fact everything about this unit screams "lowest bidder," the product fails to impress on any level. The unit comes top and bottom halves, which are held together with a sort of lock-bolt and screw mechanism. I have used this type of connection before, but in those earlier instances, the screw portion goes into wood. These go into plastic inserts within the boards which, as you can probably guess, are not in tight enough to get a good grip on anything. This is because the boards simply do not have enough material -- enough wood -- for anything to grip onto. As a result, after getting this together, I went to stand the unit up, and the two halves came completely apart, breaking several of the verticals. Two things about standing this thing up: (1) when you assemble the unit, you must keep it lying flat on the ground with the finished edges up. This is not made clear in the instructions. It was not until I was trying to put the bottom of the cabinet onto the verticals and realised that the forward facing lip of the base has to be facing up to do this, that I realized my mistake; and (2) once the top shelf and base are affixed to the verticals, you have to somehow turn the whole thing over, have the lip on the base hang over something so you can keep the unit flat, and affix the back panels. There are many issues here (that lip being a major one). But remember above when I said that there is very little material to the wood? Yea, now consider the miniscule brads that are used to put the back boards on and consider how well those are going to grip keeping this back on and you can see the other major issue. Oh! And those backing boards? Yea... the unit comes with two of these. One covers the top half and the the other the bottom half. Do you see a problem here? Neither did I at first. It was not until I went to stand the unit up that it became evident. Since the unit has such flimsy connectors holding the two halves together, and the backing boards are split along these halves, there is no rigidity to the two halves -- they are not a unit in any way, they are effectively two free-floating pieces that are intended to be stacked... held together by hope and a prayer. As my wife and I stood the unit up, the two haves (now under a modicum of pressure), completely split apart, with the screws and plastic inserts breaking free, cracking and breaking the pseudo-wood in the process. After a few choice curse words were uttered, I took the two halves, separated them, then looked at the damage to the boards. With a lot of glue, I have managed to Frankenstein the two halves together (some parts of this are not very pretty, but I put those broken parts against a wall and have decided to ignore it for now. Rather than using the wall anchors as depicted in the instructions, I put one at the top of the bottom half, securing the middle horizontal to the wall, and one at the top of the top half, securing the top horizontal to the wall. It is secure. This thing will due for now. At some point, I will replace it with something that is designed and manufactured to a higher standard. I know... that does not really narrow down the field very much -- if at all. But I am too tired and too frustrated to deal with the idea of trying to return this dumpster fire. Atlantic is a company that will not be getting any more of my business.
B**C
Read this again before assembling
Brief- I recommend this product for many reasons detailed below. Just wrote a longer review so people know what they are getting and getting into. I had assembled a couple similar ones in the past but it was long enough ago that I had to re-learn some lessons. Keep reading and it will save you time and (maybe) trouble. Long: Assuming you already bought this then read before assembling. If you haven't yet then there are a few things you would want to know prior to purchase. First -- For those who are about to build the unit: In step 4 they indicate not to overtighten the wood screws (T). As the unit is made of particle board, overtightening the screws might cause the wood to split. This is potentially a cosmetic problem but not a major issue. What the instructions FAIL TO MENTION is that in step 3 it is CRUCIAL not to overtighten the part "P" bolts. The fitting into which they insert is plastic while the bolts are metal. Years back, similar products used a metal fitting, but no longer. Therefore if you tighten the bolt it will continue to screw into the fitting and leave an insufficient amount of length for part "R" to clamp to. If you make this error it is easy to fix by backing "R" out a bit. Best practice if not in a well lit room is to tighten R using a flashlight to see the residual air gap between it and the board. Once this is no longer visible STOP. Tolerances are very tight and any further will lead to the unit being unstable as these joints will separate when under any strain. The other tip is to have an assistant available for at least 5 minutes at the end of the assembly process with a work-around indicated in the text below if you do not. ---- As to a review of the actual product. There is good news and bad news. The (not very) bad news is that an identical unit purchased 10 years ago was of better overall quality - the shelves were deeper and thicker (not an issue as the weight they hold is minimal) with better hardware to keep them in place. The current metal pins for that task are smaller while the holes they go in are not so they are apt to fall out until you actually fill the shelves to put some tension on them. It just takes a bit of patience putting them back in but in the end they work fine. The shelf depth becomes a consideration if you have this in a public space since they now measure a hair over 4.5 inch rather than just under 5.5 in. As a result, the ends of dvd/blu ray/CD cases will overhang the end of the shelf which may not be cosmetically pleasing to some (on the upside- no dusting!). That's really it as far as bad news. The good news is that this does what it is supposed to, isn't unattractive and will hold a fair number of items. It will arrive in a fairly unwieldy package. I will repeat this a couple of times to make sure the point gets across. This is a large heavy object prior to and after disassembly. The shipping weight is 65 lbs. In a pack or suitcase that's not a problem to get up several flights of stairs. In a box this size and without handles it is a two person job unless you are in a situation where you can cut the box open and take the larger pieces up first and the rest later. Just something to be aware of. One really big piece of GOOD NEWS is that the box is thick cardboard with considerable foam packing to keep all the pieces from moving around during transit and while not indestructible it should survive being dropped from low heights during transit. After all the reviews of similar items I read complaining about damage which happened prior to arrival, I didn't take this as a given. Unless they drop it out the back of the truck or drive the truck over it, you should be ok! You will need floor space larger than the final size of the unit to be able to assemble it (for those who haven't before). The instructions have you assemble the whole item face up (finished side up) then flip it over to put the back on it. (as an aside my unit conveniently had the stickers on each part located on the inner face of each piece making it less likely one would end up with it pointing the wrong way [but this wasn't specified in the instructions]) Assembly was straightforward and should take 30-45 minutes with a screwdriver and hammer (a little longer if you are a newby and/or alone). Apart from getting the parts up the stairs, you really only need an assistant for about 5 minutes of that time to get the unit flipped over and from horizontal to vertical. Flipping the unit over is a bit problematic, particularly by yourself. Once all the shelves are in the unit will have considerable structural strength. It's actually quite solid (read heavy) and my other one shows no signs of aging. Barring water damage these are likely to outlast me. HOWEVER, until the shelves are in and PARTICULARLY prior to getting the back on the thing there is not much in the way of torsional rigidity. So it is possible to damage the unit (or have it come apart temporarily) while moving it with the back off. This is more likely to happen if you are doing it by yourself and the unit is, therefore, under greater stress. As I was working alone I departed from the instructions (NOT recommending this course of action, just saying it will work). I built the top of the unit (including putting the back on carefully) then built the bottom and had that upright first and subsequently lowered the top onto it (resting the latter against an adjacent wall with a protective blanket between it and the wall). Once I lowered the top unit onto the base unit I tightened the fasteners between the two and put the back on the lower half (the latter not being nearly as easy as doing it flat but doable). It really helps to have three hands and the wall acted as that. This avoided putting strain on the unit during assembly. If you do it flat be advised that the base is wider than the rest (so it won't tip) and when you roll the unit over so it is "face down" this will leave the middle unsupported. It is best to have something to put underneath it to help support it so that the junction between top and bottom halves is not unduly exercised (particularly as you are about to beat on the back of it with a hammer to get the nails in place). YMMV. One more thing to be advised of. The screws which go through the bottom of the unit have holes for them to be started in BUT not tapped for the screw heads. Therefore the heads of the screws will protrude slightly from the bottom of the unit (remember they said to not overtighten to avoid splitting the wood). If this is going in a carpeted are or on a rug, no issue. If you plan to place it on a wood floor then self adhesive furniture pads (small) to cover the screw heads are a must purchase.
J**R
Do not overtighten screws.
I am using these shelves to organize all of our garden seeds. It is perfect for alphabetizing and visualizing seed packets so that you can easily find garden seeds needed for planting year round. The wood is simulated maple made from compressed wood particles and adhesives. It is not solidly built like solid wood furniture of old, however, it has the advantage of being lightweight and looks good in storage, with plenty of cubby holes for organizing and collecting items of interest. I find it perfect for garden seeds, as I can quickly visualize and get what I need without going through a couple of hundred seed packets in several bags every time I want to plant something. I do recommend slowly and carefully hand tightening all screws and lockdown nuts, as it is very easy to break the wood by overtightening. Also, the middle will easily buckle when laying flat for nailing on the backing board. To prevent this I would recommend using a little wood glue on the dowel rods and lockdown screws in the middle board to secure them, once you are sure all the pieces are put together correctly. All told from opening the box to completion it took me about 3 hours to put this shelf together taking my time the whole way. For the money I would certainly recommend this item. Again just take your time putting it together, hand screw in the pieces so as not to overtighten and break any wood, and use a little wood glue on the connectors and wood dowels for the middle shelf to assure that it doesn't buckle.
T**T
Good product if you can assemble it correctly
This is the same as the Atlantic 38435617 Oskar sold for the past 10+ years. Only difference is the part/model number listed in the Amazon description. Like the previous Oskar, this can be challenging to assemble. The main problem being part "R", the locking screws. Those need some extra pressure and torque to lock, but not so much that you damage something. If these aren't properly locked, the whole unit will be wobbly and might collapse when you turn it over to nail the back cover on. Even if they are locked tight, it's best to nail the back on with the unit standing up. Once the back cover is nailed in place and the unit secured to a wall, it's fairly sturdy and can handle music/movies/games without a problem. Adding 1" L-shaped brackets all around the corners can make it more rigid if the locked screws get ripped out during assembly. Quality furniture is expensive so you can't expect too much from these cheap things. With that said I'd rather pay a little more for a better design, something without the locking screws and wooden pegs that hold the two halves together. Better instructions would be nice too. The drill bit size needed for the drywall anchors supplied isn't even specified (it's 1/4"). Final complaint: the packing Styrofoam always breaks apart inside the box into tiny pieces that cling to everything. Taking all the wood out of the box creates a huge mess with everything covered with a layer of fine dust and bits of white packing foam. I really wish the manufacturer would change the shipping box design as well.
D**.
To assemble easily and without breaking anything!
Important! How to assemble-- I bought these for the size and capacity and read the comments about how to put together so it doesn't snap. I thought I figured it out for the first one, it snapped, then I figured it out for the second one and it went together in 30 minutes quicky, smoothly, and with NO issues. No breaks, nothing. And looks great. Below, I have tried to make clear the steps I followed for a very successful build--bear in mind, the other comments were helpful, but did not make the steps clear. Here is how to do it, from someone who is not skilled, but was able to build in 30 minutes with no problems: 1. Build the top first. And that means connect the top piece of wood as well. Build with the finished side facing you. 2. Turn over. 3. Nail the correct backing to the top. 4. Now, work on the bottom. Build with unfinished side up. 5. You are "changing" from the instruction page here. 6.The wooden sides are opposite the instruction picture because you need to building this bottom section with the unfinished side up. This is key. If you don't, it will snap when you turn over. It is unconnected, unsupported, and if you follow the instructions, it HAS to snap. 7. You need to build this opposite way so you can nail the back on it easily for support. This is the Holy Grail bit of advice for building this--if you follow, it will be perfect. 8.Just keep the same wooden sides next to each other like the picture, but in reverse since it is upside down from the instruction photo. Translation: the letters on each piece of wood need to be next to each other like the picture, just turned so that the shelving pin holes make sense. If I can figure that out, anyone can. 9. Because the base sticks out, it won't be flat when unfinished side is facing up. That's another snapping issue. 10. I used 7 of the little shelves to place under the sides to "level." 11. Screw in the sides, and level them as well for support. 12.. You should be ready to join the 2 13. BUT here is where it can snap. 14. Put levelers (I used the styrofoam and cardboard from box to make the Bottom half as high as the the unconnected top half (which should still be on the levelers.) 15. Slide the bottom over to the finished top--which is heavy and supported. 16. Note: I put some wood glue on the wood pins, but it does not matter. 17.Both halves should be same height, and you should be able to position the bottom (unfinished side up) into the pins without any problem or stress whatsoever. 18. Push together and tighten those cam bolts. 19. IMPORTANT 20. Nail the second backing panel into the back. Use all the nails and make secure. 21. Congratulations, the hard part is over. 22. It should be stable, but I turned it on its side, and slid it to where it would be resting. 23. I did this by myself, and it was perfect. The problem with all the other reviews saying build it side first and nail on the backing--they did not say when you had to change from the instructions, and that created confusion. I hope this helps! It certainly made it easy for me, and I just ordered 2 more. When built like this, it really was as advertised!
O**L
Excellent quality and appearance at this price point.
We ordered this unit, despite all the negative reviews. We are VERY happy with the product! Package arrived in great shape - a few "bruises" but zero damage to any of the parts. All the parts and required hardware were in the box. Yes, the broken bits of styrofoam packing makes a mess, but it did its job of protecting the contents from shipping damage. Assembly is not complicated, as long as you read the instructions, study the diagrams, and take your time. All the pre-drilled holes lined up properly and were in perfect condition, NONE of the connecting hardware pieces broke or pulled out during assembly. Standing the unit upright after nailing the back on was a little scary - we could feel some "flex" in the structure, but it held together fine. Moved unit into position, and attached the "anti tip-over" brackets. After that, the whole thing felt very secure and stable. Despite being constructed from "cheap" materials, the finished product looks very nice in our media room, and will provide much needed storage. Now we just need to decide on optimum shelf spacing for storing a combination of CDs and DVDs, and get it loaded!
Trustpilot
1 month ago
2 weeks ago