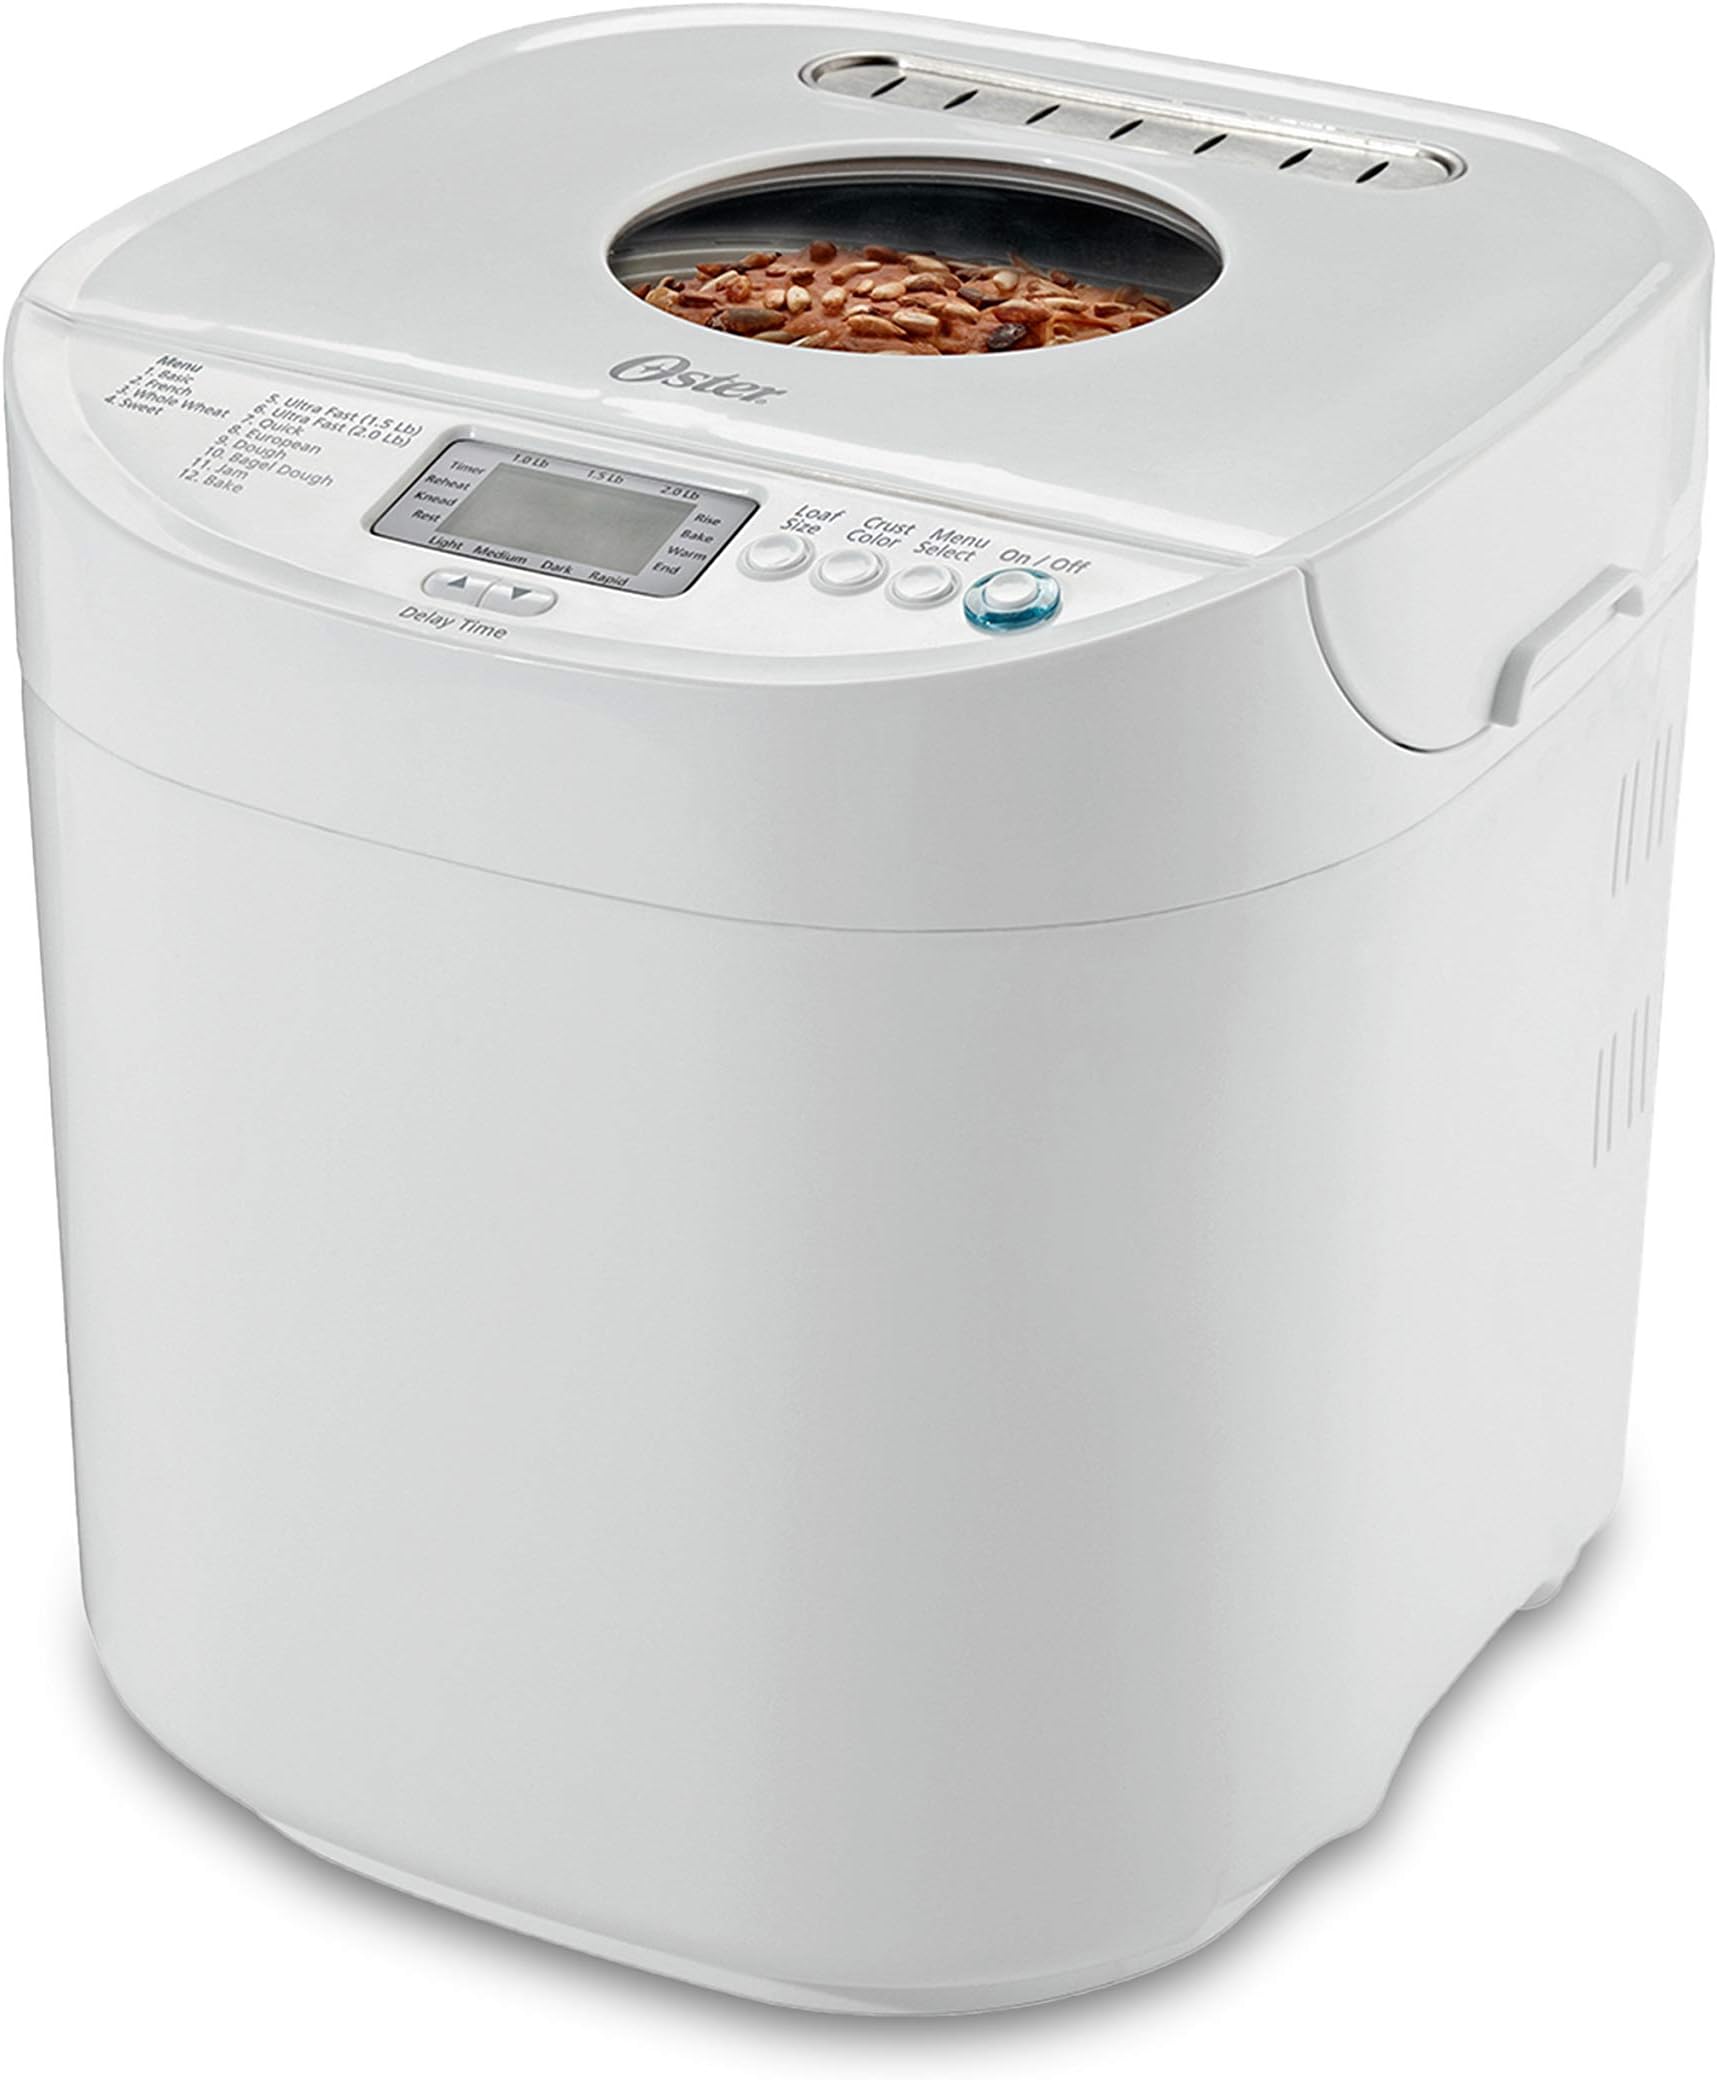


Oster Expressbake Breadmaker, 2-lb. Loaf Capacity, 2 lb, White/Ivory
Product ID: 300878
Details
- ColorWhite/Ivory
- Item Weight8 Pounds
- MaterialAluminum
- Product Dimensions14"W x 14"H
- Voltage127 Volts
⚡650W Power
🍞2 lb Capacity
⏱️Expressbake < 1hr
🍞 Rise to the Occasion with Every Slice!
The Oster Expressbake Breadmaker is a powerful 650-watt appliance designed for families, featuring a 2-pound loaf capacity, 12 customizable settings, and an express baking option that delivers fresh bread in under an hour. With a user-friendly interface and a programmable timer, this breadmaker makes it easy to enjoy homemade bread anytime.


| ASIN | B003GXM0EM |
| Best Sellers Rank | #653,209 in Kitchen & Dining ( See Top 100 in Kitchen & Dining ) #202 in Bread Machines |
| Brand Name | Oster |
| Capacity | 2 Pounds |
| Color | White/Ivory |
| Customer Reviews | 4.4 out of 5 stars 9,153 Reviews |
| Global Trade Identification Number | 10034264431925 |
| Included Components | Breadmaker |
| Item Dimensions D x W x H | 14"W x 14"H |
| Item Type Name | Oster Expressbake Breadmaker, 2-lb. Loaf Capacity |
| Item Weight | 8 Pounds |
| Manufacturer | Oster |
| Material | Aluminum |
| Model Number | CKSTBRTW20 |
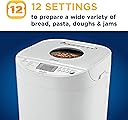
| Number of Programs | 12 |
| Part Number | CKSTBRTW20 |
| Product Care Instructions | Hand Wash Only |
| Product Dimensions | 14"W x 14"H |
| UPC | 049500819538 034264431928 |
| Voltage | 127 Volts |
| Wattage | 650 watts |
M**U
Saved money! Saved health!
Bought: March 3, 2013 @ 59.99 Date of this Review: November 12, 2015 Status of this breadmaker: Showing its age but still chugging! I have been relocated by my company (together with my family) here in the US from Singapore. We moved to New Jersey around Nov, 2012 and we have been buying loaves of bread from our nearby supermarket daily @ $2.50 a pop 5 times a week. Over the couple of months we noticed that we are feeling a bit "down" thinking it was just us adjusting to the weather but we were also gaining weight every month. So, trying to be "healthy" we started reading the labels of each food we buy and noticed a LOOOOT of ingredients that looked like from a science fiction/medical drama series (see attached photo). So we thought of making our own bread from scratch but didn't want to spend a lot of time kneading and rising the dough everyday. Enter this bread machine and some research enabled us to save money and in turn saved our health. For the money saving part, we sourced the following ingredients: Walmart: Great Value Flour 25-Pound - $8 (37 servings) Great Value Powdered Milk 4-lbs - $16 (64 servings) Zulka Morena Pure Cane Sugar, 8 lbs - $5 (128 servings) Great Value: Vegetable Oil, 1 Gal - $5 (64 servings) Augason Farms Iodized Salt, 104 oz - $5 (623 servings) Amazon: Bob's Red Mill Gluten Flour Pack of 4 of 22-ounce each - $23 (83 servings) The Ready Store: SAF Premium Yeast 16oz - $7 (48 servings) Note: Per 1 serving denotes 1 loaf of 1.5 lb bread. So per serving of all combined ingredients above costs me $1.012! (Savings: $1.488). So in less than 2 months, I already made back the cost of the bread machine. So after that and 28 months later today - this breadmaker is still baking strong even after roughly 500 loaves of bread (20+/- loaves a month) with a total saving of around $700+. That said, we felt better after a couple of months and lost some weight. Even our dog likes our freshly baked bread - note that she NEVER EVER touched the ones we bought from the store. Not to mention the great sensation of smelling the loaves you bake - it's freshness! And a dab of butter on a freshly cut loaf lifts up your morale even more! The other best thing about making your bread at home - you can go beyond that simple loaf of bread! Add nuts, add eggs, add spices. Turn it into pumpernickel. Turn it into hoagies. Into fresh baguette. Into basically...anything! I bought the "The Artisan Bread Machine" here in Amazon and delved into more creations. We can now make anything the fancy bakeries out there can make WITHOUT the unspeakable ingredients. Pros: * Durable * Can make a variety of loaves with your desired setting * It takes only around 5 minutes to dump in the ingredients then it mixes and bakes * Never failed to make the perfect loaf (only if you put in the correct ingredients in the correct order) Cons: * As it ages (more than 2 years old now), the non-stick coating is fading but that's to be expected * It doesn't do laundry Bottomline: If this breaks - I'm buying it again and hopefully the same quality as before. Worth the money and ROI pays off quickly. Better health knowing you know what goes in your bread > Priceless! ---------------------------------------- Update: 2/1/2017 After almost 4 years - we have to let go of this beloved bread machine of ours. Not because it stopped working, but because we once again have to move to a country of different voltage and would deem impractical to bring this along. So almost after 4 years - it is still working and will hopefully find a new home (donated to the VVA). Definitely, if I ever found the same brand, we're buying this again. This is a final revision of this review - This bread machine has given us wonderful bread (and some bad ones - our fault) and wonderful memories. And thank you for the helpful comments that helped us and others. Hope this would help more people in the future.
W**L
Makes great bread; I just have to improvise a bit.
Follow the Oster recipe. I did that. Twice. More or less. After reading people's experiences here and elsewhere, I added vital wheat gluten - 7 tsp. for 4-2/3 cups of 100% whole wheat flour. I also added 2 TBS oil because the Oster recipe was inexplicably missing it, though they had oil in their other bread recipes - I think it would have stuck to the pan in the mixing without it. And 1/4 cup of flax and sunflower seeds and oats. It looked dry during kneading, so I added 3 tsp of water, one at a time. The ball looked fine after that. Because my first loaf came out like a doorstop - it didn't rise even to the top of the pan - I followed other advice here and put the pan with the dough in the oven to rise - set the temp at 170 and left the door open. It rose just to the top of the pan. Then I baked it in the machine. Same result as the first loaf. Tastes good enough, but very dense - like I said, the black hole of bread. All my ingredients are fresh, and except for the above-noted changes, I followed the recipe exactly - same amount of flour, brown sugar, yeast, salt, water. Disaster. But I didn't buy this thing just to knead the dough, and then have to put the dough in a bread pan in a regular oven. So at the moment, I don't know what's going wrong. I don't think more gluten and yeast are going to help - more would probably hurt, actually. I used Whole Foods organic whole wheat flour - the recipe didn't specify a certain brand, and I doubt that could make much difference. What I want is a loaf much, much closer to the kind that, say, Dave's Killer Bread makes - whole grain, seeds and stuff, and pretty light and fluffy for whole grain bread. I'll try a few more loaves, and if they keep coming out this way, I'll be returning this thing as non-functioning. UPDATE: 4/6/16 Upgrading to 5 stars. If only because this thing walked itself off the kitchen counter, fell to the floor, the lid came off and skidded across the floor ... and I put it all back together, no plastic broke, and... IT STILL WORKS!!! Helps that the kitchen floor is wood, but still...I mean, that's worth 5 stars all by itself. OK, so that happened. My only quibble is the display - it doesn't light up and the overhead lighting has to be just right to be able to read it. Not that the timer matches what the manual says is supposed to be happening, but to me that's just another one of those irrelevancies, as you'll see if you keep reading. I've just about started to break even on making bread versus buying it. The loaves are getting better and that's because I've started using white whole wheat flour - still whole wheat, just the white variety of wheat instead of the more common red. Makes all the difference. OK, not all - I've had to increase the gluten (maybe a quarter-cup, and yes, I'm lucky gluten and my body understand each other) and yeast. The manual has a recipe that calls for 3 teaspoons of active dry yeast for 100% whole wheat bread but 5 teaspoons fast-rising yeast for Expressbake white bread. So I began using 5 teaspoons of fast-rising yeast in the normal bake 100% whole wheat. After all, fast-rising is the same as bread machine yeast, and this is a bread machine, is it not? Fast-rising needs only one rising, but normal bake has three, so fast-rising yeast + three rises = high-rise 100% whole wheat bread, right? Right. As in, beyond your wildest dreams. Of course, I look at instructions that say bread-making requires precise measurements and I think, "as if" (which is why I flunked algebra - twice - it's a lifestyle thing...) - "precise" means "just a suggestion." So each loaf is like a mystery to me - if it fails or succeeds, I don't know why. Kind of like life, huh? Full of wonder, right? I do things like, oh, set it for whole wheat, let knead for the first 5 minutes, turn it off, do it again, and again, then let it go through the program. I figure whole wheat kneads more needing - er, needs more kneading. Then when finishes its last rise, just before it begins baking, I take the dough out and pull out the kneading blade - the holes it leaves are too big. So I get results like, well, for a while I was getting loaves that rose up to the lid and stuck there - not conducive for browning. I wonder what measurement did that ... actually, I probably should say "measurement," maybe it's something to do with, like, algebra? Plus they were so big that I couldn't get to the handle. So I had to pull the handle up some by force, which took off part of the crust, then decided to just leave the thing in there and set it on bake. It would be nice if you could use my experience as an object lesson, but I have no clue what I did to make the bread do that, so I can't tell you what not to do. Except maybe to not look at measurements as "measurements." Good luck! UPDATE 4/7/16: The photo speaks for itself. Despite my best efforts, this little, much-abused machine turned out a stellar loaf of bread. Light, chewy crust...huge. UPDATE 11/1/16: Got tired of oversized loaves, and the bread tasted too yeasty, so cut back on the yeast to 3 tsp - and that worked. The crust browns nicely when it isn't squashed against the lid. One thing still bothers me: the cycles don't start and stop at the times given in the manual. Most important, the first kneading is supposed to last 5 minutes - it goes for 7 minutes, so that's OK,. But the second kneading is supposed to last 20 minutes - it doesn't; it lasts only 14 minutes. The 2 extra minutes in the first kneading doesn't make up for this shortened time. This is serious - bread depends on the kneading to make the best loaf. And my loaves are pretty dense, even for whole wheat with all kinds of added ingredients. So as I said above, I get the process going, then stop it in the middle of the second kneading and start all over again. Seems to work better. But really - Oster ought to check into this. It's been happening since Day One, and falling off the counter didn't change anything. After the whole wheat cycle is done baking, I still bake it on Bake (#12) for another 15-20 minutes - seems to need it. Otherwise, I'm happy with the machine, glad I have it, and it still warrants 5 stars. UPDATE 5/6/18: OK, don't ever do this: accidentally turn the bread machine off just as it's about to enter its final rise. I kind of brushed the button with my sleeve - no, really! - and it turned itself off. *&^^$$@*(!!! OK, look in the manual - like for power outage. The manual tells you what to do but you have to do it within 6 minutes of the outage: unplug the machine, then plug it back in and hold down the start button for 3 seconds and release, and the machine should start up where it left off. If only. Maybe it's because I turned the thing off - I should have accidentally flipped the circuit breaker. Anyway it didn't work. Now I'm having to let the dough rise in the oven - I warmed it up some, turned it off - no idea what temperature, and no idea what temp the bread machine uses. So I set it to 170, the lowest it can go, let it warm up to maybe 100, turned it off, opened the door - so it's rising nicely. Since I don't know how well it's rising - like, forming giant bubbles, rising too fast? - I can only guess and take it out when it gets to its usual machine rise height, then put it in the machine and use the Bake setting (#12). And see what happens. But really - there should be a way to set the machine to start at any step of the way - how complicated could that be to make? Maybe it's something that's available only on expensive machines?
C**Y
Super Excited!
Like many reviewers here, I've made my own bread in the past, but wanted a bread machine for the "set it and forget it" model of bread-making. This one looked easy to use, flexible in its capabilities, and affordable. It just came in the mail today (ahead of the book of recipes I also ordered), and I couldn't wait to make something with it! I took it out, set it up (cleaning two pieces, super easy), and read over the sections of the book that seemed relevant. It's clear it was written by someone who knows the English language and isn't a hack-translation. For a first shot, I went with the first recipe that shows up in the manual that many people poo-poo for not being good. But uh oh! I was out of butter and had no milk powder! After some googling, I found you can generally replace the water in the recipe with milk. And, as with other bread recipes, other oils can replace the butter (vegetable, olive, etc). PHEW! I precisely measured 1 cup milk + 3/8 cup water (who the heck comes up with 3/8 anyway?) and 2 tbs of olive oil to replace the butter. In it went. I went down the list of the other ingredients and added them in order, skipping the milk powder. The dry ingredients completely covered the wet ones at the bottom. I made a well in the flour and put the yeast in there so it didn't come into contact with the salt, as some people have warned. Medium crust and hit GO!!! I wanted to see how the machine worked following the rest of the manual exactly. No scraping the sides. No lifting the lid. Where I live, the humidity and elevation do not muck up other recipes, so I figured it should all go as planned. The result? After the first 5 minutes of mixing, there was still a bit of flour and such at the corners of the bowl. After the 15 minute mark, the dough had formed a perfect ball, not a spec of flour or anything else on the sides. I was amazed! I don't know if other recipes will work out as well, but following directions and measuring everything very carefully, as the manual states many times, it seems to work well. Another reviewer mentioned a weird beeping that occurred during the cycle (and woke him up in the night when he had set the cycle to go). The book doesn't mention it explicitly in "Bread Machine Stages" list, but that's the extra ingredients step that most cycles have. It scared me at first, but once I knew what it was everything was okay. The bread just came out and it looks and tastes awwweeeesooooome! My husband and I give it 5 stars. It's big and fluffy and yummy. No pockets of non-mixed ingredients on the inside, no flour or other stuff on the outside. It's firm enough that I can cut it into thin sandwich slices without totally smooshing it, but soft and airy on the inside. The crust is crunchy, but not hard. The mixing spatula was left in the bowl when I took the bread out, and it didn't make much of a hole in any one piece of bread. So... the first recipe works fine if you do it right, and bread making is all about figuring out what works for your area anyway. All I have left to clean is a few crumbs in the bowl and on the mixing spatula. Much easier than regular bread and took about as long to make!
C**C
Makes great whole grain bread (I've included a recipe for THIS machine)
I bought this because I wanted to start making healthier bread than what I could easily find at the store. I made a couple breads from the included recipe booklet, but primarily I’ve been making my own whole-grain sandwich bread. I’ve been using it for about a year and make roughly one loaf every week. It works GREAT, much better than I had anticipated based upon what others had told me about using bread machines. One thing about bread machines is that recipes need to be tweaked for each different machine. So, here’s my recipe for my whole grain bread which has half the salt and half the sugar or a store bought whole grain bread – it’s gotten rave revues from anyone that’s tried it (and my four year old even eats the crust). ====================== 2 c + 4tsp whole wheat. (325g) ¾ c whole grain multigrain of your choice (135g) 4 tsp gluten 3 Tbl dry milk 2 Tbl brown sugar ½ tsp salt 7/8 tsp Red Star quick rise yeast --- 9 oz water 2 Tbl olive oil --- #3 (whole wheat setting), 1.5lb, medium crust (or light if you prefer) --- Mix and soak (rest) all ingredients besides yeast overnight covered in a bowl. Warm to 80F if necessary, add yeast, and mix yeast into dough by kneading several minutes. Add more flour (or water) as necessary during kneading. Start bread machine. Remove paddle right after shaping (when 1hr 40min left), spray post with oil and replace dough; shape as necessary. =========================== The key to super soft and fluffy whole grain bread is to let everything except the yeast rest overnight so that the moisture can penetrate the grains. Then I knead for 5 minutes with a mixer (do 8 minutes if by hand). Even though the machine will technically knead the bread, I’ve found that you REALLY need the extra kneading to get the gluten out of the whole grains. Another trick is to remove the paddle from the machine right after the last rise. In whole wheat mode (#3) that happens at 1:40 so I just set a timer to alert me (you will hear the paddle spin a few times). The way I do it is I take a little olive oil spray and spray my right palm lightly – this will help keep the dough from sticking to your hand so you don’t upset the shaping. Open up the lid and put out the pan and just flip it upside down and drop the dough into your oiled hand. Then take out the paddle. Next spray the post that the paddle was on. Then just plop the dough back in (reshape it LIGHTLY if needed). Then when the bread is finished, you will have a very very small hole that will only hit one slice of bread! Now, there will be some bread that sticks to the post and the easy way to get that off is just to let the pan cool down for 5 minutes. Once it’s cool, that little bit of dough that cooked onto the post will pop right off. Although you can leave the bread in the machine, I recommend taking it out right away or moisture will condense and the bottom of your loaf will get a little soggy. Overall, this makes a great loaf of bread and is very consistent. There are a few downsides to this bread machine. The one I hate the most is that if you accidentally unplug it, it will NOT remember where it left off when you plug it back in. So if you have this plugged into the same outlet as your mixer, BE CAREFUL when you unplug your mixer so you don’t accidentally unplug the bread machine. Also, this machine will beep at you when it’s time to add nuts and dried fruit. How well it does this is entirely dependent upon the recipe. If you are doing a really light bread then it will work. But if you are doing a whole wheat or any kind of heavy bread I don’t feel it does a decent job of incorporating the nuts and fruit. Instead I take it out after kneading and knead in those ingreadients by hand to make sure they are fully incorporated. FWIW – I find that a 1.5lb sandwich loaf basically rises to the top of the pan or maybe slightly more. This is roughly 5” wide, 7” long and 5” high and for me yields 16 slices of bread. A 2lb loaf will rise significantly above the pan.
F**Y
I'm a French bread obsessive compulsive! Help me, Obi Wan Kenobi!!
2nd EDIT 2/17/2015 Success! I "found" the solution to better tasting French bread and texture! After making suitable adjustments for an slight overise/crash issue, I adjusted the yeast down to 1.5 TSP of Saf Red, 1 leveled TSP of sugar, 1.5 cup water, 3 TBSP EVOO and 1.5 TSP salt for a 2lb loaf. PLUS 1 level TSP of Hodgson vital wheat gluten!! Unlike the Con Agra bread flour from Costco I've used for years, many "bread flours" simply do not contain enough gluten to give loaves that real bakery bread crust and texture. This simple addition produced excellent taste, texture and crust. The loaf is still moist and chewy with a crispy crust after 3 days at 6000 ft altitude and high desert humidity. This is now my "go to" recipe for outstanding French bread. Too many "grocery store" bread flours don't have sufficient gluten; others are expensive. Look into the six pack of Hodgsons gluten as an economical fix/improvement for "dry, cracker tasting" French breads. My next attempt at an improvement will be to use the darkest setting for crust color. I've made them at "medium" so far. 1st EDIT 2/14/2015 In the last 24 hours, I saw the price go from 69.99 back down to under $62. This a lot like Vegas! Orig Review: I'm giving a full five stars on this machine. Here's why: My trusty (very trusty) old Welbilt ABM 100-3 The Bread Machine, a Japanese made 1.5 lb machine took a long walk off a short counter. Sadness! Being very heavy and almost all metal and heavy, thick glass... and the floor a vinyl covered slab of concrete, the result was not pretty. But since it had done so well, for so many loaves and decades, it deserved a worthy replacement. Cheap at 62 bucks (Feb/7/2015) delivered and brimming with rave reviews, this Oster CKSTBRTW20 2-Pound Expressbake was to take over duties for old R2D2 (as they were nicknamed.) By the way, R2D2 STILL WORKS! Ok, onto the new Oster. My fav bread is French or Italian traditional. Most recipes for this bread are almost identical. The machines makes the differences. For example, in R2D2, you put the yeast first, then dry stuff and finally water/oils. Opposite from Oster. But this machine does extremely well!! I saw few reviews of french bread so I crossed the old fingers and prayed for the best. After a cleaning/"burn off" breaking in run on Menu 5, I loaded in proper order... 1 3/8 (later added 3 TBSP water) room temp water, 3 TBSP EVOO (for nostalgia,) 4 leveled cup of Gold Star Best for Bread flour, 1 1/2 TSP Morton Sea Salt, 1 heaping TBSP powdered sugar (on hand but granulated is fine,) and finally 2 level TSP of Saf Red Active dry yeast. Machine was set on Menu 2 French, 2lb loaf and Medium crust color. Let me add that I'm at nearly 6000 ft altitude and it's dry here. Also out of the ordinary is a minor mishap with the beater blade which came loose as I was fiddling with the dry ball and trying to get the flour out of the corner. As a result, I restarted the machine so the dough ball got a few more minutes of knead time than normal. Waiting begins. It's pretty quiet. I forget to check on the progress; especially the final rise. When the final beeps sound, I check the result. Hmmm. It over rose and hit the lid a bit then fell back to a bit over top of pan level. Not so bad. How's it look and taste? After cooling 30 minutes or so, DAMN excellent French bread with a medium browned crisp crust and an even texture top to bottom, left to right throughout! One of the best French breads I've ever made! Not like the corner Italian bakery with open hearth, coal fired vintage brick ovens I grew up on for 50 years in Chicago, but damn good! Some things I've noticed. Gold Star bread flour tasted "tasteless flat" in the old R2D2. Hodgson's and King Arthur seemed a bit more flavorful and were also OK, but 20lb bags of ConAgra unbleached bread flour from Costco seemed always the best all around. I've been using, until lately, Red Star active dry yeast (also from Costco) before this new Saf. Even with the Saf, the flours seemed tasteless in R2D2. Help me out maybe, someone? With the Welbilt ABM 100-3, 1.5lb (R2D2) I used 1 or 3/4 TBSP yeast (both brands,) 1 TBSP salt, 3 TBSP EVOO or corn oil, 1 TBSP sugar and 3 cups of the various flours. Usually, the pan over and rose crashed badly also. I am going to try the first standard solutions (cutting back the yeast and/or sugar) and see how it goes. What I CAN state is that the Oster performed perfectly and made a very delicious French bread, but now two pounds worth! I see that a few days after I purchased, it went from 62 to almost 70 bucks. Some folks may pause a bit at the increase. Don't fret! Buy it now. While a lot lighter and more fragile than old R2D2, you can do much more, and get excellent results, with this machine. I read many other machines, regardless of cost, may give less than stellar results. A lot depends on the person as well as the various machines. These Oster reviewers seem the most knowledgeable bread lovers and give good, honest comments. One last thing I am missing with the old Welbilt... it has a cool air fan boosted cool down cycle. This really keeps the loaf from getting soggy and spreads godly great fresh baked bread aromas throughout the house. With the Oster, a good amount of condensation forms under the lid and may drip onto the golden goodness. Just extract the bread when the cycle is done. WEAR MITTS! lol For full disclosure, I have an old KitchenAid Professional 6qt mixer and do electric oven baking bread on occasion. Don't be a hater! lol Bread masters... any advice on the over rising? Remember, this was my first loaf and at 6000 feet altitude. Go Oster!
A**N
Now I can bake in the summer!!
I live in Phoenix, so using the oven from mid-May through mid-October is avoided like the plague. I love to bake, so I found myself saying things like "Well, when it gets cooler, we can make cornbread." or "When it cools off, we'll bake a batch of zucchini bread." I put off doing something I love because of the weather! I keep asking myself why we live here... but that's off topic. Now I can bake year-round! Using the Oster instruction manual, I baked the Expressbake White Bread 1.5# loaf as soon as I opened the box. I had fresh bread, in July, within two hours of Amazon's delivery! I tried the 3-hour bake vs. the Expressbake, and I think both are great... so I'll stick with the Expressbake for our daily bread. Why wait? The bread slices beautifully and we use it just like a normal loaf of bread we would buy from the store. Seriously. Even my 11-year-old prefers homemade bread for his sandwiches now... PB&J, turkey & cheese, and it makes fantastic grilled cheese! Using quality ingredients (i.e. King Arthur Flour, etc) a loaf of bread now costs me $1.55 per loaf (for the white bread listed above) vs. $3.99 or more from the grocery store, minus all the bad ingredients and preservatives most of us can't pronounce. I also purchased The Bread Lover's Bread Machine Cookbook (also through Amazon) based on customer reviews. I wanted to get the most out of this bread maker. I have now made raspberry jam, white sandwich bread, apple walnut bread (from the Oster book; great toasted), light rye (Oster book), pasta dough, pizza dough, (both on dough setting) and a wonderful Banana Bread quick bread (no yeast) from the Bread Machine cookbook. Because this machine's kneading blade is meant for kneading, it does NOT mix batters properly. So if you decide to make banana bread, corn bread, or cake, etc. you will need to mix all of the ingredients in a bowl FIRST, then pour into the bread maker bread pan, MINUS the kneading blade (you won't need it) - you will skip to the "Bake" function for these types of recipes. The "Quick Bread" is like a "Cake" cycle called for in some recipes - but because this maker does not mix, you will pre-mix the batter then pour it into the pan, then select the "Bake" cycle (about an hour) instead (no mixing in the bake cycle). Like normal baking, you will check the bread at the end of the cycle with a toothpick. For example, the banana bread was not done at the end of the cycle, so I restarted the Bake cycle and set a timer for 10 minutes, then rechecked the bread. It took an extra 10 - 15 minutes to finish this bread and it is one of the best banana breads I've ever made. This machine would make an excellent gift for a shower, birthday, wedding... especially along with the cookbook. I think it would even work great in a dorm room or in a barracks room (those who allow cooking in your room, but easy to hide in a locked wall locker with all the ingredients). Easy to clean. Easy to use. Saves you money. Healthy for your family. Worth every single penny.
A**R
Highly Recommend Oster 2 Pound Breadmachine
I bought this Oster 2 pound bread machine 2 years ago and just love it! It is easy to use and with things like Pintrest there are so many diffrent bread recipes and recipes you would never think to use a breadmaker for like pound cake for example, at least I didn't. I use mine often or should I say I get on bread making sprees when I use it everyday for a month, then get burnt out and give it a rest for a couple weeks then use it for 6 weeks until the scale is now yelling at me so away it goes again for 2 or 3 weeks, by then hopefully my scale is done yelling at me. I like to bake my bread in the oven a lot and it really is no more work to do it that way. It's nice to sometimes show off and have your loaves appear that they have been made all my hand, including all the mixing and kneading, though I do love the feel of yeast dough in my hands, it last for about 45 seconds then I'm tired of kneading by then. This is one of the reason I love and use the Oster breadmachine, for it has a dough cycle which I use all the time and nobody has a clue they all think my bread is hand made step by step. Most all the breadmachines have a timer so you can put all your ingredients in the machine for example when you go to bed, and then hot fresh wonderful smelling bread is waiting there for you when you roll out of bread. That's great and all for your family with all your meals but if you are the one that's always chosen, like I am now, to bring the bread for work potlucks and all the family gatherings, you want everyone to think you have been slaving in the kitchen all day and night to bring them wonderful bread right, so you can't bring a loaf that has that square bread machine shape to it. You want it to look like you did all the mixing and kneading, like I said, and were there babysitting it during all the rises. I received a breadmachine years and years ago, I didn't use it much it seemed unreliable and the bread not consistent in flavor and texture like Osters, and don't remember it having the dough option. This is where the Oster does all the heavy lifting let's say, because it does all mixing and kneading and the first rise all on the dough setting it just does not bake it. If you prefer it to also bake it for you it does that too no problem and I still use that mode when I'm busy and making it for my family. If you want it to look homemade all you need to do is take it out after the dough cycle complete and let it rest for 10 minutes covered with a cotton towel just on the counter, I read this was a good thing to do but sorry I don't remember why. After it has had its 10 minute rest then gently shape it into the type of loaf you want, but don't man handle the dough and over work it, read that too. After you have taken a minute or two and it is in the shape you want on a cookie sheet, oven tile, pizza pan, (use corneal on the pans first if baking on those), or shaped into a bread pan, cover again with cotton towel and let it go through its second rise and when that's done place in the oven and inhale that wonderful smell while its baking away. I'm sure all the directions for that are included in the manual you recieve with this wonderful breadmaker. So I would recommend this and would buy again, and it seems everything is made so cheaply now with plastic to fall apart but as I mentioned, I using this frequently, daily at times, for two years and still works great. And it make great loaves every time too, not just every other time. So buy, enjoy that heavenly homemade bread smell throughout the house and the taste in your mouth, you won't regret it at all.
D**.
Comparison of Zojirushi BB-PAC20 vs Oster CKSTBRTW20 (pros and cons)
I am new to bread making and bread machines. I wanted to make low carb bread in a bread machine instead of baking by hand so I purchased the Oster 2-Pound Expressbake Bread Machine Model: CKSTBRTW20 based on positive reviews and more importantly, the price (~$50). I thought I would try making simple white bread a few times to get used to the machine and the process before I attempted to use expensive low carb ingredients. I baked 4 loaves in the Oster and none of them turned out well. They tasted good and rose well but all flopped during baking. For each subsequent loaf, I used the troubleshooting steps in the manual to improve the next loaf (i.e. extra water, less flour, proofing yeast, fast acting yeast) and nothing improved. As for all bread making, I was very careful in my measurements. All loaves rose but flopped during baking, making them very difficult to remove the pan from the machine AND removing the loaf from the pan. When the bread flopped, the crust formed over the handle and the only way to remove the pan from machine or the bread from the pan was to crack the top crust off the loaf on one side. The paddle also left a huge hole in the bottom when removed. By contrast, the Zojirushi BB-PAC20 is a major improvement over the Oster. I decided to use up another bag of bread flour to try this new machine by making regular (full carb) bread. So far, the first two loaves turned out perfectly. I made a simple loaf of white bread from the manual and then a loaf of egg/challah bread from their website. For the first loaf, I used measuring cups/spoons and the second, I used weighted measures. I used a kitchen scale and a scientific gram scale for sugar, salt and yeast. The egg/challah dough was so wet and sticky, I had to restart the machine 3 times because I kept adding so much flour and wanted to ensure proper kneading time. I understand that challah dough should be tacky but not sticky but to get to that point, I needed to add almost a cup more of flour. So either the recipe and/or the machine are very forgiving because it turned out beautifully. I just attempted my first loaf of low carb bread in the Zojirushi using the gluten program and medium crust. It seemed to work ok but needs some tweaking the program to get a better dough prior to baking. I had to double the recipe I was making by hand because the Zojirushi does not make 1 lb loaves. After slicing, the low carb bread did rise, but was very dense and had a strong alcohol smell, similar to rubbing alcohol. So this recipe definitely needs some tweaking. Overall, even though the Zojirushi machine is larger and more expensive, it produces better, more consistent loaves of bread than the Oster. PS - my friends are loving my bread making experimenting. Since I can’t eat regular bread, I am giving them away to friends until I perfect my low carb bread making. My conclusion: Keeping the Zojirushi and returning the Oster. Zojirushi BB-PAC20 Pros: * produces a long, horizontal loaf which makes normal-sized slices for sandwiches; also loaf fits into standard twist-tie storage bags * bread pan handles stand up so no chance of getting baked into the bread * two paddles for better kneading * top browning element yields beautiful bread * extremely quiet and no thumping around on the counter * better more clear user guide and DVD * user defined programs; can create a custom program to include a shape step to remove the dough to shape the loaf * paddles do not leave large holes; paddles also slide out of bread easier so the holes can be closed up better which leaves very small holes on outside crust * lid sensor pauses action so lid can be opened to check consistency or shape dough Cons: * Price; at $275 it is 5 times more expensive than the Oster * size; much larger footprint and heavier than the Outer * no lighted display so depending on ambient light, may need to use a flashlight * The woman in the DVD has the most annoying voice and mannerisms. It’s only 15 min long so I watched to ensure I was following the procedure. Oster CKSTBRTW20 Pros: * Cost; at $50 it was one of the lowest priced bread machines on Amazon * Size; small footprint so fits better in tight spaces Cons: * flopped bread seems to be a problem in this machine (based on some reviews and my own experience) * no lighted display so depending on ambient light, may need to use a flashlight * louder than Zo and thumps around on counter during kneading; moved so much that I could not leave the room * bread pan is oddly shaped; loaf is very high * pan handle folds down and is blocked by crust so difficult to remove pan * when bread is removed, paddle leaves a very large hole in the bottom * uneven browning; top is very lightly baked while sides and bottom are very brown
A**R
Five Stars
good stuff
L**E
Suggest that you search out and explore various recipes
The machine is easy to use and offers a variety of bread types and other dough products. However, I would suggest searching out other recipes online. We have only tried whole wheat recipes so far, but the results varied quite a bit according to the recipe we used. As the comments suggest, you can experiment and add or subtract small amounts of ingredients in a particular recipe to get better results, but for the beginner, trying various recipes can be an easier entry into using the bread machine to its maximum. After a few attempts with mixed results, the recipe that I tried today (found online) produced a lighter, tastier whole wheat bread as compared to the ones in the user manual. Generally pleased with the simplicity of use and variety of bread products available on this machine. Also, clean-up is quick and easy.
C**N
Excelente
Excelente equipo. Es importante seguir las instrucciones correctamente. También tienen que considerar a que altura sobre el nivel del mar está operando la panera, ya que de eso depende que quede bien el producto final. Las primeras piezas de pan, no quedaron bien, por lo que tuve que cambiar un poco las recetas ya que se tenia que aumentar o disminuir algún ingrediente. Pero después, todo fue muy fácil, y el resultado es asombroso. Excelentes Hogazas de Pan. Lo recomiendo ampliamente. Pero recuerden, hay que hacer pruebas al principio, pero una vez que quede un hogaza, apuntar bien la receta y volverla a hacer igual Sugiero comprar un libro de recetas, ya que en estos libros, viene bien explicado la diferencia de cocinar en ciudades que están al nivel del mar y las que están a mas de 1500 metros de altura sobre el nivel del mar (Como Mexico,D.F., Puebla, Toluca, etc). Si consideran este factor, el producto final sale perfecto
L**E
Super machine à pain! Très bon achat.
Je n'ai que de bons commentaires pour ma nouvelle machine à pain. J'ai fait plusieurs recettes et le pain est toujours parfait. La texture de la mie et de la croute sont toujours parfait. La mie est moelleuse et la croute croustillante sans être dure. L'appareil est très stable sur le comptoir et ne bouge pas. Le bac interne est facile à manipuler, facile à installer et à retirer quand le pain est prêt. Très bon achat, je suis très satisfaite.
L**S
Excelente en Jalisco, Mexico
Con levadura instantánea en buen estado, levanta bien la masa, excepto en el modo xpress de 1 hora total, ahí siento que no levanta tanto como en los otros modos, pero eso es de esperarse y de cualquier forma quedan muy decentes. Buena calidad, no hace mucho ruido ni se tambalea al batir. OJO: Si tienes niños, jugando aprietan el botón de inicio o apagado, se echó a perder el pan, xq no puedes reiniciar donde ibas, inicia de nuevo a batir y demás. Hemos probado pan de plátano, clásico, italiano, etc. todos han salido bien sin problemas. Pagué cerca de 100 USD ($1,920MXN) y compraría de nuevo, mis hijos piden pan diario desde que la tenemos. He escuchado quejas por la altura sobre el nivel del mar, pero en Guadalajara, funcionó sin problemas.
Trustpilot
1 month ago
1 month ago