


Desertcart purchases this item on your behalf and handles shipping, customs, and support to Kyrgyzstan.
🔭 Own the night sky — see what others miss!
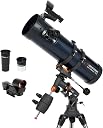
The Celestron 130EQ Newtonian Astromaster Telescope combines a powerful 130mm aperture with fully coated optics and a precision German Equatorial mount, delivering crisp, bright views of planets, moons, and deep space. Its quick no-tool setup, sturdy adjustable steel tripod, and convenient accessory tray make it the perfect dual-purpose instrument for both terrestrial and astronomical exploration. Backed by a limited lifetime warranty, it’s a must-have for millennial professionals eager to elevate their stargazing game.

| ASIN | B000MLL6RS |
| Additional Features | Fully-coated optics, lightweight frame, manual German Equatorial mount, included accessories, and free astronomy software |
| Best Sellers Rank | #32,130 in Electronics ( See Top 100 in Electronics ) #32 in Telescope Refractors |
| Brand | Celestron |
| Built-In Media | 1 x Celestron 130EQ Newtonian Astromaster Telescope |
| Coating | Aluminum;Silicon Dioxide |
| Compatible Devices | iPhone, iPad, Android devices |
| Customer Reviews | 4.4 out of 5 stars 3,378 Reviews |
| Dawes Limit | 0.89 Arc Sec |
| Exit Pupil Diameter | 1.44 Millimeters |
| Eye Piece Lens Description | Barlow |
| Eye piece lens description | Barlow |
| Field Of View | 0.67 Degrees |
| Finderscope | Red dot |
| Focal Length Description | 610 millimeters |
| Focus Type | Manual Focus |
| Global Trade Identification Number | 00050234310451 |
| Item Dimensions D x W x H | 88.9D x 48.3W x 30.5H centimeters |
| Item Type Name | Telescope |
| Item Weight | 17 Pounds |
| Manufacturer | Celestron, LLC. |
| Manufacturer Part Number | 31045 |
| Model Name | AstroMaster 130EQ |
| Model Number | 31045 |
| Model name | AstroMaster 130EQ |
| Mount | Equatorial Mount |
| Number of Batteries | 1 Lithium Metal batteries required. (included) |
| Number of Items | 1 |
| Objective Lens Diameter | 130 Millimeters |
| Objective lens diameter | 130 Millimeters |
| Optical Tube Length Measurement | 552 Millimeters |
| Optical tube length | 610 Millimeters |
| Optical-Tube Length | 610 Millimeters |
| Power Source | Manual |
| Telescope mount description | Equatorial Mount |
| UPC | 050234310451 |
| Unit Count | 1.0 Count |
| Warranty Description | Limited Lifetime Warranty |
| Zoom Ratio | 33x a 65x |
H**N
unable to see any thing
not usable
J**N
Muy buena opción
Lo adquirí pensando en observación de la luna y planetaria. De momento solo lo he usado para observar la luna y el resultado es gratamente satisfactorio. Actualizaré cuando vaya a por saturno que entiendo que es el planeta referencia para muchos. Su montaje es sencillo y las instrucciones son claras. El uso de una montura eq me daba miedo pero para empezar con la luna es bastante intuitivo, no es tan desesperante como esperaba aunque tal vez me puse bien cargado de paciencia por el respeto que le tenía.
F**Z
Alın ve uzay macerası yaşayın.
Çok iyi bir teleskop. Başlangıç için 50AZ modelini almıştım ama arasında çok fark var. Andromeda, jüpiter, saturn ve niceleri telefonumda var ama "AMAZON TÜRKİYEDE RESİMLERİ AÇSA GÖSTERECEM!" Eğer çok üst segment alıp para basmayacam diyorsanız ideal. Çok ekmeğini de yedim ürünün ;) 2 eksisi var el ile taşınmaz çok ağır. Ekstra lens alıp geliştirmek lazım. Jüpiterin 2 büyük çizgisi ve büyük kırmızı gözü lens yardımı ile gözüküyor. Ayrıca fotozeynep ile 1 günde kapınızda.
T**O
Excelente qualidade - Vale cada centavo
É bem preciso na busca de planetas quando se regula bem a buscadora. As lentes que vem nele é de altíssima qualidade e só fica "devendo" uma barlow para aumentar o zoom. - Antes de comprar, é importante saber a latitude e longitude da sua localidade. - Se vai comprar, compre uma barlow também. Respeitando a capacidade do telescópio - Zoom real máximo é de 260x (sem aberrações nas imagens) - Para ver a lua, fica muito bom com o filtro lunar e as lentes de 10mm e 20mm dão e sobram - A regulagem precisa é muito boa - Se for fazer imagens/vídeos, recomendo um suporte para celular ou câmera DSL
A**N
Great for first time users
After much searching and investigating I picked this telescope as it had the largest aperture for my price range. It is very well built and was easy to setup and build. The guide is useful, but ended up searching YouTube for a video guide - this also included how to balance the telescope [...]). The telescope itself was supplied with 2 lenses, a 20mm and a 10mm. The 20mm is plastic and I only use it as a starting lens to position the telescope first to what I want to see. The 10mm is a good little lens and give nice view of the stars and moon. I also purchased the 'Celestron AstroMaster Accessory Kit' at the same time - this included lens filters and additional 5mm, 15mm and 2x lenses. This gives more range of magnifications to use with the telescope. Viewing with the telescope is very good. The moon is amazing, but you will NEED a moon filter - it is very bright. You can clearly see the moons of Jupiter and with my additional 5mm lens I can just about make out the markings of Jupiter. As for the other planets they have not been visible in the evenings yet - but can't wait until Saturn appears! The only fault is the StarPointer. It's not that good, but you can work around/with it. I have even had my 4 year old daughter looking at the moon - which she found fascinating as she could see the craters very clearly. Since buying this, I have also contacted Celestron support (issue with the additional lens). They were quick and put me in touch with their local distributor (Hama) in the UK. Hama were also very helpful. All-in-all this is very good for the price it costs. I wanted a good telescope that would allow me to get started in Astronomy, without using it for a short while and having to replace it when I want more. This is a good start and with the right lenses will do for what I want it for. Good quality lenses are not cheap (it's the price of the telescope itself for a set), but I can now slowly upgrade this over time now that I have a decent telescope.
T**E
Worth the extra cost over the Powerseeker 127EQ
Tried the Powerseeker 127EQ first and was only acceptable. Then I bought the Astromaster 130EQ and found it to be a fine quality sharp image excellent Reflector Telescope. You should be prepared to learn a bunch before feeling accustomed to this Reflector but you will be rewarded for your efforts. A laser collimator is a must to check, and if necessary, realign the mirrors, known as Collimating. I spent some time learning how to collimate this Scope, or align the mirrors and I devised an additional step in the beginning as I am a former technical writer. First, making sure the laser Collimator is NOT in the focuser tube and is definitely OFF, stand a few feet in front of the opening or aperture of the telescope and look into the opening where you will see the cross frame in front, the mirror in the back, and the reflection of the front cross frame in the back mirror. Then slowly and carefully concentrate on what you see and move your view slowly so the mirror and reflection of the cross frame appear centered within each other and the telescope tube. The point is to confirm that the main mirror is perpendicular to the axis of the tube such that all parts viewed appear to be all centered or concentric with each other. If looking straight down the tube center, you see the reflection of the secondary mirror frame up front off center and offset from the actual frame up front, then carefully adjust the primary mirror in back so everything looks aligned. That means the back mirror reflection of the front cross frame should be aligned behind the frame when looking absolutely down the center of the tube and the mirrors appear correctly centered. After you have assured a nearly aligned primary mirror when viewed from the front, then you can proceed to install the laser collimator into the eyepiece focuser with the indicator target pointing forward as the telescope does. Turn on the laser and DO NOT LOOK into the front of the telescope until you are done and the laser is out and OFF. Slowly adjust the secondary mirror up front carefully and slowly loosening and tightening very delicately each of the three screws until the laser dot is centered on the target. Remember to very delicately loosen and tighten the screws slowly and in steps between the three until you become accustomed to how the adjustments affect the laser dot on the target. Once you have centered the dot on the target adjusting the secondary mirror up front, then TURN OFF the laser and rotate the laser Collimator in the focuser tube such that the target opening is facing the back of the Telescope where the primary mirror is. Turn on the laser and observe the laser dot on or near the target. The dot should be centered in the target and likely will be close or off towards the outer part of the target. Very carefully loosen the locking phillip screws of the back large primary mirror to allow further adjustment with the larger knurled knobs that adjust the mirror. Very slowly adjust one knob at a time while you become accustomed to the results of each adjustment as they affect the movement of the laser light dot on the target of the collimator. Do this all slowly until you gradually learn the tricks to collimate. Do not make big adjustments to the primary mirror unless you have to. When done, turn OFF the laser collimator and remove it from the focusing tube. Once again, DO NOT look at the laser beam or the front of the telescope while the laser is in use. Now that the eyepiece focuser tube is open, look in the tube and you should see a reflection of your eye's pupil in the center of the small secondary mirror and mirrors and cross frame should all look centered upon each other or concentric. NEVER LOOK AT THE LASER BEAM END, ONLY THE DOT ON THE TARGET WHEN IT IS INSTALLED IN THE TELESCOPE. A laser collimator really is a must for easy collimation testing before each use of the telescope and especially after transporting the telescope as vibrations may change mirror alignment or collimation. I highly recommend pointing the telescope horizontal during mirror collimation outdoors as the laser light may be considered offensive by planes with resulting complaints and possible law actions. I collimate indoors. DANGER; never look at the laser beam as eye damage can result. Only look at the light dot on the target when the collimator is installed in the telescope. The laser collimators are very low power but safety practices should always be a way of life. In actual use, I just barely saw the cluster of galaxies between Virgo and Leo on a dark night near the new moon and gladly told myself it was worth the money and effort to have seen the dim but visible galaxies with the fuzzy center nuclei of stars. Dark conditions and eyes adjusted to the dark are necessary. I also viewed Jupiter and five of it's moons in very good detail on a marginal seeing night. The planet was actually too bright and required a filter to lower the the brightness and improve contrast. For the price, it is an excellent light gatherer. I also have a Powerseeker 80EQ Refractor that exhibits very clear images. The Telescope paid for itself when I could see deep space distant galaxies. That is a result of the larger light gathering ability of the Reflector. I recommend Dean Fuller's video on YOU TUBE on how to operate an equatorial mount and polar align for beginners. It was faster and easier to understand than the written instructions.
Trustpilot
3 days ago
1 week ago