


Buy anything from 5,000+ international stores. One checkout price. No surprise fees. Join 2M+ shoppers on Desertcart.
Desertcart purchases this item on your behalf and handles shipping, customs, and support to Kyrgyzstan.
๐ ๏ธ Power your projects with precision and protection โ never settle for less!
The HiLetgo 14.8V 4S 30A Li-ion Battery BMS PCB is a compact, high-performance protection board designed for 18650 lithium battery packs. It delivers up to 30A continuous current with advanced multi-protection features including overcharge, over-discharge, short circuit, and overcurrent safeguards. Its precise voltage detection and 60mA cell balancing current ensure optimal battery health and longevity, making it an essential component for reliable, high-capacity battery assemblies.
| ASIN | B07X28845M |
| Best Sellers Rank | #198,571 in Tools & Home Improvement ( See Top 100 in Tools & Home Improvement ) #792 in Power Converters |
| Brand | HiLetgo |
| Color | green black |
| Customer Reviews | 4.0 4.0 out of 5 stars (124) |
| Input Voltage | 4.2 Volts |
| Item Weight | 0.02 Kilograms |
| Manufacturer | HiLetgo |
| Mfr Part Number | 3-01-1548 |
| Model Number | 3-01-1548 |
| Output Voltage | 17 Volts (DC) |
| Plug Type | Micro USB |
H**.
works well for me
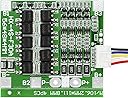
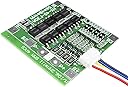
So far, so very good (April 10th, 2024). As far as I can tell this BMS works as advertised. Setup: I ordered two of these BMSs to create two 4S, 3P lithium battery packs with 14.8V nominal voltage, using for each pack twelve 2,500 mAh LMC cells with each 3.7V nominal voltage (4.2V max) and 10A max discharge rate per cell. The voltage of one 100% charged battery pack is 16.8V and the capacity is 7,500 mAh. The maximum discharge current of 3 cells in parallel is 30A which is what the BMS is rated for. I did the wiring successful using the wiring diagrams from the Amazon pictures. In my application, one battery pack consists of of 4 units of 3 parallel cells. The instructions that came with the BMS were not so helpful but the pictures from Amazon explained everything. Charging: I am using an 18V, 2.7A power supply to charge the two packs connected in parallel. I fried a 12V, 2A powersupply (it got too hot during 1 hour of charging while providing 2.7A), so I found and bought a slightly more capable powersupply that was just right (max current eated at 2.7 A). I verified that the charging cut-off mechanism of the BMS is activated at a battery pack voltage of 16.7-16.8V which is just right at 100% charge. So charging working great now. Discharging: I connected both packs in parallel, hopefully giving me a total of 60A maximum discharge current at 16.8 V maximum voltage, or 1,008 watts of max power. I have only tested low discharge currents of up to 2 ampere so far, and that has worked well. The bms is rated for up to 30 ampere discharge, which I intend to test in future.
L**Z
Best deal ever!
Well build. Easy to use, keep in mind that there is two ways to wire it to your battery assembly, but both ways work wonderful. There is no indicator of fully charge unless you add one. Really happy with this product.
R**E
You have to plug it in to "wake it up"
Like most of the reviews, I got the board, wired it up according to the picture with four 18650 battery holders, checked all of the connections with a multimeter, put four fully-charged 18650 batteries into the holders, and expected 14.8V or more at the P+ and P- pins. I was getting 2.1V out and thought that these boards must really be defective like so many of the reviews say. As it turns out, the board requires that you apply power to the P+ and P- pins before it "wakes up". Basically you have to have everything wired up including the charging port that you're going to use wired to the P+ and P- pins, have the batteries in the holders, and then "plug it in" briefly to wake up the board. Just one second of being plugged in will do it. Then you can unplug it and it will keep putting out the full 16V or whatever your input voltage is as long as you don't disconnect the batteries. This means don't put a power switch between the batteries and the board. Wire both the battery holders and the charging port straight to the board so that the board is powered from the batteries all the time. If you want to add a power switch, add it between this board's output and the circuit you're trying to power.
R**H
These are advertised as Lipo BMS Units. Not True
I bought two for Lipo packs of (4) 5C 10Ah cells in series. No instruction! Luckily, I work with these often. The boards I was sent charge to 16.23vdc then go into protection and opens the batteries output settles to 15.55vdc. The cells are not charging balanced. 2 cells are at 3.7 one at 4 on at 4.18. The boards they sent seem like they are designed for the LiFepo cells that operate between 2 - 3.7vdc. Lipo cells operate between 3.7 to 4.2vdc. The boards look the same but have different resister values to setup the higher thresholds for Lipo vs LiFepo so you may want to not buy these boards.
D**R
Worked fine once I figured out the wiring
As others have stated, this BMS sorely lacks documentation. I eventually found wiring diagrams on other websites and got it wired up correctly. Attached to this review is a wiring diagram from the same BMS listed elsewhere. Hopefully this helps someone. One positive note is that it did not go up in smoke when I had it wired incorrectly. The big solder pads for the B+/- P+/- and balance leads are very nice. Don't be dumb like me and try to clip off the balance lead connector while the thing is powered up. I let out the magic smoke and now this unit is bin fodder. I will probably order more of these in the future.
Trustpilot
1 day ago
3 days ago