


🏰 Elevate your cat’s lifestyle with the ultimate multi-level castle!
The Yaheetech Large Multi-Level Cat Tree stands 63 inches tall, featuring sisal-covered scratching posts, a cozy condo, hammock, dangling ball, and extended platforms. Designed for all cat breeds and life stages, it offers a safe, stable, and stylish environment that encourages climbing, playing, and resting. With a 3-year warranty and easy assembly, it’s a top-rated (#3 in Cat Trees) pet furniture piece that blends practicality with modern aesthetics.


| Breed Recommendation | All Breed Sizes |
| Customer Reviews | 4.7 out of 5 stars 7,345 Reviews |
| Material | Particleboard, plush , sisal |
| Mounting Type | Floor Mount |
| Product Dimensions | 30.5"L x 19"W x 63"H |
| Recommended Uses For Product | Indoor |
| Specific Uses For Product | Indoor |
D**N
I have only nice things to say
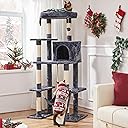
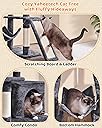
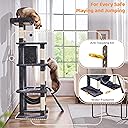
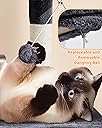
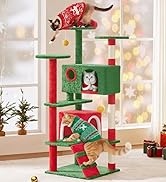
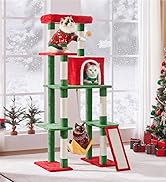
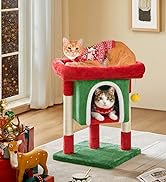
I get all of my cat furniture from Yaheetech, which is not what I would have expected from a garbled sounding brand name, but I go through a ton of cat trees, towers, litter hiding enclosures, and these guys are consistently affordable, easy to put together, look great, and cats love them. I constantly have the cats trying to hop on while I am still putting them together. I picked this one because of the bed at the very top. These types of trees, the bed rim gets floppy and folds over eventually, and I wanted to get something with an extra large space for my extra large guy. I also wanted to add some height so he feels less hassled by younger cats. All boxes checked: it’s tall and multi dimensional but doesn’t get in the way, it’s cozy, the cats love it, it’s great for climbing on or for snoozing in, and it also looks nice. I have put a lot of cat furniture together so it’s straightforward for me, and the design is very intuitive to assemble imo, however I have still occasionally had issues with the directions. Every so often there will be something which is very slightly different on the instructions from what came out of the box, which can be really confusing when the instructions are mostly visual. That’s my only qualm with this company. At least stuff is pretty simple to take apart, so if you need to backtrack a few steps you can, it’s just a pain. My recommendation for anyone with assembly issues is to lay out all of the pieces and tools, check them against the instructions and pictures of the tree, label the components yourself, and go over the steps a few times while touching and naming the specific pieces out loud. If you do this, you should notice immediately if something seems unusual, and once you start you will already have a good mental image of the process. Great product. I also appreciate that all the parts are lightweight, so it’s easy to move the box around or put the tree in different spots. 10/10
M**Y
Good, sturdy tree for the price!
I'm always worried about these things because my cats have been touched by an angel (they're fat) and I worry that cat trees won't hold up to the heft. But this tree is great! It took about an hour to assemble. Approximately half an hour of that was spent on step one, trying to get the godforsaken screws lined up with the columns. But you can do this! It was easy peasy after that step. And this is also easy for one person to assemble alone, which is great news because the cats were not even offering to assist. I'm happy to say that it's been a hit. I shook it a bit to see how easy it would be to knock down, but it seems pretty stable. It comes with a screw to attach the tree to the wall, which I will probably do at some point, because although it seems sturdy and stable enough not to need that screw, I'm sure the cats will figure out how to knock over the tree, probably around 3am on a work night. My prize jewel, a 22 pound jiggly-bellied Russian Blue, has been jumping around on it and hanging out on every level and everything seems to be holding tight. So far, all three cats have been climbing and jumping all over it with no issues. To sum it up, it was easy enough to put together, and it's sturdy enough for three fatty boom batties to enjoy. Highly recommend!
B**R
Highly recommend the cat tree
The cat tree has been amazing! Really good quality, sturdy, holds up good. The top perch is really big and we have a really big cat that does good up there as do all the others. The kitten loved the bottom hammock and rope and the middle box house has been great for sticking cat food in there and it being high enough away from the dogs. All of the cats love the top perch the most. The cats have loved using all the scratchers. Really easy for them to go up and down the tree, has not have any shaking problems. The kitten has loved the ball hanging toy as well. We have another smaller cat tree that has gotten bitten apart and is very shaky but this one has not had any problems at all, really well made and worth the money. Don't have to worry about the dogs with the kitten or cats and it helped the kitten get acquainted with the dogs as well. It took a moment to figure out how to put together but then it was pretty easy after that. Thank you to the makers of this! I often come home and the kitten is at the top level and wakes up to meet me with the dogs. This gets used multiple times a day.
J**K
My cats love their cat tree! And it wasn’t expensive.
The cat tree is nice and tall with lots of spots for my two cats to sit on and play or nap. They both love using it to scratch and stretch. I removed the little hammock because they were not interested in using it, but other cats might love that. The top platform bed is big enough for my big boy who is around 15 lbs. His little brother enjoys the little hut thing and they don’t fight over who gets to use it. Our previous cat tree had one top platform and they couldn’t fit together once they grew up. Now they each have their favorite spot and it’s not a total eye sore. It’s actually kinda simple and pretty. I did put a heavy 30 lb dumbbell on bottom to stabilize it because it rocks a little bit and I wanted them to feel secure. I like that I can move it around the house when necessary. We recently moved it to another room to accommodate our Christmas tree. The price is very reasonable too. It was easy to assemble.
K**E
Good cat tree for a good price
I am very happy with this cat tree. I looked at so many different ones trying to find one that that seemed decent and worth my money. I believe I have found just that. I liked that it was very easy to build, it took less than an hour and the directions were very simple. The material is soft and my cat loves sleeping on it. It is decently stable. I have carpet so it’s not perfect but it works and feels safe for my cat to play on. I definitely would recommend this one!
P**I
Great cat tower
Easy to put together and good quality pieces! My cat loves it! It is a bit taller and wider than I thought it would be, but I really like the size. Makes it seem very stable.
C**M
My cat loves it!
Not hard to put together if you look carefully at the pictures. There are no written instructions. Made well and looks great. Has carpeting and sisal for cat scratching that my cat actually uses. Has several shelves, a box if cats like to hide and best of all a top bed. It is tall enough for a cat to feel comfortable and not threatened.
J**P
Very Nice and Attractive...Fur Babies Are Using It Already
I ordered this because of the price point and the need for a new one due to the old one being pretty well worn after 15 years. From the photos, this is the perfect look we wanted for our clan of felines. This item arrived August 27, 2025 undamaged and packaged VERY well. I was impressed with how so many parts fit in the size of box. The box was not too heavy, maybe 20-25 lbs. If you have issues with this weight, be sure to ask for help. Upon opening the box from the top, the instruction booklet was right there on top, which was nice, I didn't have to dig for it through all the pieces. What was nice about having the booklet right there and available was, my husband and I were able to open it up to the "parts listing" and check off each part as he pulled them out. Furthermore, each and every piece had a number on it that corresponded with the piece numbers in the booklet. This was a GREAT time saver from having to 'guess' which piece was what from the photos in the booklet. Inventorying each piece, and the hardware, took about 5 minutes. (see page 4/15) This build project took my husband and I about 3 hours to complete. However, your mileage may vary. As we took each piece from the box, we laid them out in a logical order, keeping all the same numbered parts together. Once that was completed, we began the endeavor of 'building' this cat tree. However, I do want to state that; there are NO written instructions in the booklet, it is just 15 pages of photos to follow in putting this together. But...fear not, for the photos are VERY self explanatory and visually effective in understanding how everything goes together. I highly recommend you use a power drill or a small battery operated drill with the appropriate "star" shaped bit that corresponds with the bolt head. It makes tightening the bolts down soooooo much easier and will save your fingers, hand and wrist's from becoming tired from just using the small Allen wrench that is provided. Trust me on this! Another thing I want to point out is; Two people are highly recommended to put this together, albeit, one person 'could' do it, but with more time consuming moves and possible frustration. I read for my husband while he worked each piece to assemble. Well, okay...I helped with assembly too. Surprisingly, that worked out pretty well and we only had two episodes of disagreement. ;-) The first piece to put together was "the box." The box (or cubby) has two pieces of wood covered with fabric. You have to take the stated numbered post (4 of them with the same number) and put them INSIDE the furry fabric box. This part was the most difficult, for you have to do one post at a time and get it lined up with the holes in the wood & fabric and the holes on each end of the post. This sounds rather intense, but it's not really. Once you realize what needs to get done and you get the first post installed, the other three go much quicker. We had a hard time lining up the holes in the wood and the holes in the end of the post to get the bolts started, so I got to 'thinking outside the box', got a Phillips screwdriver, poked it through the top of the wood hole and manipulated the post hole until the screwdriver was inside the post hole. From there, I moved the screwdriver around in a slow circular motion to where the holes were aligned and put the first bolt in and screwed that into the post. (I recommend NOT tightening all the bolts down all the way until all the post bolts are in place) I flipped the box over and did the other end the same way. This screwdriver manipulation really helped in getting the holes lined up to put the bolts in. I will say though, this process WILL test your patience. But don't give up. Also, the inside posts do fit tight, which is the designed idea, but you can still move the posts around for alignment of the holes. Hope that makes sense. Don't forget to tighten down all the bolts on this piece once they're in place. The second step was pretty simple and easy. This is attaching the flat 'scratch board' to the appropriate board as shown in the photo. Always be sure you're using the correct bolts depicted in the photo and according to the inventory list. The third step is also a simple step. However, we lost time on this due to not paying attention to the photo and noticing how the flat pieces were laying in the photo and how the posts attached. We ended up having to take all four posts off and putting them back on according to the depiction of the photo. *sigh* Just make sure the two flat pieces are laid out according to the photo and the two holes in each board that are closer to one side of the boards are facing each other when you attach the appropriate posts. The fourth step is pretty simple also, however, this is where you will use four of the long threaded bolts without heads. These bolts have an 'indicated' notch in the middle of them to indicate when you STOP screwing them into the piece so that you have equal amounts of thread for each piece. Again, just follow the visual photo and the numbers on each board and the appropriate bolts. Step five is pretty simple also. Just follow the visual and use the appropriate bolts. Hang in there...you're getting close to being done. Step six is attaching your cubby box to the large flat piece you just completed attaching. This isn't difficult, but we finally realized that; if you TIP the tree to one side to align the holes up with the bottom of the cubby, it's much easier to manipulate and achieve success. Again...this is where a drill will really assist in getting this done quickly without wearing out your hands or fingers with the small Allen wrench. Step 7 is another simple fixture. Just follow the diagram and appropriate pieces. Step 8 is putting on the very top BED piece. The bottom of the #10 post is attached to the outside top of the cubby box, and the bolt used has to be attached from inside the cubby box. It's much easier if you poke the bolt up through the fabric to assist in aligning the hole of the post up to screw it down. Do the same for the two bolts that attach the bed to the top of the two posts. YOU'RE ALMOST THERE! The last two things to do is to attache the rope to the underside of the large flat piece. Again, we tilted the tree to about 35-45 degrees for easier access to the bolt hole to attach the rope. Easy Peasy. Last, but not least, you probably noticed small metal hinges attached to two of the flat boards during earlier construction. Those are the hinges that the fabric hammock piece with the clips attach too. YAYYYYYY! You did it! Give yourself a huge pat on the back. However, there is one last piece remaining, if you so choose to do it. You probably notice the STRAP with the holes in it that was attached to the large flat piece earlier. This is used to attached the tree to a wall to prevent tipping over. This is an option, and we did not use this to attach to anything. This cat tree is surprisingly very sturdy and stable once everything is put together. It's much more stable than our old one and our 16 lb Norwegian Forest cat has no problem climbing up the tree to get into his NOW favorite spot. There is no wiggling or swaying of the tree when he gets to clambering up the side to reach his bed. My husband and I both highly recommend this cat tree, if you're looking for a new one. The price point is most excellent and we are VERY happy with the end results. This item ended up being much better than we ever expected it to be. Also...there was NO chemical odor in the fabric used for this tree. THAT is a plus. The best of luck and joy if you choose to purchase this cat tree.
Trustpilot
2 weeks ago
2 weeks ago