We remain fully operational. Our teams are working around the clock to ensure your deliveries continue safely.

DOWNLOAD THE APP


Customer Services
Copyright © 2025 Desertcart Holdings Limited
DOWNLOAD THE APP


🖨️ Print Strong, Print Smart, Print Overture!
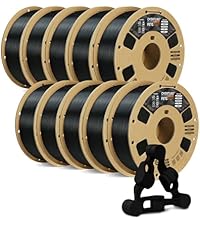
OVERTURE PETG 3D Printer Filament is a premium 1.75mm spool designed for professional and hobbyist FDM printers. It offers exceptional strength and toughness, combining the ease of PLA with the durability of ABS. With precise dimensional accuracy of ±0.02mm and excellent weather resistance, it’s perfect for functional prototypes, mechanical parts, and outdoor applications. Supported by a 1-year warranty and broad printer compatibility, this filament ensures reliable, vibrant, and smooth printing every time.


| ASIN | B07PDV9RC8 |
| Additional Features | Premium PETG Material |
| Best Sellers Rank | #29 in Industrial & Scientific ( See Top 100 in Industrial & Scientific ) #6 in 3D Printing Filament |
| Brand | OVERTURE |
| Brand Name | OVERTURE |
| Color | 1 Kg White |
| Customer Reviews | 4.2 out of 5 stars 18,270 Reviews |
| Global Trade Identification Number | 90810031294711 |
| Item Diameter | 1.75 Millimeters |
| Item Weight | 1 Kilograms |
| Manufacturer | OVERTURE |
| Manufacturer Part Number | OVPETG175 |
| Material | Polyethylene Terephthalate Glycol |
| Material Type | Polyethylene Terephthalate Glycol |
| Model Number | OVPETG175 |
| Number of Items | 1 |
| Special Feature | Premium PETG Material |
| UPC | 850006233410 |
| Unit Count | 35.274 Ounce |
| Warranty Description | 1-year Warranty |
J**T
Great PETG for my project. 250C was sweet spot, and prints perfect on Sovol SV07+ PEI bed.
Grass Green is pretty close to Ryobi's green. I printed PETG and found 250C, the max, was best. I also noticed it printed more shiny at higher temps. Duller at lower. 70C bed was fine and 80C no different on Sovol SV07 PEI bed. Fast led to problems. Sweet spot was around 38mm/sec for walls. If I dialed it up to 50mm/sec then stringing started. On a roll sitting for about 3-4 weeks it did pick up moisture which can cause your nozzle to accumulate some excess. Keep an eye out for it. If you come back to a final print with little extra blobs, it's probably knocked off the nozzle as it moved around. I used Cura default for wall thickness but I did drop my layers to 1.6mm for better arches. I didn't use bed adhesion (brim, raft, etc), bridges or supports but I also kept all my angles gradual. Look at the pic and you'll see they are basically circles. I used 20% infill as well as 30%. No real difference. When setting the power drills on the bracket arms, they only deflect maybe 1-2mm. Barely noticeable. Yes, by hand you can make it deflect 5-6mm but this is just to organize my tools, not create a climbing wall that will support lots of weight. I printed all of what you see with 1 spool. I have a 2nd loaded to do a ton of more tool wall brackets, but wanted to get this review up. If your print has started, and you have moisture issues, try bumping the temp up and keep an eye on it. You may get through it bumping 5 degrees at a time to watch for change. In my case, it was in the infill area, and so it's "entombed" inside. When I ramped up to 60mm/sec and got to higher layers, like around 300 of 500 (again, 1.6mm height layers) it did start to have issues rising a bit, and catching upon hot end return. I reduced the speed back to 32, and dropped the fan from 20% to 10% and the clipping stopped for a perfect finish. I do also use glue pen for adhesion to the bed, but even on a clean bed (no glue pen) I still had great adhesion. Finish is great. No stringing if I keep speeds down. Strong as you'd expect from PETG. I am super happy. I did read reviews that were negative but didn't have problems. The storage bag is resealable which is really nice. Spool did not detach on either spools. My filament was unopened on both rolls, ordered about 4 weeks apart. I will definitely order this product again as I get more of my power tools wall mounted, and when I get a chance I will upload the STL files to Thingiverse. I created these prints on TinkerCad. website, exported STL into Cura and then sliced GCode sent to Sovol SV07Plus.
P**N
Great PETG Filament That Just Works!
I've been using the OVERTURE 4KG PETG bundle with my FDM printer and overall it’s been an excellent experience. This filament prints very reliably and gives strong, functional parts right off the spool. 👍 What I Loved Smooth prints on a .4 mm nozzle — surfaces come out clean and even, with very nice finish quality. Supports release easily — support structures peel off without leaving noticeable marks on the model, which saves tons of cleanup time. No clogs at all — runs smoothly with no jams or feed issues, even with extended prints. Strong, durable prints — parts feel tough and are well suited for functional prints, prototypes, or mechanical uses. 🛠️ Printing Tips On smaller parts that have limited area touching the build plate, I recommend adding a brim to improve first-layer adhesion and prevent lifting. The filament sticks well overall, but a brim really helps those tiny contact points. 🎯 Summary Great value PETG filament that hits all the basics: reliable extrusion, smooth finish, easy support removal, and zero clogging. Ideal for hobbyists or anyone doing lots of functional prints — highly recommend!
M**S
Excellent PETG – Strong Prints and a Great Cobalt Blue Color
I’ve had consistently good results with Overture’s PETG filament over the years, and the Digital Blue color is no exception. It prints very clean with minimal stringing and excellent layer adhesion. I’ve used this filament for a number of functional prints, and the parts have turned out strong and durable. It’s been reliable across multiple projects, which is exactly what you want when printing parts that actually need to hold up to use. I also really like this particular shade of blue. Many blues from other manufacturers tend to be either very light “baby blue” or a dark navy. This color lands closer to a cobalt blue and looks fantastic on finished prints. Overall, Overture continues to be a great value brand. The price is reasonable, but the performance has been just as good as many higher-priced filaments I’ve tried.
R**S
Poor adhesion and poor quality (Red food safe PETG)
I've used Overture filament and have had good luck with it. That ended today. The "Food Safe 1.75mm Transparent Red PETG Filament, Strong PETG 3D Printer Filament for 60-500mm/s High Speed FDM 3D Printers" was horrible. I've printed the same item (aquarium lid) out of PLA a few times to get everything perfect, with no issues. I printed another part of the lid under PETG (different color and different brand) also with no issues. I could not get good bed adhesion, no matter what I did. The two ends of the print lifted off the bed due to warpage every time I tried to print. I slowed the print speed down by 50%, increased bed temperature, reduced the fans, calibrated everything before the print and the extrusion left blobs and again would not adhere to the bed. Additionally, the color difference within the part itself was inconsistent. I dropped pics of two of the failed prints so you can see the quality. I cancelled one print, early on, and then left the printer to complete the other print with it appeared that the latest settings would correct the issue. The 2nd print failed after 4 hours. It lost adhesion and fell over. It looks like the warping at the ends contributed to the loss of adhesion, I'm printing on a Creality K2 Pro and the printer recognized the failure and stopped before too much of a mess was made. I've used other Overture colors in PETG with no issues, but this particular food safe PETG was horrible and I ended up sending it back. This is the first time I didn't eat the cost for a product that I used and was not in 100% resale condition and sent it back to Amazon.
K**C
Not as easy as PLA but really nice once dialed in
The only reason for 4 stars instead of 5 is because of their claim "prints easy like PLA." It took me a few failed prints using settings they list on the packaging before i finally got it dialed in. By contrast, PLA is much less finicky and has a lot more wiggle room. The initial problems i had on the failed prints were the printout being too brittle, bad bed adhesion, and really bad stringing. Once i managed to dial it in though, it was as good as i can expect from the base model Ender 3. Actually i think the print quality was better than their own PLA. But again, i would not agree with it being "easy." The only upgrade i have is the glass bed. The "clear" miniature in the pictures was printed with a 0.4 mm nozzle and 0.16 layer height (more slicer settings listed below). For comparison the painted model is PLA 0.12 layer height and a glued-on acrylic base. The paint fills in most of the layer lines though anyway. One of the pictures makes it look like there might be bubbles but i assure you that's just model detail and light refraction. My intention was to print out copies of my miniatures with the clear PETG to indicate when they're invisible. I knew i wouldn't achieve anything close to glass but i thought i'd get more translucency than what i got. I'm not a 3D printing expert so maybe you can get better results than me. There is some very minor stringing around the hands but it did fantastically with everything else despite being so small. There are a couple support artifacts leftover on the circle base but that's just my fault. Another thing to note is that the hardness of PETG is quite noticeable compared to PLA when doing cleanup on the printed model. Just FYI the painted miniature was printed in OVERTURE white PLA. I've never had a problem with OVERTURE filaments and i don't see any reason to buy from another brand. I don't even have a filament dryer but the filament has always been reliable even when sitting for a couple years. I'll update this in case my experience changes with the PETG. These are the main points in the slicer settings i used for the miniature. Layer height: 0.16 mm, wall line count: 1, infill density: 100%, infill pattern: Lines, connect infill lines: Enabled, infill line directions: [45], infill overlap percentage: 15%, printing temperature: 245 C, build plate temperature: 80 C, (all) print speed: 20 mm/s, travel speed: 150 mm/s, enable retraction: Enabled, retraction distance: 3 mm, retraction speed: 20 mm/s, enable print cooling: Enabled, fan speed: 30%, initial fan speed: 0%, generate support: Enabled, support structure: Tree, build plate adhesion type: None. I use generic glue stick on the glass bed and do the slicing in Cura 5.9.
J**R
Excellent quality. Rosey color.
First thing I did was put it in a dryer for a few hours. I have no experience with this material straight out of the box. I've used a few rolls of Overture transparent red. Print quality is excellent. Bed adhesion is as I would expect for PETG at proper settings. Filament is in neat rows as I've come to expect from Overture. This is good material. My only complaint is the color; it's a little "rosey" for my use. On a RGB color wheel, I'd say this Overture transparent red PETG is a #350 hue. I've previously used ERYONE transparent red which is closer to #5-10 on that same color wheel, "candy red". See photo, Overture on the right. ERYONE is also a little brighter so it catches the light and "glows" a little better, so I'll be going back to that. My application needs a certain shade. Otherwise, the Overture transparent red PETG is perfect. Transparent PETG Tip: Use warmer, slower settings with as little cooling as possible for the best rich color. Turn off fans altogether if the design allows. Printing fast with fans on will result in a matte finish that won't have the same color depth.
H**S
Easy to print and strong
Good PETG for the price. It is not too picky on temperature, it prints fine anywhere from 245-255 on my Ender 3 V2. It doesn't bridge very well but that is to be expected for PETG, if you want to bridge I recommend printing at 245 and turning on bridging settings in Cura which makes bridges possible although pretty ugly. Supports work better than bridging, but can be hard to remove because PETG sticks to itself so well. Here are my settings for Ender 3 v2: micro swiss all-metal hotend / original extruder / original bowden tube bltouch leveling probe + yellow springs nozzle 0.4mm 250c bed plain glass + gluestick, 85c first layer speed 10 speed after first layer 30 first layer height: 0.28 layer height after first layer: 0.2 fan: none unless you are trying to bridge, if so use bridge detection to turn fan 100% only for the bridge retraction 3mm @ 30 I find that the biggest struggle with PETG is just getting the first layer to stick and look good. Once you get past the first layer it is usually smooth sailing. If you have problems with the first layer, first of all dry your filament even if it is brand new. It is an easy way to eliminate frustrations. Also go ahead and calibrate your extruder steps and measure your filament diameter and put that into your slicer, again these are easy steps that ensure you will not be fighting under/over extrusion while you are trying to get everything else figured out. Next use glue stick on plain glass and let the glue stick dry. You want the glass to look dull, not shiny, but it also shouldn't feel sticky to the touch. This combo works great for me, it adheres well but not TOO well and the prints pop themselves off when they cool. Lots of people like hairspray too but gluestick works fine for me and is less messy. Finally the #1 most important thing is to adjust your z offset and first layer height. You cannot mush the filament onto the bed like PLA, it needs to fall out of the nozzle and gently lay down onto the bed. Before doing anything with your z-offset I recommend turning your first layer height up to .28 or .3. The reason is that this sets your nozzle higher AND automatically adjusts the flow rate to match. If you just start bumping your z-offset higher and higher, you will be under-extruding by a lot which can cause its own problems. Once you set your first-layer height to .28, then start printing a test print and live-adjust your Z until the lines lay down and stick to the bed, and are neither gooping up onto the nozzle, nor being hit by the nozzle and pulled off the bed. This is tricky because the sweet spot here is TINY. Like within one or 2 micro-adjustments on the z, either side of that you will have issues. But once you hit the sweet spot on the Z you are golden. Then print some bed leveling test prints and adjust your first layer extrusion multiplier or line width if needed so your lines are touching. I recommend always using the bed level print that is CIRCLES when starting off, not squares. The sharp corners on the squares are super unforgiving and will pop off instantly if your settings aren't right. It is easier to use a bed leveling print with circles to dial your settings in without frustrating yourself and needing to restart the print a hundred times. When printing things over 2" tall I recommend using a wide brim because originally I was using skirt and I have had taller prints pop off the bed right as they are nearly finished, I think the reason is due to the lower part of the print cooling off. A brim is cheap insurance against your whole print being ruined at the last moment, and is easy to remove and leaves little trace that it was ever there.
E**R
More versatile but slightly more temperamental than PLA+
***Update*** TLDR: Downgrading to 2 stars due to inability to finish larger and/or more complicated builds with this filament. This filament is proving to be very temperamental in my Ender 3 v2. The problem seems to be with the Bowden tube (or there is already a spiral tension in the filament as it is wound on the spool at the factory). As a piece is printed, the filament spirals as it flexed through the Bowden tube to the hot end. As this filament has a fair amount of elasticity (much more than PLA), this torsion doesn't extrude out the hot end but instead starts to translate through the filament back to the feeder. First will come the clicking as the filament starts to bind up in the Bowden tube and at the feeder; this is the combination of the feeding gear/bearing trying to grip onto filament that is under increasing spiral tension (think of twisting fibers into a thicker and tougher strand of rope) and slowly begins to strip the "bite marks" off the filament, especially during retractions. Eventually, the filament will twist and be stripped to the point of fracture. The filament going into the Bowden tube stops advancing to the hot end, and a strand of filament comes out of the feeder anywhere it can escape This happens even after upgrading to Capicorn Bowden tubes, playing around with the "grip" tension of the feeder, cleaning the hot end barrel, setting the screws holding the feeding gear/bearing to the right torque, etc. (One can pull out the filament from the Bowden tube and see a spiral staircase imprinted by the extruder all the way down to the hot end.) The solution is to remove all of the filament that has passed the into the Bowden tube and re-load virgin filament. Then it will print fine until enough torsion builds back up again. However, if a piece requires quite a bit of retractions, then this will happen much sooner - somewhere between 3-6 meters of filament. This isn't because of less torsion, but because the feeder is pushing back and forth on a piece of filament that is becoming less compliant and more difficult to handle, which quickly wears off the "bite marks" and erodes the filament into a thinner strand. If the feeder bites into a virgin piece of filament, then it can maintain bite for a bit longer, but spiraling will still eventually happen. I'm taking away stars as it's not usable for large builds or builds requiring a lot of retractions. Not dropping past 3 star as the prints that can be completed are translucent with a good mix of elasticity and strength/durability. However, this makes working with this filament much, MUCH more frustrating than more forgiving alternatives like PLA. Beginners and those with Bowden tube printers should probably use this filament with caution due to the frustration that awaits. Those looking for unique PETG properties might consider giving this a try. I don't know how this filament behaves under a direct extruder, but I suspect results may be better as it seems that the back and forth flexing of the Bowden tube is what is applying a "crankshaft" effect on the filament that is torsioning the filament. ***Initial Review*** Previously, I used only Overture's PLA+/PLA Pro filament (which is a great PLA filament, BTW), but I wanted a filament with greater strength and unique features (i.e. translucency). Still being relatively new to 3D printing, only printing/experimenting during my scarce spare time, and not having a specific application demanding rigorous specifications for printed parts, I opted for PETG over more specialized filaments that reputedly require more more experience and time to get right. First, Overture's quality is great. Their clear PETG filament is white without any perceivable tint. It feeds great; hasn't clogged or tangled. It's labelled as clear, transparent, or translucent. It's best described as translucent (although I have seen some reviewers here polish their prints until clear/transparent. So it is possible to get crystalline prints - but I've not tried this as I don't have the time/patience). When printed at the higher end of the recommend nozzle temps (my settings, 245C), prints appear more glossy. However, I have to use 90+C bed temp to prevent warping, and I also slow down the print speed and increase retraction to reduce stringing. It still strings quite a bit. I haven't found the right settings yet, so I use these settings for parts where the stringing primarily affects/hidden amongst infill. When printed at the lower end of the recommended nozzle temps (my settings, 225C - which is lower than Overture's recommended range - bed temp 80C), prints appear more matte. However, handling feels more like PLA with improved details and much, much reduced stringing. I've tried to go down to 220C, but I starting having adhesion issues. I have prints comparing both settings (print and fan speed set to same). The left clip was printed at the higher temp and the right clip printed at lower temp. For the gears, the right gear was printed at the higher temp, and the left gear at the lower temp. Glossy doesn't necessarily mean more transparent, although one can see very slightly "deeper" into the glossy print. Both exhibit more of a frosted glass appearance; glossy just means more reflective and less surface friction (i.e. the glossy gear spins slightly more quietly than the matte one, which is already much more quiet than PLA due to increased plasticity/elasticity of PETG). I'm still working on getting the right settings. But from what I see so far, I would recommend Overture to anyone working with PETG.
Trustpilot
2 months ago
2 weeks ago